- เนื้อหาที่จะได้เรียนรู้
- 1. แนวคิด: 2 ระดับของ Spec-Driven Development
- 2. เตรียมสภาพแวดล้อม
- 3. กำหนดขอบเขต Workshop ก่อนสร้างโค้ด
- 4. เขียน Capability Spec ให้ตรวจสอบได้
- 5. Reference Implementation: FastAPI
- 6. Automated Tests: เชื่อม Spec กับพฤติกรรมจริง
- 7. ยกระดับจาก Spec-anchored สู่ Spec-as-source ด้วย Tessl
- 8. ทดลองทำ Spec Drift ให้ตรวจจับได้
- 9. CI/CD: บังคับ Spec-as-source ใน GitHub Actions
- 10. ขั้นตอนพัฒนาฟีเจอร์ใหม่แบบ Spec-as-source
- 11. แบบฝึกหัดท้าย Workshop
- 12. ปัญหาที่พบบ่อย
- บทสรุป
- แหล่งอ้างอิง (เข้าถึง 15 ตุลาคม 2026)
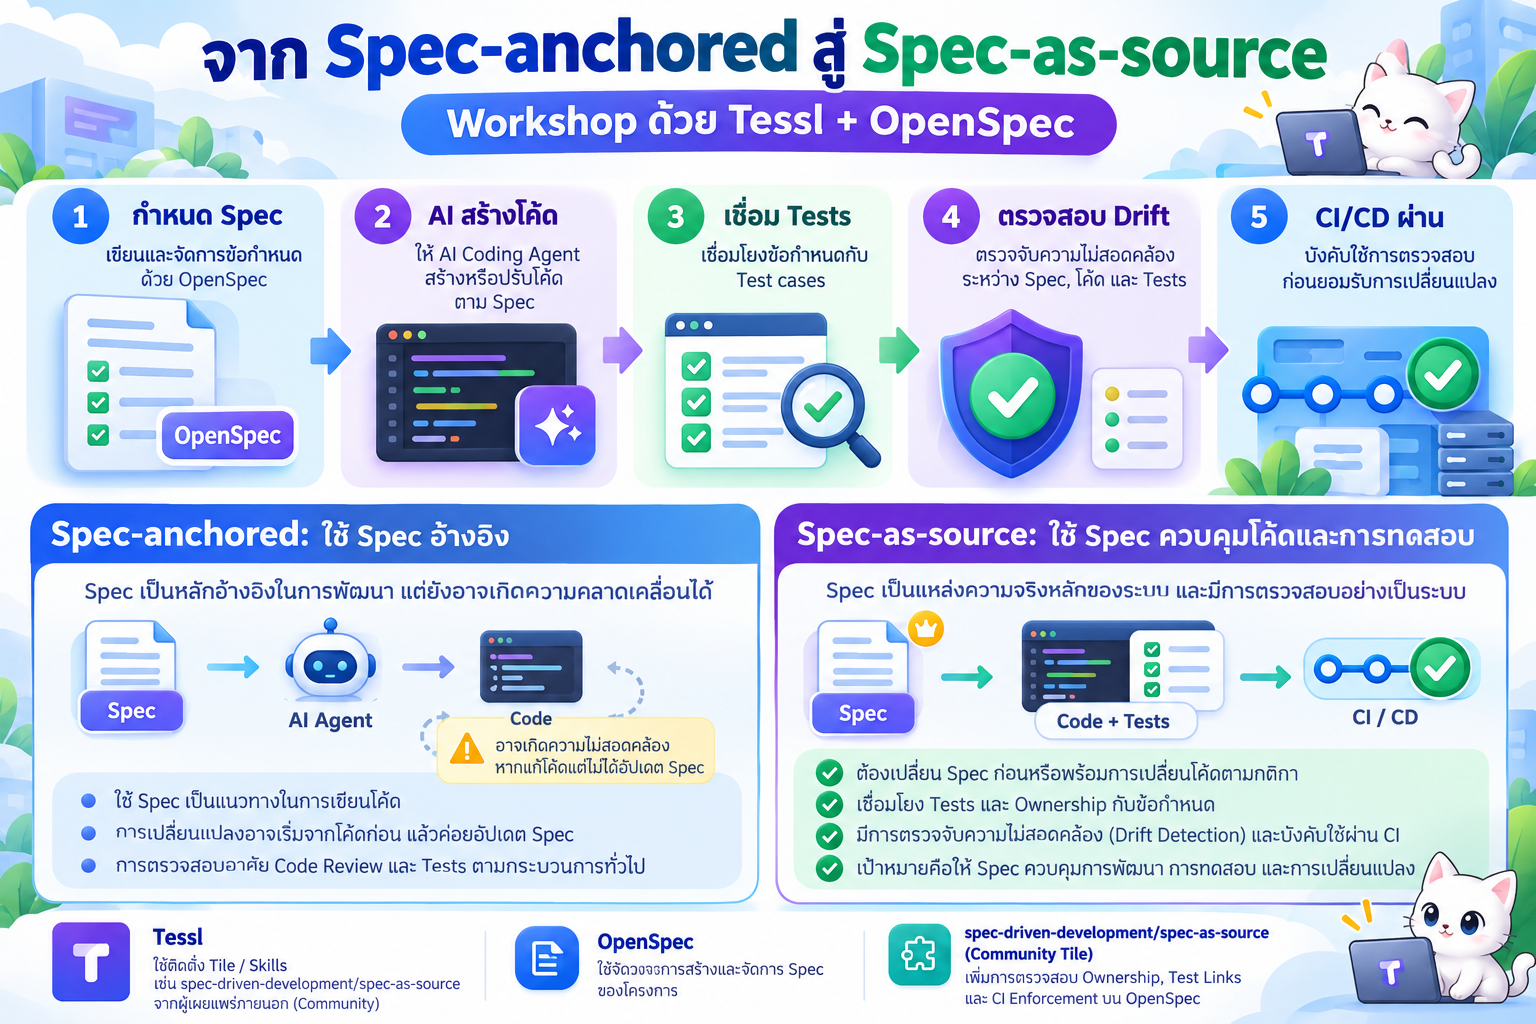
เป้าหมาย: เปลี่ยนการทำงานแบบ “AI เขียนโค้ดแล้วค่อยตรวจ” เป็น “กำหนดพฤติกรรมใน Spec → สร้างโค้ดและทดสอบ → บังคับตรวจสอบ Spec/Code/Test ก่อนรวมงาน”
#เนื้อหาที่จะได้เรียนรู้
- แยกความหมายระหว่าง Spec-anchored กับ Spec-as-source
- ใช้
openspec initและ workflow ของ AI Coding Agent (/opsx:propose→/opsx:apply→/opsx:archive) - เขียน Capability Spec ที่กำหนดพฤติกรรมชัดเจนด้วย SHALL/MUST, Scenario, Verified by
- ใช้ Tessl เพื่อเพิ่ม Skill/Rule และตรวจความสัมพันธ์ของ Spec → Target Source → Tests
- ทดลองสร้าง Todo REST API ด้วย Python/FastAPI และรัน Automated Tests
- สาธิตการตรวจจับ drift ใน CI และวิธีแก้โดยเริ่มจาก Spec
เวลาแนะนำ: 2–3 ชั่วโมง • ระดับ: Intermediate • ตัวอย่าง: Todo REST API (ข้อมูลในหน่วยความจำ ไม่มีฐานข้อมูล)
#1. แนวคิด: 2 ระดับของ Spec-Driven Development
| ประเด็น | Spec-anchored | Spec-as-source |
|---|---|---|
| บทบาทของ Spec | จุดอ้างอิงเพื่อวางแผนและสร้างโค้ด | แหล่งอ้างอิงที่ใช้ควบคุมการเปลี่ยนแปลงโค้ด |
| การสร้างฟีเจอร์ | เขียน Spec ก่อนแล้วให้ Agent implement | เช่นเดียวกัน แต่ต้องมี ownership และ verification |
| ความสัมพันธ์กับ Tests | อาจเชื่อมโยงผ่านงาน/การรีวิว | เชื่อมข้อกำหนดกับไฟล์ทดสอบที่ตรวจสอบได้ |
| เมื่อแก้ Source Code | ควรย้อนกลับไปดู Spec | ตรวจว่า Target ที่เปลี่ยนมี Spec เจ้าของที่อัปเดตตาม |
| CI | Test/Build ตามทั่วไป | Test + Spec Link + Ownership/Manifest Checks |
| ความเสี่ยง | Spec กับโค้ดอาจค่อย ๆ แยกจากกัน | ลด drift ด้วยกฎและเครื่องมือตรวจสอบ (ไม่ใช่การพิสูจน์เชิงความหมาย 100%) |
flowchart TD
    A[User Story / Requirements] --> B[OpenSpec: Proposal + Spec + Tasks]
    B --> C[AI Coding Agent]
    C --> D[Implementation]
    C --> E[Automated Tests]
    B --> F[Tessl Community Tile: spec-as-source]
    F --> G[Ownership + Link + Manifest Checks]
    D --> G
    E --> G
    G --> H{Verification ผ่านหรือไม่?}
    H -->|ไม่ผ่าน| B
    H -->|ผ่าน| I[Code Review + CI + Merge]
ข้อควรแยก: Tessl เป็นระบบ Registry/CLI สำหรับแจกจ่ายบริบท เช่น Skills, Rules, Docs; OpenSpec ทำหน้าที่จัดการวงจร Specification; และ Tile spec-driven-development/spec-as-source เป็นองค์ประกอบเสริมจากบุคคลภายนอกที่ผสานทั้งสองเข้ากับกระบวนการตรวจสอบ
#2. เตรียมสภาพแวดล้อม
ต้องมี Node.js รุ่นใหม่ (เอกสาร Tessl แนะนำ Node.js 22.17+), Python 3.11+ สำหรับตัวอย่างนี้, Git, AI Coding Agent เช่น Claude Code/Cursor/Copilot/Codex และเทอร์มินัล Bash
ระบบปฏิบัติการ: macOS/Linux เหมาะกับคำสั่งด้านล่าง; สำหรับ Windows แนะนำ WSL2 เพราะการรองรับ Tessl บน Windows ผ่าน WSL ยังระบุว่าเป็นแบบทดลอง
#2.1 ติดตั้ง Tessl CLI
บน Linux/WSL/macOS:
curl -fsSL https://get.tessl.io | sh
tessl --help
หากใช้ macOS + Homebrew:
brew install tesslio/tap/tessl
ตรวจสอบสคริปต์ติดตั้งและแหล่งที่มาก่อนเรียกผ่าน
curl | shเสมอ; การล็อกอิน Tessl อาจจำเป็นตามสิทธิ์ของ Registry/บัญชี
tessl login
#2.2 ติดตั้ง OpenSpec
npm install -g @fission-ai/openspec
openspec --version
#2.3 สร้างโครงการ
mkdir tessl-todo-workshop
cd tessl-todo-workshop
git init
mkdir -p app tests
touch app/__init__.py

python3 -m venv .venv
source .venv/bin/activate
python -m pip install --upgrade pip
python -m pip install 'fastapi>=0.115' 'pydantic>=2' 'uvicorn>=0.30' 'httpx>=0.27' 'pytest>=8' 'PyYAML>=6'
python -m pip freeze > requirements.txt

# ตั้งค่า Tessl ให้เชื่อมกับ Claude Code (เปลี่ยน agent ได้)
tessl init --agent claude-code --project-dependencies skip

# ตั้งค่า OpenSpec และเลือก AI Coding Agent ที่ใช้งานจริง
openspec init
ขณะ
openspec initให้เลือกเครื่องมือ AI ตามที่ปรากฏ ถ้า Agent ไม่เห็นคำสั่งใหม่ให้ปิดและเปิด session ของ Agent อีกครั้ง
ตรวจสอบ:
tessl list
openspec list
python -m pytest --version
#3. กำหนดขอบเขต Workshop ก่อนสร้างโค้ด
ระบบ Todo API จะมี endpoint สามรายการ:
| Method | Endpoint | ผลลัพธ์ที่คาดหวัง |
|---|---|---|
POST |
/todos |
สร้าง Todo โดยคืน HTTP 201 และสถานะเริ่มต้น done=false |
GET |
/todos |
แสดง Todos ทั้งหมดตามลำดับการสร้าง คืน HTTP 200 |
PATCH |
/todos/{id}/complete |
ปรับ done=true; ถ้าไม่พบ ID คืน HTTP 404 |
Business Rules / Acceptance Criteria
titleต้องมีอักขระจริงหลังตัดช่องว่างหัวท้าย และยาวไม่เกิน 120 ตัวอักษร มิฉะนั้นคืน422(การตรวจข้อมูลด้วย FastAPI/Pydantic)- Todo ใหม่มี
idเป็นจำนวนเต็มที่ไม่ซ้ำภายในโปรเซส และdone=false - สามารถแสดงรายการได้ตามลำดับการสร้าง
- การ complete สำเร็จทำให้
done=true; ID ที่ไม่มีอยู่คืน404 - ข้อมูลถูกเก็บไว้ในหน่วยความจำเพื่อเน้นกระบวนการ Spec; รีสตาร์ตแล้วข้อมูลหาย (ไม่ใช่ตัวอย่าง production persistence)
#พรอมป์ต์สำหรับ AI Coding Agent (ขั้น Spec-anchored)
พิมพ์ข้อความนี้ ในช่องสนทนาของ AI Coding Agent ไม่ใช่ใน Terminal:
/opsx:propose create-todo-api
Create a Todo REST API using Python FastAPI.
Requirements:
- POST /todos returns 201 with id, trimmed title, done=false.
- Empty/blank title and title length over 120 return 422.
- GET /todos returns all todos in insertion order.
- PATCH /todos/{id}/complete returns updated todo; unknown id returns 404.
- Store data in memory for this workshop only.
- Include pytest tests and explain acceptance criteria.
Do not implement yet; review the proposal, spec, design, and tasks first.
หมายเหตุ:
/opsx:proposeและ/opsx:applyเป็นคำสั่ง ภายใน Agent Chat ของ OpenSpec ไม่ใช่คำสั่ง Shell; รูปแบบการเรียกอาจต่างกัน เช่น Cursor/Copilot ใช้/opsx-proposeและ Codex ใช้ Skill แทน slash command ให้ยึดข้อความที่openspec initสร้างสำหรับ Agent นั้น
ทบทวนเอกสารใน openspec/changes/<ชื่อ-change>/ โดยเฉพาะ proposal, specs และ tasks จากนั้นจึงสั่ง:
/opsx:apply
เมื่องานผ่าน Test/Review ให้สั่ง:
/opsx:archive
หรือใช้ CLI ตรวจสอบรายละเอียดก่อน archive:
openspec list
openspec validate --help
openspec view
หลัง archive ตัว Spec หลักจะอยู่ในลักษณะ openspec/specs/todo-api/spec.md (ชื่อ capability ขึ้นกับที่ Agent สร้างจริง)
#4. เขียน Capability Spec ให้ตรวจสอบได้
ในขั้น Spec-anchored คุณอาจมีข้อกำหนดแต่ยังไม่มี metadata ครบสำหรับการบังคับใช้ Spec-as-source ต่อไปนี้คือตัวอย่างไฟล์ที่เราจะใช้เป็น canonical spec หลังจัดระเบียบแล้ว:
ไฟล์: openspec/specs/todo-api/spec.md
---
targets:
  - app/main.py
---

# Todo API Specification

## Purpose

Provide a minimal API to create, list, and complete todos.

## Requirements

### Requirement: Create todo
The system SHALL create a todo with a unique integer id,
trimmed title, and done=false, responding with HTTP 201.

**Verified by**: [@test] tests/test_todos.py

#### Scenario: Valid creation
- **WHEN** the client POSTs a valid title to /todos
- **THEN** the response is HTTP 201 with id, title, and done=false

### Requirement: Reject invalid title
The system MUST reject a blank title or title exceeding
120 characters with HTTP 422.

**Verified by**: [@test] tests/test_todos.py

#### Scenario: Blank or overlong title
- **WHEN** the client POSTs an invalid title
- **THEN** the response is HTTP 422 and no todo is created

### Requirement: List todos
The system SHALL return all todos in insertion order via GET /todos.

**Verified by**: [@test] tests/test_todos.py

#### Scenario: List after creation
- **WHEN** the client requests GET /todos after creating two todos
- **THEN** the response is HTTP 200 with both todos in order

### Requirement: Complete todo
The system SHALL mark a todo done via PATCH /todos/{id}/complete
and MUST return HTTP 404 if the id does not exist.

**Verified by**: [@test] tests/test_todos.py

#### Scenario: Existing todo
- **WHEN** the client completes a known todo id
- **THEN** the response contains done=true

#### Scenario: Unknown todo
- **WHEN** the client completes an unknown todo id
- **THEN** the response is HTTP 404
อธิบายไวยากรณ์ที่สำคัญ:
targets:ระบุ source files ที่ Spec เป็นเจ้าของ โดยใช้พาธอิง root ของ repo### Requirement: ...เป็นหัวข้อ Requirement ในไวยากรณ์ OpenSpec รุ่นปัจจุบัน ไม่ใช้รูปแบบเก่าREQ-XXXเป็นหัวข้อSHALL/MUSTระบุพฤติกรรมเชิงบังคับที่ทดสอบได้**Verified by**: [@test] ...เชื่อม Requirement กับไฟล์ทดสอบที่มีอยู่จริง#### Scenario:และWHEN/THENกำหนด Acceptance Criteria ให้ชัดเจน
หาก OpenSpec สร้าง canonical spec ใหม่โดยไม่มี targets: ให้เติมผ่าน Skill spec-writer หลังการรวม Spec ตามแนวทาง Tile ที่ติดตั้ง
#5. Reference Implementation: FastAPI
ถ้าต้องการเปรียบเทียบโค้ดที่ AI สร้างกับตัวอย่างที่ทดสอบได้ ให้ใช้ implementation ต่อไปนี้ ทั้งนี้ ในกระบวนการจริง ให้ Agent สร้าง/แก้โค้ดจาก Spec อย่าใช้การคัดลอกโค้ดเพื่อข้ามกระบวนการทบทวน Spec
ไฟล์: app/main.py
# GENERATED FROM SPEC: openspec/specs/todo-api/spec.md
from fastapi import FastAPI, HTTPException
from pydantic import BaseModel, Field, field_validator


class TodoCreate(BaseModel):
    title: str = Field(min_length=1, max_length=120)

    @field_validator("title")
    @classmethod
    def normalize_title(cls, value: str) -> str:
        value = value.strip()
        if not value:
            raise ValueError("title must not be empty")
        return value


class Todo(BaseModel):
    id: int
    title: str
    done: bool = False


def create_app() -> FastAPI:
    app = FastAPI(title="Spec-Driven Todo API")
    todos: dict[int, Todo] = {}
    next_id = 1

    @app.post("/todos", response_model=Todo, status_code=201)
    def create_todo(payload: TodoCreate) -> Todo:
        nonlocal next_id
        todo = Todo(id=next_id, title=payload.title)
        todos[next_id] = todo
        next_id += 1
        return todo

    @app.get("/todos", response_model=list[Todo])
    def list_todos() -> list[Todo]:
        return list(todos.values())

    @app.patch("/todos/{todo_id}/complete", response_model=Todo)
    def complete_todo(todo_id: int) -> Todo:
        todo = todos.get(todo_id)
        if todo is None:
            raise HTTPException(status_code=404, detail="Todo not found")
        updated = todo.model_copy(update={"done": True})
        todos[todo_id] = updated
        return updated

    return app


app = create_app()
#รัน API
uvicorn app.main:app --reload
เปิด http://127.0.0.1:8000/docs เพื่อทดลองผ่าน Swagger UI หรือทดสอบด้วย curl (เปิด Terminal อีกหน้าต่าง):
curl -i -X POST http://127.0.0.1:8000/todos \
  -H 'Content-Type: application/json' \
  -d '{"title":"Learn Spec-Driven Development"}'

curl -i http://127.0.0.1:8000/todos
curl -i -X PATCH http://127.0.0.1:8000/todos/1/complete
ผลลัพธ์ที่คาดหวัง: การสร้างครั้งแรกได้ 201 และออบเจ็กต์ที่มี id: 1, done: false; หลัง PATCH จะเป็น done: true
#6. Automated Tests: เชื่อม Spec กับพฤติกรรมจริง
ไฟล์: tests/test_todos.py
from fastapi.testclient import TestClient
from app.main import create_app


def client() -> TestClient:
    return TestClient(create_app())


def test_create_todo_returns_201() -> None:
    with client() as c:
        response = c.post("/todos", json={"title": "Write a spec"})
        assert response.status_code == 201
        assert response.json() == {"id": 1, "title": "Write a spec", "done": False}


def test_rejects_blank_or_whitespace_title() -> None:
    with client() as c:
        for title in ["", "  "]:
            assert c.post("/todos", json={"title": title}).status_code == 422


def test_rejects_overlong_title() -> None:
    with client() as c:
        assert c.post("/todos", json={"title": "x" * 121}).status_code == 422


def test_list_todos() -> None:
    with client() as c:
        c.post("/todos", json={"title": "First"})
        c.post("/todos", json={"title": "Second"})
        response = c.get("/todos")
        assert response.status_code == 200
        assert [t["title"] for t in response.json()] == ["First", "Second"]


def test_complete_todo() -> None:
    with client() as c:
        todo_id = c.post("/todos", json={"title": "Finish workshop"}).json()["id"]
        response = c.patch(f"/todos/{todo_id}/complete")
        assert response.status_code == 200
        assert response.json()["done"] is True


def test_complete_unknown_todo_is_404() -> None:
    with client() as c:
        assert c.patch("/todos/999/complete").status_code == 404
รันทดสอบที่ root ของ repo:
python -m pytest -q
สำหรับ reference implementation ข้างต้น ตรวจสอบแล้วว่าชุดทดสอบ 6 cases ผ่านทั้งหมด บนสภาพแวดล้อมทดสอบของบทความ (ผลในเครื่องผู้เรียนอาจต่างกันเมื่อใช้เวอร์ชันแพ็กเกจ/โค้ดที่ AI สร้างต่างออกไป)
หมายเหตุการออกแบบ: Test แยก state ด้วย
create_app()ทุกครั้ง เพื่อไม่ให้ Todo จาก test หนึ่งส่งผลต่อ test ถัดไป
#7. ยกระดับจาก Spec-anchored สู่ Spec-as-source ด้วย Tessl
เราจะติดตั้ง Tile ที่ให้กฎและ Skills สำหรับ ownership, test-link checking และ CI enforcement โดยไม่สับสนกับการใช้งาน Tessl Spec Registry สำหรับ library-usage documentation ตามปกติ
#7.1 ติดตั้ง Tile ชุมชน
ตรวจสอบรายละเอียด, เวอร์ชัน, และ Security Scan ที่หน้า Registry ก่อนติดตั้ง:
https://tessl.io/registry/spec-driven-development/spec-as-source
จาก root ของโปรเจ็กต์:
tessl search spec-as-source
tessl install spec-driven-development/spec-as-source
tessl list
สำคัญ: เคยมี namespace สะกดผิดเป็น spec-driven-devlopment ในรุ่นเก่า และผู้พัฒนาย้ายไป spec-driven-development ตั้งแต่สาย 3.x; ไม่ควรคัดลอกคำสั่งเก่าจากบทความก่อนหน้านั้นโดยตรง
#7.2 ให้ Agent เตรียมระบบ Enforcement
หลังติดตั้ง Tile และเปิด Session ของ Agent ใหม่ หาก Agent มองเห็น Skills ของ Tile ให้ส่งข้อความต่อไปนี้ ใน Agent Chat:
Use spec-as-source-setup.
Inspect the installed skill and set up the OpenSpec spec-as-source schema,
verification scripts, and CI for this repository. Report which files were
created or modified. Do not overwrite existing custom CI without review.
คาดว่าจะมีโครงสร้างลักษณะนี้หลังขั้น setup (ขึ้นกับรุ่นของ Tile):
openspec/
  schemas/spec-as-source/
  specs/todo-api/spec.md
scripts/
  check-spec-links.sh
  check-target-ownership.sh
  build-spec-manifest.py
  check-plan-gate.sh
  verify.sh
.github/workflows/
  spec-verification.yml
อย่าสับสน: ตัวอย่างนี้เป็นผลลัพธ์ที่ คาดหวังจาก Skill setup ไม่ใช่สิ่งที่คำสั่ง
tessl installสร้างทั้งหมดทันที และไม่ใช่คำสั่งที่ทดลองรันจริงในบทความ
#7.3 สร้าง Plan ที่ผ่าน Approval Gate
Tile นี้มี Skill plan-mode และกติกาอนุมัติแผนก่อนสร้าง change ใหม่ ใช้ใน Agent Chat:
Use plan-mode.
Prepare openspec/PLAN.md for extending the Todo API with delete-todo.
Show the planned change and request human approval before implementation.
เมื่อแผนได้รับอนุมัติตามขั้นตอนของ Skill จึงเข้าสู่การเสนอ Change ใหม่ผ่าน openspec-propose หรือ OpenSpec workflow ที่ติดตั้งจริง อย่าถือว่าแค่สร้างไฟล์ PLAN.md แปลว่าได้รับอนุมัติแล้ว
#7.4 ตรวจ Spec, Source และ Tests
หลัง setup สร้างสคริปต์แล้ว ให้รัน:
bash scripts/check-spec-links.sh
bash scripts/check-target-ownership.sh
python scripts/build-spec-manifest.py
bash scripts/verify.sh
หรือสั่ง Agent:
Use spec-verify.
Review the todo-api spec, declared targets, linked tests,
and potential semantic drift. Give file-and-line evidence.
การตรวจสอบหลักมีดังนี้:
| Check | ตรวจเรื่องอะไร | ตัวอย่างข้อผิดพลาด |
|---|---|---|
| Spec Links | [@test] ชี้ไปยังไฟล์ที่มีจริง |
เขียน tests/test_create.py แต่ไม่มีไฟล์ |
| Target Ownership | การเปลี่ยนไฟล์ target สอดคล้องกับ Spec เจ้าของ | แก้ app/main.py โดยไม่แก้ Spec ตาม policy |
| Manifest | อ่าน/เชื่อม metadata ของ Spec ได้ | YAML frontmatter ผิดรูปแบบ |
| Test Suite | โค้ดทำตามพฤติกรรมที่ทดสอบ | POST คืน 200 แทน 201 |
| Semantic Review | ความหมายของ Code และ Spec ตรงกัน | มี rule ใหม่ในโค้ดแต่ไม่มี requirement หรือ test |
ข้อจำกัด: Shell checks ตรวจรูปแบบ/ความสัมพันธ์/ประวัติการเปลี่ยนแปลงได้ แต่ไม่สามารถพิสูจน์ความถูกต้องของพฤติกรรมทั้งหมดโดยลำพัง จึงยังจำเป็นต้องทำ Review และเพิ่ม Tests ที่มีคุณภาพ
#8. ทดลองทำ Spec Drift ให้ตรวจจับได้
#Exercise A: ทำให้ Test ล้มเหลว
- แก้
app/main.pyจากstatus_code=201เป็นstatus_code=200โดย ไม่แก้ Spec - รัน
python -m pytest -q - ดูว่ากรณี
test_create_todo_returns_201ล้มเหลว เพราะพฤติกรรมจริงขัดกับ Spec ที่กำหนด HTTP 201 - กลับไปแก้
status_code=201เพื่อคืนสภาพระบบ
สิ่งที่เรียนรู้: Tests ตรวจ behavioral drift ที่มี Assertion ครอบคลุม แม้ไฟล์ test ยังมีอยู่ครบ
#Exercise B: ทำให้ Spec Link หายไป
- สำรอง Spec ใน branch ทดลอง
- เปลี่ยนลิงก์
**Verified by**: [@test] tests/test_todos.pyเป็น**Verified by**: [@test] tests/missing_test.py - รัน
bash scripts/check-spec-links.sh - คาดหวัง Check ไม่ผ่าน เพราะไฟล์อ้างอิงไม่มีจริง
- คืนพาธเดิมแล้วรันตรวจอีกครั้ง
#Exercise C: ทดสอบ Ownership Gate ผ่าน Git Diff
- Commit baseline เมื่อ Spec, Source และ Tests ผ่านทุก Check แล้ว
- สร้าง branch ทดลอง แก้
app/main.pyโดยไม่ปรับ Spec เจ้าของ - เรียก Ownership Check ตามวิธีเทียบ base branch/commit ที่สคริปต์เวอร์ชันติดตั้งรองรับ หรือเปิด PR เพื่อให้ CI เป็นผู้ตรวจ
- คาดหวัง CI แจ้ง policy violation เมื่อมีการเปลี่ยน Target โดยไม่มีการอัปเดต Spec ที่เกี่ยวข้อง
- ปรับ Spec และ Tests ให้เป็นเหตุเป็นผลก่อนรวม PR
คำเตือน: Ownership check ต้องมี baseline/การเปรียบเทียบ Git ที่เหมาะสม จึงไม่ควรตีความการรันบน working tree เปล่า ๆ ว่าตรวจประวัติ PR ได้ครบ และการแก้ Spec แบบไม่มีสาระเพื่อหลบ Gate ก็ยังต้องถูกปฏิเสธในการ Review
#9. CI/CD: บังคับ Spec-as-source ใน GitHub Actions
โดยปกติ spec-as-source-setup สามารถสร้าง workflow สำหรับ CI ให้อยู่แล้ว ควรเปิดอ่านและปรับให้ตรง repository ก่อนใช้ ตัวอย่างต่อไปนี้เป็น แนวทางสำหรับ repo ตัวอย่างเมื่อมี scripts/verify.sh อยู่จริง ไม่ใช่ไฟล์ CI ที่ Tessl สร้างโดยตรง:
ไฟล์: .github/workflows/spec-checks.yml
name: Spec Verification
on:
  pull_request:
  push:
    branches: [main]

jobs:
  verify:
    runs-on: ubuntu-latest
    steps:
      - uses: actions/checkout@v4
        with:
          fetch-depth: 0
      - uses: actions/setup-python@v5
        with:
          python-version: '3.12'
      - uses: actions/setup-node@v4
        with:
          node-version: '22'
      - name: Install dependencies
        run: |
          python -m pip install -r requirements.txt
          npm install -g @fission-ai/openspec
      - name: Run spec validation and tests
        run: bash scripts/verify.sh
ก่อนนำขึ้น Production: ตรวจ script จริงของ Tile, สิทธิ์ของ Workflow, การเปรียบเทียบ base branch, dependencies และ Security Scan; หลีกเลี่ยงการกำหนดสิทธิ์ write ถ้า Check อ่านอย่างเดียว
#10. ขั้นตอนพัฒนาฟีเจอร์ใหม่แบบ Spec-as-source
ตัวอย่าง Requirement ใหม่: ลบ Todo ด้วย DELETE /todos/{id}
sequenceDiagram
    participant Dev as Developer
    participant Spec as OpenSpec / Plan
    participant AI as Coding Agent
    participant CI as Verify + CI
    Dev->>Spec: เสนอ Change และ Acceptance Criteria
    Spec-->>Dev: แสดง Plan/Spec ให้ตรวจและอนุมัติ
    Dev->>AI: Implement ตาม Spec ที่อนุมัติ
    AI->>AI: แก้ Target และเขียน Tests
    AI->>CI: Run links / ownership / tests
    alt มี drift หรือ tests fail
      CI-->>AI: Report mismatch
      AI->>Spec: ปรับงานให้ตรงข้อกำหนด
    else ผ่านการตรวจ
      CI-->>Dev: Ready for human review
    end
Prompt ตัวอย่างใน Agent Chat:
Use prompt-loop.
Plan a DELETE /todos/{id} capability.
Constraints: existing id returns HTTP 204, missing id returns HTTP 404.
First update proposal and the capability spec including scenarios,
target ownership, and linked tests. Do not change source code until the
change and acceptance criteria are reviewed and approved.
เมื่อผ่านการอนุมัติ จึงให้ Agent Apply → Verify → Work Review → Sync/Archive ตาม workflow ที่ Tile/Agent ติดตั้งกำหนด
#11. แบบฝึกหัดท้าย Workshop
- เพิ่ม
GET /todos/{id}: กำหนด200เมื่อพบ และ404เมื่อไม่พบ พร้อม Scenario และ Tests - เพิ่ม
DELETE /todos/{id}: ยืนยันว่า HTTP 204 ไม่มี response body พร้อม Negative Test - เพิ่ม
priority: ยอมรับค่าlow,medium,highเท่านั้น สร้าง Requirement ใหม่และตรวจ Validation - ทดลอง CI Gate: เปิด PR ที่แก้ Target แต่ไม่อัปเดต Spec บันทึกผล แล้วแก้ไขให้ผ่านอย่างถูกต้อง
- ทำ Traceability Matrix: ออกรายงาน Requirement → Target → Test → Result จาก Manifest ที่สร้างได้
#Checklist ก่อนส่งงาน
- [ ] มี OpenSpec proposal/spec/tasks ที่ผ่านการรีวิว
- [ ] canonical Spec อยู่ใต้
openspec/specs/<capability>/spec.md - [ ] ระบุ
targets:ถูกต้องในทุก Capability ที่ต้องควบคุม Source - [ ] ทุก Requirement มี Scenario และ
[@test]ที่ชี้ไฟล์จริง - [ ] สร้าง/ปรับ Source จาก Spec และมี Test สำหรับกรณีปกติและผิดพลาด
- [ ]
python -m pytest -qผ่าน - [ ]
bash scripts/verify.shผ่านหลัง Tile setup (ถ้าติดตั้ง) - [ ] ทดลองทำให้ CI ล้มเหลวได้จริงเมื่อเกิด Drift
- [ ] มี Human Review ก่อน Merge ไม่พึ่งผล AI อย่างเดียว
#12. ปัญหาที่พบบ่อย
| อาการ | สาเหตุที่เป็นไปได้ | แนวทางแก้ |
|---|---|---|
tessl: command not found |
ติดตั้ง CLI ไม่สำเร็จ/PATH ไม่ถูก | ตรวจวิธีติดตั้งตาม OS และ tessl --help |
/opsx:propose ไม่ทำงานใน Terminal |
เป็นคำสั่ง Agent Chat | เรียกใน Agent หรือใช้รูปแบบที่ openspec init แจ้ง |
Skill spec-as-source-setup ไม่ปรากฏ |
Agent ไม่โหลด Skill หลังติดตั้ง | ตรวจ tessl list, ไฟล์ Tile ที่ติดตั้ง และ restart Agent |
scripts/verify.sh ไม่มี |
ยังไม่ได้ run Skill setup | ให้ Agent ดำเนินการ setup และดูรายงานไฟล์ที่สร้าง |
check-spec-links ไม่ผ่าน |
ไฟล์ [@test] ไม่อยู่ตาม path |
เพิ่มไฟล์ทดสอบหรือแก้ลิงก์ให้ถูกต้อง |
| Ownership check แปลก ๆ | ไม่ได้กำหนด base commit/branch หรือ spec ownership | ตรวจ git history, frontmatter และ script version |
| OpenSpec Spec รูปแบบต่างจากบทความ | ใช้ schema/profile/plugin คนละรุ่น | ดู openspec --version, schema และ Skill ที่ติดตั้งจริง |
| Windows เรียก shell script ไม่ได้ | ใช้ PowerShell แทน Bash | ใช้ WSL2 หรือ shell ที่รองรับ Bash |
#บทสรุป
Spec-anchored ทำให้ AI Coding Agent มีขอบเขตและข้อกำหนดชัดเจนก่อนพัฒนา ส่วน Spec-as-source เพิ่มหลักฐานและกลไกควบคุมความสัมพันธ์ของ Spec, Source, Tests และ CI เพื่อป้องกันไม่ให้โค้ดค่อย ๆ เปลี่ยนไปโดยไม่มี Spec รองรับ
สำหรับโครงการที่ต้องการเริ่มใช้อย่างมีประสิทธิภาพ ควรเริ่มจาก Capability เล็ก ๆ, เขียน Acceptance Criteria ที่ทดสอบได้, ทบทวนผลที่ Agent เสนอ แล้วจึงเพิ่ม Ownership Gate ใน CI เมื่อทีมพร้อม การมี [@test] หรือ Target Manifest ไม่ได้รับประกัน ว่าระบบถูกต้องเชิงธุรกิจทั้งหมด: Human Review, Security Testing และ Test Coverage ยังจำเป็น
#แหล่งอ้างอิง (เข้าถึง 15 ตุลาคม 2026)
- Tessl — CLI Commands
- Tessl — Supported platforms
- Tessl — Installing the CLI
- Tessl Registry — spec-driven-development/spec-as-source (community Tile, authored by Giuseppe Di Canosa)
- Tessl Registry — Spec Writer Skill
- OpenSpec — How Commands Work
- OpenSpec — CLI Reference
- OpenSpec — Slash Commands
- Tessl Blog — Tessl Launches Spec-Driven Framework and Registry
หมายเหตุเชิงปฏิบัติ: ตัวอย่าง FastAPI และ pytest ในบทความนี้ถูกทดสอบแยกในสภาพแวดล้อม Python แล้ว ส่วนคำสั่ง Tessl / OpenSpec / Tile setup เป็นขั้นตอนจากเอกสารอ้างอิงซึ่งต้องเรียกในเครื่องที่ติดตั้งเครื่องมือและ Agent จริง