- 1. ปัญหาเมื่อไม่มี API Gateway
- 2. API Gateway คืออะไร
- 3. ประโยชน์ของ API Gateway
- 4. API Gateway กับ Microservices
- 5. API Gateway ไม่เหมือน Load Balancer
- 6. API Gateway กับ Reverse Proxy
- 7. ตัวอย่าง API Gateway
- 8. Workshop: จำลอง API Gateway ด้วย Docker Compose
- 9. Request Flow ของ Workshop
- 10. Workshop Extension
- 11. ข้อควรระวัง
- 12. สรุป
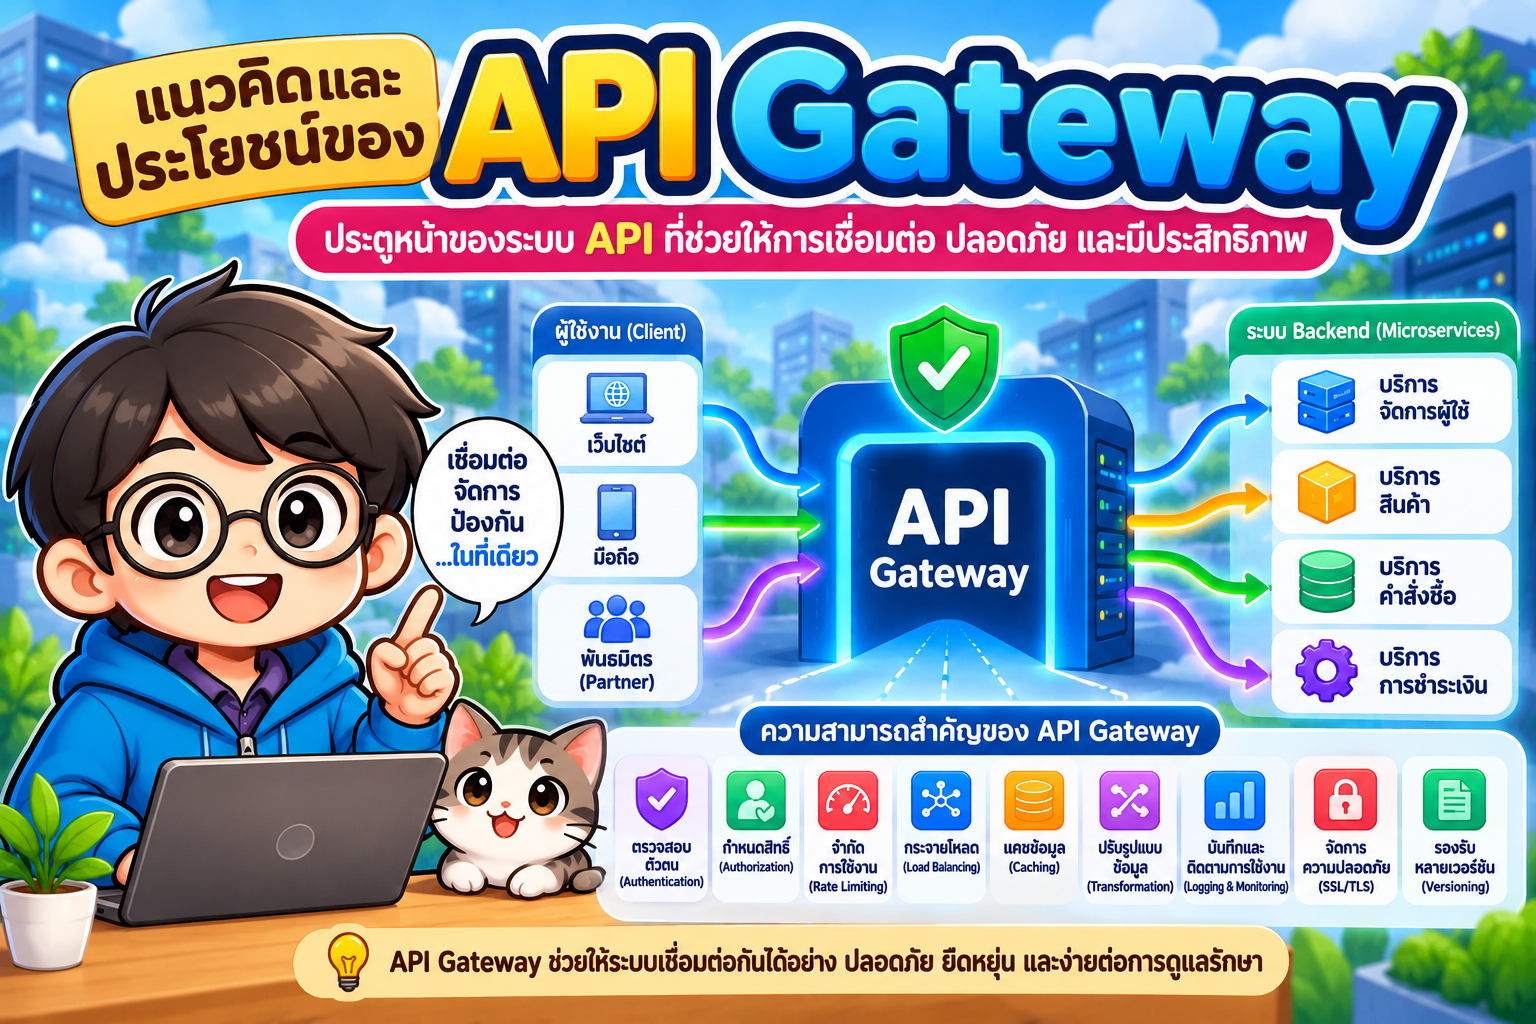
เมื่อระบบซอฟต์แวร์เติบโตจาก Monolithic Application ไปสู่ Microservices Architecture จำนวน API และ Service มักเพิ่มขึ้นอย่างรวดเร็ว หาก Client ต้องติดต่อแต่ละ Service โดยตรง จะเกิดความซับซ้อนทั้งด้าน URL, Authentication, Security, Monitoring และการควบคุม Traffic
API Gateway จึงเข้ามาทำหน้าที่เป็น Single Entry Point หรือประตูหลักสำหรับรับ Request จาก Client ก่อนส่งต่อไปยัง Backend Service ที่เหมาะสม
บทความนี้อธิบายแนวคิด ประโยชน์ และตัวอย่าง Workshop เพื่อให้เห็นภาพการนำ API Gateway ไปใช้งานจริง
#1. ปัญหาเมื่อไม่มี API Gateway
สมมติระบบ E-Commerce มี Service ดังนี้
Web / Mobile
   |
   +----> User Service      :8001
   +----> Product Service   :8002
   +----> Order Service     :8003
   +----> Payment Service   :8004
Client จำเป็นต้องรู้ตำแหน่งของแต่ละ Service เช่น
http://server:8001/users
http://server:8002/products
http://server:8003/orders
http://server:8004/payments
เมื่อจำนวน Service เพิ่มขึ้น ปัญหาที่พบได้ เช่น
- Client ต้องจำ URL และ Port หลายชุด
- แต่ละ Service ต้องจัดการ Authentication เอง
- การกำหนด Rate Limit กระจัดกระจาย
- การเปลี่ยนตำแหน่ง Backend อาจกระทบ Client
- การเก็บ Log และ Metrics ทำได้ยากขึ้น
- การจัดการ TLS/HTTPS ซ้ำซ้อน
- การควบคุม API Policy ไม่มีศูนย์กลาง
#2. API Gateway คืออะไร
API Gateway เป็นตัวกลางระหว่าง Client และ Backend Services
                 +------------------+
Web ------------>|                  |----> User Service
Mobile ---------->|   API Gateway   |----> Product Service
Partner API ----->|                  |----> Order Service
                 +------------------+----> Payment Service
                         |
                         + Authentication
                         + Authorization
                         + Rate Limiting
                         + Logging
                         + Monitoring
                         + Routing
                         + Load Balancing
Client จึงสามารถเรียกผ่าน Endpoint กลาง เช่น
https://api.example.com/users
https://api.example.com/products
https://api.example.com/orders
โดยไม่จำเป็นต้องทราบว่า Service จริงทำงานอยู่ที่ Server, Container หรือ Kubernetes Pod ใด
#3. ประโยชน์ของ API Gateway
#3.1 Single Entry Point
ประโยชน์พื้นฐานที่สุดคือการรวมจุดเข้าใช้งาน API ไว้ที่ Gateway
แทนที่จะเป็น
Client -> Service A
Client -> Service B
Client -> Service C
สามารถเปลี่ยนเป็น
Client
   |
   v
API Gateway
   |
   +--> Service A
   +--> Service B
   +--> Service C
Client จึงไม่ต้องรู้รายละเอียดโครงสร้างภายในระบบ
#3.2 Request Routing
Gateway สามารถกำหนดเส้นทาง Request ไปยัง Service ต่าง ๆ
ตัวอย่าง
/api/users/*       -> User Service
/api/products/*    -> Product Service
/api/orders/*      -> Order Service
เช่น
GET /api/products/100
Gateway จะส่ง Request ไปยัง Product Service โดยอัตโนมัติ
#3.3 Authentication
API Gateway สามารถทำหน้าที่ตรวจสอบตัวตนก่อนอนุญาตให้ Request เข้าถึง Backend
รูปแบบที่พบบ่อย ได้แก่
- API Key
- JWT
- OAuth 2.0
- OpenID Connect
- Basic Authentication
Flow ตัวอย่าง
Client
  |
  | JWT
  v
API Gateway
  |
  +--> Validate Token
          |
          +-- Invalid --> 401 Unauthorized
          |
          +-- Valid ----> Backend API
ข้อดีคือ Backend แต่ละ Service ไม่จำเป็นต้องสร้างกลไกตรวจสอบ Token ซ้ำในทุกจุด หากสถาปัตยกรรมและ trust boundary ออกแบบให้ Gateway รับผิดชอบงานดังกล่าว
#3.4 Authorization และ Policy Enforcement
นอกจาก Authentication แล้ว Gateway ยังสามารถใช้ Policy เพื่อควบคุมว่าใครสามารถเข้าถึง API ใดได้
ตัวอย่าง
Admin  -> /api/admin/*
User   -> /api/profile/*
Public -> /api/products/*
ช่วยรวมกฎการเข้าถึง API ไว้ในตำแหน่งที่บริหารจัดการได้ง่ายขึ้น
#3.5 Rate Limiting
Rate Limiting ใช้ควบคุมจำนวน Request ที่ Client สามารถส่งเข้ามาได้ในช่วงเวลาหนึ่ง
ตัวอย่าง
100 requests / minute
หาก Client ส่ง Request เกินกำหนด Gateway สามารถตอบกลับ
HTTP/1.1 429 Too Many Requests
ประโยชน์ ได้แก่
- ลดการใช้งาน API ที่มากผิดปกติ
- ลดความเสี่ยงจาก Traffic Spike
- ป้องกัน Backend จาก Request จำนวนมาก
- แบ่งระดับการใช้งานตาม API Plan ได้
#3.6 Load Balancing
เมื่อ Service มีหลาย Instance
               +--> API Server 1
API Gateway ---+--> API Server 2
               +--> API Server 3
Gateway สามารถกระจาย Request ไปยัง Backend หลายเครื่องหรือหลาย Container
ช่วยเพิ่ม
- Availability
- Scalability
- Fault tolerance
อย่างไรก็ตาม ในระบบขนาดใหญ่ Load Balancing อาจทำร่วมกับ Load Balancer, Kubernetes Service หรือ Service Mesh ตามสถาปัตยกรรมที่เลือกใช้
#3.7 Centralized Logging
เมื่อ Traffic ผ่าน Gateway สามารถบันทึกข้อมูลสำคัญ เช่น
Timestamp
Client IP
HTTP Method
Endpoint
Status Code
Latency
Consumer
Request ID
ตัวอย่าง
2026-10-07T10:00:00
GET /api/products
200
42ms
ข้อมูลเหล่านี้ช่วยในการ Debug, Audit และวิเคราะห์พฤติกรรมของระบบ
#3.8 Monitoring และ Observability
API Gateway สามารถเป็นแหล่งข้อมูลสำหรับระบบ Monitoring เช่น
API Gateway
    |
    +--> Metrics
    |
Prometheus
    |
Grafana
Metrics ที่ควรติดตาม เช่น
Request Rate
Error Rate
Latency
HTTP Status Code
Upstream Response Time
ทำให้ทีม DevOps หรือ SRE มองเห็นสุขภาพของ API ได้ง่ายขึ้น
#3.9 Caching
บาง Response สามารถ Cache ที่ Gateway เพื่อลดจำนวน Request ที่ต้องส่งไปยัง Backend
Client
  |
  v
Gateway
  |
  +-- Cache Hit --> Response
  |
  +-- Cache Miss --> Backend API
เหมาะกับข้อมูลที่อ่านบ่อยและเปลี่ยนไม่บ่อย เช่น Catalog หรือข้อมูล Public บางประเภท
ผลที่ได้คือ
- ลด Latency
- ลด Backend Load
- รองรับ Traffic ได้มากขึ้น
#3.10 SSL/TLS Termination
Gateway สามารถรับ HTTPS จาก Client แล้วจัดการ Certificate ที่จุดกลาง
Client
   |
 HTTPS
   |
   v
API Gateway
   |
Backend Services
ทำให้การจัดการ Certificate และ HTTPS Policy เป็นระบบมากขึ้น แม้การสื่อสารระหว่าง Gateway กับ Backend ก็ควรเลือกใช้ TLS ตาม threat model และข้อกำหนดด้านความปลอดภัยของระบบ
#3.11 Request / Response Transformation
Gateway บางระบบสามารถแก้ไข Request หรือ Response ก่อนส่งต่อ
ตัวอย่าง
Add Header
Remove Header
Rewrite Path
Transform Request
Transform Response
เช่น Client เรียก
/api/v1/products
แต่ Backend จริงใช้
/internal/products
Gateway สามารถทำ Path Rewrite โดย Client ไม่จำเป็นต้องทราบรายละเอียดภายใน
#3.12 API Versioning
Gateway ช่วย Routing API หลาย Version ได้ เช่น
/api/v1/products -> Product API v1
/api/v2/products -> Product API v2
ทำให้สามารถพัฒนา Version ใหม่โดยยังคงรองรับ Client รุ่นเก่าในช่วง Migration
#4. API Gateway กับ Microservices
API Gateway มีบทบาทสำคัญใน Microservices เพราะช่วยแยก Client ออกจากโครงสร้าง Service ภายใน
                    Internet
                        |
                        v
                 +-------------+
                 | API Gateway |
                 +-------------+
                   /    |    \
                  /     |     \
                 v      v      v
              User   Product  Order
             Service Service Service
หาก Product Service ย้ายจาก Server A ไป Server B Client ไม่จำเป็นต้องแก้ URL ตราบใดที่ Gateway ยังคง Interface เดิมไว้
#5. API Gateway ไม่เหมือน Load Balancer
ทั้งสองเทคโนโลยีมีส่วนที่ทับซ้อนกัน แต่มีวัตถุประสงค์ต่างกัน
| Feature | API Gateway | Load Balancer |
|---|---|---|
| Request Routing | ✓ | ✓ |
| Load Balancing | ✓ | ✓ |
| JWT Authentication | ✓ | โดยทั่วไปไม่ใช่หน้าที่หลัก |
| API Key | ✓ | โดยทั่วไปไม่ใช่หน้าที่หลัก |
| Rate Limiting | ✓ | ขึ้นกับผลิตภัณฑ์ |
| API Transformation | ✓ | จำกัด/ขึ้นกับผลิตภัณฑ์ |
| API Analytics | ✓ | จำกัด |
| API Policy | ✓ | จำกัด |
จึงไม่ควรตีความว่า API Gateway และ Load Balancer สามารถแทนกันได้ทั้งหมด
#6. API Gateway กับ Reverse Proxy
Reverse Proxy รับ Request จาก Client แล้วส่งต่อไปยัง Backend
Client
   |
Reverse Proxy
   |
Backend
API Gateway สามารถมองได้ว่าใช้แนวคิด Reverse Proxy เป็นพื้นฐาน แต่เพิ่มความสามารถสำหรับการบริหาร API เช่น
Authentication
Authorization
Rate Limiting
API Key
Analytics
Transformation
API Policies
Developer/API Management
ความสามารถจริงขึ้นอยู่กับผลิตภัณฑ์และ Configuration ที่ใช้งาน
#7. ตัวอย่าง API Gateway
เครื่องมือที่นิยมใช้ เช่น
- Kong Gateway
- Apache APISIX
- NGINX
- Traefik
- AWS API Gateway
- Azure API Management
- Google Cloud API Gateway
การเลือกใช้ควรพิจารณา Deployment Model, Performance, Plugin Ecosystem, Security, Observability, Cloud Integration และต้นทุน
#8. Workshop: จำลอง API Gateway ด้วย Docker Compose
Workshop นี้ใช้แนวคิด
Client
  |
  v
API Gateway
  |
  +--> Service A
  |
  +--> Service B
#โครงสร้าง Project
api-gateway-workshop/
├── docker-compose.yml
├── gateway/
│   └── nginx.conf
├── service-a/
│   └── index.html
└── service-b/
    └── index.html
#Step 1: สร้าง Service A
สร้างไฟล์
service-a/index.html
เนื้อหา
<h1>Service A</h1>
<p>Hello from Service A</p>
#Step 2: สร้าง Service B
สร้างไฟล์
service-b/index.html
เนื้อหา
<h1>Service B</h1>
<p>Hello from Service B</p>
#Step 3: สร้าง Gateway Configuration
สร้างไฟล์
gateway/nginx.conf
events {}

http {

    server {

        listen 80;

        location /service-a/ {

            proxy_pass http://service-a/;

        }

        location /service-b/ {

            proxy_pass http://service-b/;

        }

    }

}
Gateway จะทำ Routing ดังนี้
/service-a/* -> service-a

/service-b/* -> service-b
#Step 4: สร้าง docker-compose.yml
services:

  gateway:
    image: nginx:alpine
    ports:
      - "8080:80"
    volumes:
      - ./gateway/nginx.conf:/etc/nginx/nginx.conf:ro
    depends_on:
      - service-a
      - service-b

  service-a:
    image: nginx:alpine
    volumes:
      - ./service-a:/usr/share/nginx/html:ro

  service-b:
    image: nginx:alpine
    volumes:
      - ./service-b:/usr/share/nginx/html:ro
#Step 5: Start System
docker compose up -d
ตรวจสอบ Container
docker compose ps
#Step 6: ทดสอบ Service A
เปิด Browser
http://localhost:8080/service-a/
หรือ
curl http://localhost:8080/service-a/
ผลลัพธ์
<h1>Service A</h1>
<p>Hello from Service A</p>
#Step 7: ทดสอบ Service B
curl http://localhost:8080/service-b/
Gateway จะ Routing Request ไปยัง Service B
#9. Request Flow ของ Workshop
Client
  |
  | GET /service-a/
  v
+-------------+
| API Gateway |
|    NGINX    |
+-------------+
       |
       | Routing
       v
+-------------+
|  Service A  |
+-------------+
       |
       v
   Response
จุดสำคัญคือ Client ติดต่อเพียง
localhost:8080
ไม่จำเป็นต้องเข้าถึง Container ของ Service A หรือ Service B โดยตรง
#10. Workshop Extension
หลังจากเข้าใจ Routing แล้ว สามารถต่อยอด Lab ด้วย API Gateway ที่รองรับ API Management โดยตรง เช่น Kong หรือ Apache APISIX เพื่อทดลอง
Authentication
       ↓
Rate Limiting
       ↓
Routing
       ↓
Load Balancing
       ↓
Logging
       ↓
Monitoring
ตัวอย่าง Architecture
                     Client
                       |
                       v
                +-------------+
                | API Gateway |
                +-------------+
                  |    |    |
          +-------+    |    +-------+
          |            |            |
          v            v            v
       User API    Product API   Order API
          |            |            |
          +------------+------------+
                       |
                  Database
#11. ข้อควรระวัง
API Gateway มีประโยชน์มาก แต่หากออกแบบไม่เหมาะสมอาจกลายเป็นจุดคอขวดหรือจุดล้มเหลวสำคัญของระบบ
ควรพิจารณา
- High Availability
- Horizontal Scaling
- Health Check
- Timeout
- Retry Policy
- Circuit Breaker
- TLS
- Secret Management
- Logging
- Metrics
- Distributed Tracing
และหลีกเลี่ยงการใส่ Business Logic จำนวนมากลงใน Gateway เพราะอาจทำให้ Gateway กลายเป็นระบบที่ซับซ้อนและผูก Service เข้าด้วยกันมากเกินไป
#12. สรุป
API Gateway เป็นองค์ประกอบสำคัญของระบบ API และ Microservices โดยทำหน้าที่เป็นจุดกลางระหว่าง Client กับ Backend Services
ประโยชน์สำคัญประกอบด้วย
- Single Entry Point
- Request Routing
- Authentication
- Authorization
- Rate Limiting
- Load Balancing
- Centralized Logging
- Monitoring และ Observability
- Caching
- SSL/TLS Termination
- Request/Response Transformation
- API Versioning
แนวคิดสำคัญสามารถสรุปเป็น Flow ได้ว่า
Client
   |
   v
API Gateway
   |
   +--> Authentication
   +--> Authorization
   +--> Rate Limiting
   +--> Routing
   +--> Load Balancing
   +--> Logging / Metrics
   |
   v
Microservices
ดังนั้น API Gateway ไม่ได้เป็นเพียงตัวส่งต่อ Request แต่เป็น Control Point สำหรับ API Traffic ที่ช่วยให้ระบบมีความปลอดภัย บริหารจัดการง่าย สังเกตการณ์ได้ และรองรับการขยายตัวได้ดีขึ้น
#แนวทางสำหรับ Workshop ถัดไป
สามารถต่อยอดจาก Workshop นี้เป็น
Kong API Gateway
        |
        +-- JWT Authentication
        |
        +-- Rate Limiting
        |
        +-- Load Balancing
        |
        +-- Prometheus
        |
        +-- Grafana
        |
        +-- Multiple REST API Containers
ซึ่งเหมาะสำหรับใช้เป็น Lab ต่อเนื่องในหัวข้อ Microservices, DevOps, Cloud Native และ API Management