- Bugpatrol คืออะไร
- ความสามารถสำคัญของ Bugpatrol
- สิ่งที่ควรเข้าใจก่อนใช้งาน
- สิ่งที่ต้องเตรียม
- Workshop: ใช้ Bugpatrol ทดสอบ Web Application
- ขั้นตอนที่ 1 ติดตั้ง Chromium สำหรับ Playwright
- ขั้นตอนที่ 2 เริ่มต้น Bugpatrol
- การ Init แบบอัตโนมัติ
- ขั้นตอนที่ 3 ตั้งค่า .bugpatrol/bugpatrol.yml
- ขั้นตอนที่ 4 เขียนคำแนะนำให้ Explorer
- ขั้นตอนที่ 5 ให้ Explorer สำรวจระบบ
- ขั้นตอนที่ 6 ให้ Judge วิเคราะห์ Bug
- ขั้นตอนที่ 7 เปิด Dashboard
- ขั้นตอนที่ 8 เปิด Automatic Checks เพิ่มเติม
- ขั้นตอนที่ 9 เปิด Fixer
- ขั้นตอนที่ 10 Retest หลังแก้ Bug
- ขั้นตอนที่ 11 ตรวจสอบ Fix ด้วยคำสั่งที่กำหนด
- ขั้นตอนที่ 12 เชื่อมต่อ GitHub
- ขั้นตอนที่ 13 Preview ก่อน Publish
- Bugpatrol จะ Publish อะไรไป GitHub
- ขั้นตอนที่ 14 ตรวจ CI ของ Pull Request
- ขั้นตอนที่ 15 Sync สถานะจาก GitHub
- ขั้นตอนที่ 16 รัน Full Patrol
- รันเพียงหนึ่ง Cycle
- ตัวอย่าง Configuration สำหรับ Workshop
- คำสั่ง Bugpatrol ที่ควรรู้
- การใช้ Bugpatrol ร่วมกับ Coding Agent
- ตัวอย่าง Workflow ที่แนะนำสำหรับทีมพัฒนา
- แนวทางการใช้งานอย่างปลอดภัย
- Bugpatrol ต่างจาก Playwright Test อย่างไร
- เหมาะกับงานประเภทใด
- ประเด็นน่าสนใจสำหรับงานวิจัย
- ข้อดีของ Bugpatrol
- สิ่งที่ควรระวัง
- สรุป
- แหล่งอ้างอิง
ในงานพัฒนาซอฟต์แวร์ การทดสอบแบบ End-to-End มักต้องใช้เวลามาก โดยเฉพาะระบบที่มีหลายหน้าจอ หลาย workflow และมีการเปลี่ยนแปลงโค้ดอย่างต่อเนื่อง
Bugpatrol เป็นเครื่องมือ Open Source ที่นำแนวคิด Agentic AI มาใช้กับงาน Software Testing โดยสร้างทีม QA เสมือนจาก AI Agents หลายบทบาท เพื่อช่วยสำรวจแอป ตรวจสอบปัญหา แก้ไขโค้ด ทดสอบซ้ำ และสามารถเชื่อมต่อกับ GitHub เพื่อสร้าง Pull Request หรือ Issue ได้
จุดเด่นคือ Bugpatrol ไม่ได้ทำงานเพียงการสร้าง test script แต่พยายามทำงานคล้ายทีม QA ที่เข้าใช้งานระบบจริง วิเคราะห์สิ่งที่พบ และตัดสินใจว่าปัญหานั้นควรถูกจัดเป็น Bug หรือไม่
บทความนี้อ้างอิงจาก repository และเอกสารของโครงการ Bugpatrol ณ วันที่ 30 กันยายน 2026
#Bugpatrol คืออะไร
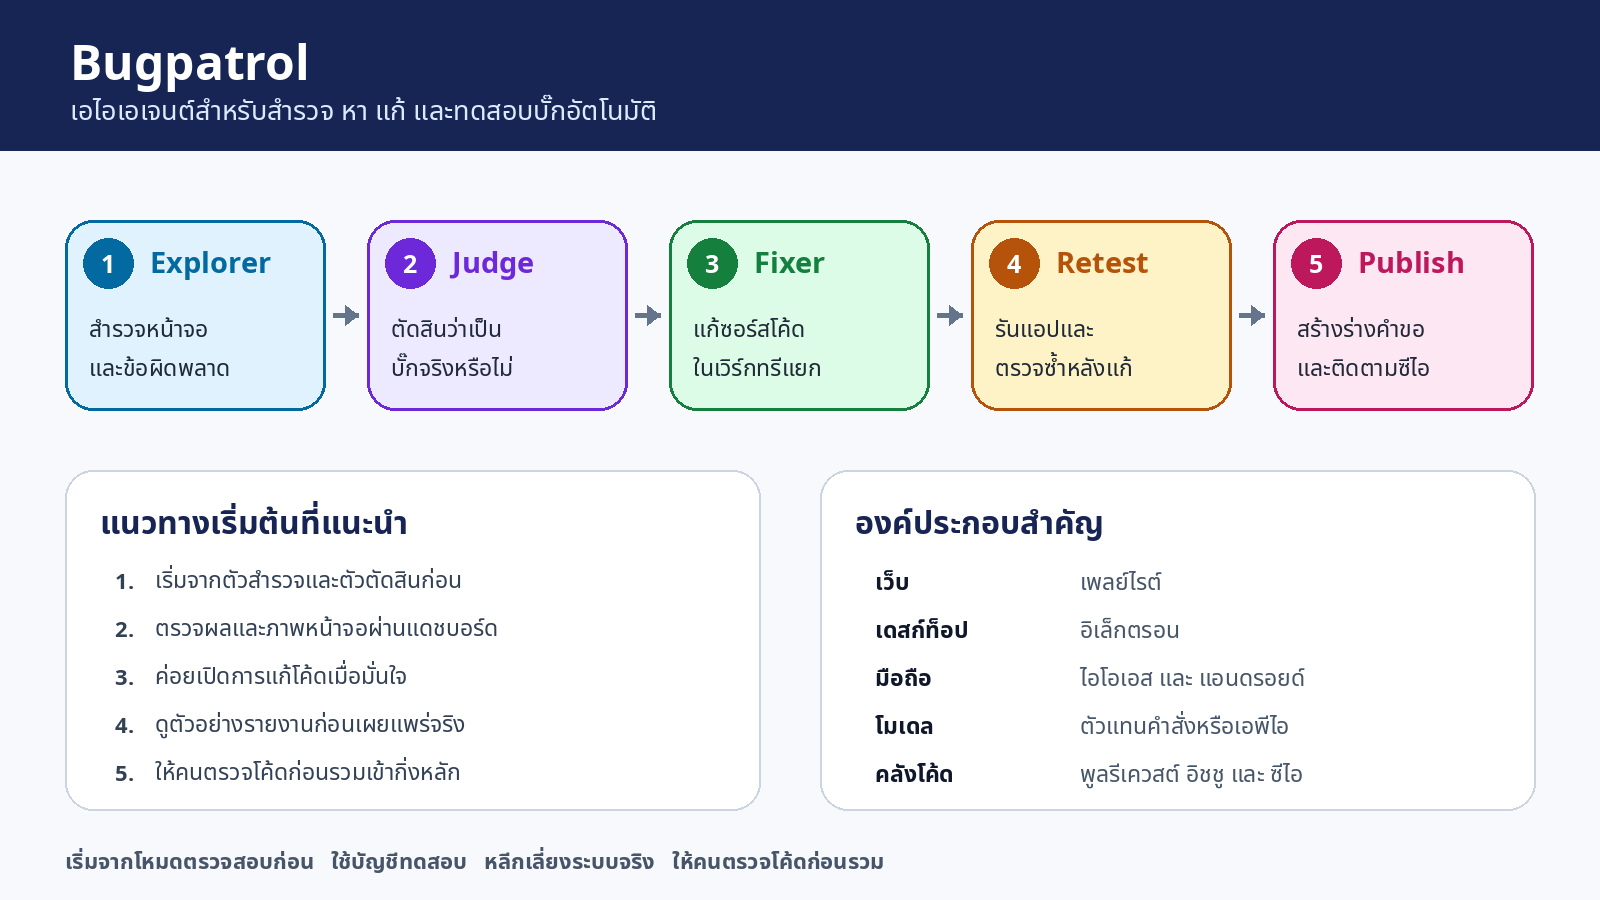
Bugpatrol อธิบายตัวเองว่าเป็น QA team made of agents โดยมี AI Agent หลัก 3 บทบาท
| Agent | หน้าที่ |
|---|---|
| Explorer | เข้าใช้งานแอป สำรวจหน้าจอ ดู Console Error และ Failed Request แล้วรายงานสิ่งผิดปกติ |
| Judge | วิเคราะห์สิ่งที่ Explorer พบ และตัดสินว่าเป็น Bug จริงหรือไม่ |
| Fixer | อ่าน Issue และ Source Code แล้วสร้างการแก้ไขใน Git Worktree แยกต่างหาก |
หลังจาก Fixer แก้โค้ดแล้ว ระบบสามารถนำ Explorer และ Judge กลับมาทดสอบซ้ำเพื่อยืนยันว่า Bug ถูกแก้จริง
โฟลว์หลักจึงเป็น
flowchart LR
    A[Start App] --> B[Explorer]
    B --> C[Bug Candidates]
    C --> D[Judge]
    D --> E{Real Bug?}
    E -->|No| F[Dismiss]
    E -->|Yes| G[Issue]
    G --> H[Fixer]
    H --> I[Retest]
    I --> J{Fixed?}
    J -->|No| H
    J -->|Yes| K[Publish]
    K --> L[GitHub PR / Issue]
กล่าวอีกแบบคือ
Explore → Judge → Fix → Retest → Publish
#ความสามารถสำคัญของ Bugpatrol
Bugpatrol รองรับงานหลายรูปแบบ เช่น
- Web Application ผ่าน Playwright
- Electron Application ผ่าน Chrome DevTools Protocol
- iOS Simulator
- Android Emulator
- AI Agent CLI เช่น Claude Code, Codex, Kimi CLI และ pi
- LLM ผ่าน API เช่น OpenAI, Anthropic, OpenRouter, Vercel AI Gateway หรือ Custom Endpoint
- GitHub Pull Request
- GitHub Issue
- Local Dashboard
- Agent Memory
- Automatic UI Checks
- Continuous Patrol ตามการเปลี่ยนแปลงของ Git Commit
สำหรับ Web Application กระบวนการ Explorer จะสามารถดูทั้งหน้าจอ, Console Error และ Failed Network Request ได้
#สิ่งที่ควรเข้าใจก่อนใช้งาน
Bugpatrol สามารถแก้ไขโค้ดและเปิด Pull Request อัตโนมัติได้ ดังนั้นควรเริ่มจากโหมดตรวจสอบก่อน
ลำดับที่แนะนำคือ
explorejudge- ตรวจสอบผลผ่าน Dashboard
- เปิด
fixer - ใช้
publish --dry-run - เมื่อมั่นใจแล้วค่อยเปิด GitHub Publishing
ไม่ควรนำ Bugpatrol ไปทดสอบกับ Production โดยใช้บัญชีผู้ใช้จริงหรือข้อมูลจริง
#สิ่งที่ต้องเตรียม
ตามเอกสารของโครงการ ควรมี
- Node.js 22 หรือใหม่กว่า
- Git
- Project อยู่ภายใน Git Repository
- มี
originremote - LLM หรือ Agent CLI อย่างน้อยหนึ่งตัว
- Chromium สำหรับ Web Application
- GitHub CLI (
gh) หากต้องการเปิด PR หรือ Issue อัตโนมัติ
ตรวจสอบ Node.js
node --version
ตรวจสอบ Git
git --version
ตรวจสอบ remote
git remote -v
หากต้องการใช้งาน GitHub integration ให้ตรวจสอบ
gh auth status
#Workshop: ใช้ Bugpatrol ทดสอบ Web Application
สมมติว่าเรามี Web Application ที่รันด้วยคำสั่ง
npm run dev
และเปิดที่
http://localhost:3000
โครงสร้าง Project ตัวอย่าง
my-web-app/
├── src/
├── package.json
├── package-lock.json
└── .git/
เข้าสู่ Project
cd my-web-app
#ขั้นตอนที่ 1 ติดตั้ง Chromium สำหรับ Playwright
สำหรับ Web Application เอกสาร Bugpatrol แนะนำให้ติดตั้ง Chromium หนึ่งครั้งด้วยคำสั่ง
PLAYWRIGHT_SKIP_BROWSER_GC=1 npx -y playwright@1.48.2 install chromium
บน Windows PowerShell สามารถกำหนด environment variable ก่อนรันคำสั่งได้ เช่น
$env:PLAYWRIGHT_SKIP_BROWSER_GC="1"
npx -y playwright@1.48.2 install chromium
#ขั้นตอนที่ 2 เริ่มต้น Bugpatrol
Bugpatrol ไม่จำเป็นต้องติดตั้งแบบ Global สามารถใช้ผ่าน npx ได้ทันที
npx bugpatrol init
คำสั่ง init จะช่วยตรวจหา
- ประเภทของ Application
- คำสั่งสำหรับ Start Application
- URL
- Agent CLI ที่ติดตั้งอยู่
- LLM Provider สำหรับ Explorer
- LLM Provider สำหรับ Judge
- LLM Provider สำหรับ Fixer
หลังจากนั้นจะสร้างโฟลเดอร์
.bugpatrol/
├── bugpatrol.yml
├── instructions.md
└── runs/
ความหมายของแต่ละไฟล์
| Path | หน้าที่ |
|---|---|
.bugpatrol/bugpatrol.yml |
Configuration หลัก |
.bugpatrol/instructions.md |
คำแนะนำเกี่ยวกับระบบสำหรับ Explorer |
.bugpatrol/runs/ |
Session, Screenshot, Issue, Fix, Memory และ Worktree |
โดย runs/ จะถูกเพิ่มใน .gitignore
#การ Init แบบอัตโนมัติ
หากต้องการใช้ค่าที่ตรวจพบโดยไม่ถามทีละข้อ
npx bugpatrol init --yes
ถ้าต้องการระบุ Agent CLI
npx bugpatrol init --yes --agent codex
หรือกำหนด Agent แต่ละตัวแตกต่างกัน
npx bugpatrol init \
  --yes \
  --explorer codex \
  --judge codex \
  --fixer codex
สามารถเปลี่ยนเป็น claude, kimi, pi, openrouter, vercel, openai หรือ anthropic ตาม environment ที่ใช้งาน
#ขั้นตอนที่ 3 ตั้งค่า .bugpatrol/bugpatrol.yml
ตัวอย่าง Configuration สำหรับ Web Application
version: 1

app:
  platform: web
  source: .
  setup:
    - run: npm run dev
      background: true
      readyWhen: 'Local:|ready'
  connect:
    url: http://localhost:3000
  instructions: .bugpatrol/instructions.md

agents:
  explorer:
    maxSteps: 100
    use: codex

  judge:
    use: codex

  fixer:
    enabled: false
    use: codex

  github:
    enabled: false

  memory:
    enabled: true

  patrol:
    intervalMinutes: 30
    cycles: 0
    pull: origin/main
จุดสำคัญคือ
fixer:
  enabled: false
และ
github:
  enabled: false
หมายความว่าในช่วงแรก Bugpatrol จะยังไม่แก้ Source Code และยังไม่สร้าง GitHub PR หรือ Issue
#ขั้นตอนที่ 4 เขียนคำแนะนำให้ Explorer
ไฟล์
.bugpatrol/instructions.md
เปรียบเสมือนเอกสาร onboarding สำหรับ QA คนใหม่
ตัวอย่าง
# Demo Web Application

ระบบนี้เป็นระบบจัดการงานสำหรับผู้ใช้งานทั่วไป

## สิ่งที่ควรทดสอบ

- Login
- Dashboard
- Create Task
- Edit Task
- Delete Task
- Logout

## Login

เข้าสู่ระบบด้วย

Email: {{TEST_EMAIL}}
Password: {{TEST_PASSWORD}}

## ข้อควรระวัง

- ห้ามลบข้อมูลผู้ดูแลระบบ
- ห้ามเปลี่ยน Password
- ห้ามส่ง Email จริง
- ห้ามเรียก Payment Gateway จริง
หากใช้ Secret ต้องประกาศชื่อ Environment Variable ใน bugpatrol.yml
app:
  secrets:
    - TEST_EMAIL
    - TEST_PASSWORD
แล้วกำหนดค่าจริงใน Environment
Linux/macOS
export TEST_EMAIL="tester@example.com"
export TEST_PASSWORD="your-test-password"
PowerShell
$env:TEST_EMAIL="tester@example.com"
$env:TEST_PASSWORD="your-test-password"
Bugpatrol ใช้ Placeholder เช่น
{{TEST_EMAIL}}
เพื่อหลีกเลี่ยงการส่งค่าจริงของ Secret ไปยัง Model โดยตรง
#ขั้นตอนที่ 5 ให้ Explorer สำรวจระบบ
เริ่มสำรวจ Application
npx bugpatrol explore
Explorer จะ
- Start Application
- เปิด Browser
- เข้าใช้งานระบบ
- สำรวจ Screen
- วิเคราะห์ UI
- ตรวจ Console Error
- ตรวจ Failed Request
- สร้าง Candidate Finding
- บันทึก Screenshot
- เรียนรู้ Routine ที่สามารถ replay ได้
เราสามารถกำหนด Goal เฉพาะได้
npx bugpatrol explore --goal "Test the login and dashboard flow"
หรือ
npx bugpatrol explore --goal "Test creating, editing and deleting a task"
แนวทางนี้เหมาะมากสำหรับการทำ Exploratory Testing แบบเจาะจงตาม Feature
#ขั้นตอนที่ 6 ให้ Judge วิเคราะห์ Bug
หลังจาก Explorer ทำงานแล้ว ให้ Judge วิเคราะห์ผล
npx bugpatrol judge
Judge จะตรวจ Finding ที่ Explorer พบ และตัดสินว่า
- เป็น Bug จริง
- ไม่ใช่ Bug
- ควรถูก Dismiss
- ควรสร้าง Issue
ดูรายการ Issue ผ่าน Terminal
npx bugpatrol issue list
#ขั้นตอนที่ 7 เปิด Dashboard
Bugpatrol มี Local Dashboard สำหรับติดตาม Agent
npx bugpatrol dashboard
เปิด Browser
http://127.0.0.1:4311
ถ้าต้องการเปลี่ยน Port
npx bugpatrol dashboard --port 5000
Dashboard มีข้อมูลสำคัญ เช่น
- Agent ที่กำลังทำงาน
- Issue ที่ตรวจพบ
- Screenshot
- Explorer Sessions
- Screen Graph
- Agent Activity
- Token Usage
- Fix Diff
- Retest Result
- Memory
- GitHub PR/Issue State
Dashboard อ่านข้อมูลจาก
.bugpatrol/runs/
จึงสามารถเปิดดูผลเก่าได้แม้ Patrol จะหยุดไปแล้ว
#ขั้นตอนที่ 8 เปิด Automatic Checks เพิ่มเติม
สามารถเปิด UI Checks ได้ เช่น
agents:
  checks:
    - usability/contrast
    - usability/tap-target
    - layout/overflow
    - rendering/broken-imagery
ตัวอย่าง Check ที่รองรับ เช่น
| Check | ตรวจอะไร |
|---|---|
usability/contrast |
Contrast ต่ำ |
usability/tap-target |
ปุ่มหรือ Control มีขนาดเล็กเกินไป |
layout/overlap |
Element ซ้อนกัน |
layout/overflow |
Content ล้น |
layout/off-viewport |
Element อยู่นอก Viewport |
layout/horizontal-scroll |
หน้าเว็บกว้างเกิน Viewport |
rendering/broken-imagery |
รูปโหลดไม่สำเร็จ |
rendering/unstyled-content |
CSS ไม่ทำงาน |
pixel-diff |
หน้าจอเปลี่ยนจาก Baseline |
อย่างไรก็ตาม Automatic Checks อาจสร้าง False Positive ได้ จึงควรเปิดเฉพาะรายการที่เหมาะกับ Application
#ขั้นตอนที่ 9 เปิด Fixer
เมื่อเรามั่นใจว่า Explorer และ Judge ทำงานถูกต้องแล้ว สามารถเปิด Fixer
agents:
  fixer:
    enabled: true
    minSeverity: minor
    maxPerCycle: 2
    verify: npm test
    commitMessage: 'fix: {title}'
    retest:
      enabled: true
      prepare: npm install
      attempts: 2
    use: codex
จากนั้นรัน
npx bugpatrol fix
Bugpatrol จะสร้าง Branch ลักษณะ
bugpatrol/fix-<issue>
และสร้าง Git Worktree ภายใน
.bugpatrol/runs/worktrees/
Fixer จึงไม่ควรแก้โค้ดตรงบน Working Directory หลักของนักพัฒนา
#ขั้นตอนที่ 10 Retest หลังแก้ Bug
หลัง Fixer แก้ปัญหา Bugpatrol สามารถนำ Flow เดิมกลับมาทดสอบใหม่
npx bugpatrol retest --issue <issue-id>
Explorer จะ replay ขั้นตอนที่เกี่ยวข้อง แล้ว Judge จะเปรียบเทียบผลก่อนและหลังแก้ไข
แนวคิดนี้สำคัญมาก เพราะไม่ใช่แค่ให้ AI แก้ Source Code แต่ต้องมีหลักฐานว่า
Bug → Fix → Execute Application → Retest → Judge
#ขั้นตอนที่ 11 ตรวจสอบ Fix ด้วยคำสั่งที่กำหนด
ควรกำหนด
verify: npm test
หรือใน Project จริงอาจใช้
verify: npm run lint && npm run typecheck && npm test
Bugpatrol จะเรียกคำสั่งนี้หลัง Fixer ทำงาน
ตัวอย่างสำหรับ Project ที่ใช้ Playwright
verify: npm run typecheck && npx playwright test
ข้อดีคือการตัดสินว่า Fix สำเร็จไม่ได้ขึ้นอยู่กับคำตอบของ LLM เพียงอย่างเดียว แต่มี Deterministic Verification เพิ่มเข้ามา
#ขั้นตอนที่ 12 เชื่อมต่อ GitHub
ก่อนเปิด GitHub integration ให้ตรวจสอบ
gh auth status
จากนั้นแก้
agents:
  github:
    enabled: true
    pullRequests: draft
    issueMinSeverity: major
    labels:
      - bugpatrol
แนะนำให้เริ่มจาก
pullRequests: draft
เพื่อให้คนตรวจ Code Review ก่อน Merge
#ขั้นตอนที่ 13 Preview ก่อน Publish
ก่อนสร้าง PR หรือ Issue จริง ให้ใช้
npx bugpatrol publish --dry-run
Report จะถูกเขียนไว้ใน
.bugpatrol/runs/publish/
ตรวจสอบเนื้อหาให้เรียบร้อยก่อน Publish จริง
จากนั้นจึงใช้
npx bugpatrol publish
หรือ Publish เฉพาะ Issue
npx bugpatrol publish --issue <issue-id>
#Bugpatrol จะ Publish อะไรไป GitHub
หลัก ๆ มีสองประเภท
#Pull Request
สร้างเมื่อ
- Issue มี Fix
- Retest ผ่าน
- ยังไม่มี PR เดิม
#GitHub Issue
สร้างเมื่อ
- Bug มี Severity ถึงค่าที่กำหนด
- ไม่มี Fix ที่สำเร็จ
- ยังไม่มี Issue เดิม
Bugpatrol สามารถแนบข้อมูล เช่น
- Summary
- Expected Result
- Actual Result
- Steps
- Screenshot
- Severity
- Fix
- Diff
- Verification Result
- Retest Result
#ขั้นตอนที่ 14 ตรวจ CI ของ Pull Request
Bugpatrol สามารถติดตาม CI ได้
npx bugpatrol ci --wait
หรือเฉพาะ Issue
npx bugpatrol ci --issue <issue-id>
หาก CI Failed ระบบสามารถส่ง Log กลับไปให้ Fixer วิเคราะห์และแก้ไขเพิ่มเติมได้ตามจำนวน Attempt ที่กำหนด
#ขั้นตอนที่ 15 Sync สถานะจาก GitHub
ใช้คำสั่ง
npx bugpatrol github sync
ตัวอย่างการ Sync
| GitHub | Bugpatrol |
|---|---|
| PR ถูก Merge | Fix ถูกบันทึกว่า merged |
| PR ถูก Close | Fix ถูกมองว่า rejected |
| Issue ถูก Close เป็น completed | Issue เป็น fixed |
| Issue ถูก Close เป็น not planned | Issue ถูก dismiss |
| Issue ถูก Reopen | Issue กลับมาเป็น filed |
แนวคิดนี้ทำให้ Bugpatrol เรียนรู้จากการตัดสินใจของทีมพัฒนาได้ด้วย
#ขั้นตอนที่ 16 รัน Full Patrol
เมื่อทุกอย่างพร้อม สามารถให้ Bugpatrol ทำงานครบวงจร
npx bugpatrol
หรือ
npx bugpatrol patrol
หนึ่ง Cycle จะมีแนวทางประมาณ
Pull latest code
      ↓
Start application
      ↓
Explore
      ↓
Judge
      ↓
Fix
      ↓
Retest
      ↓
Publish
      ↓
Check CI
      ↓
Wait for next commit
ค่าเริ่มต้น Patrol สามารถตรวจรอบใหม่ตามช่วงเวลาที่กำหนด เช่น 30 นาที
#รันเพียงหนึ่ง Cycle
สำหรับ Workshop หรือ CI Environment มักเหมาะกับ
npx bugpatrol --once
ถ้าต้องการทดสอบ Commit เดิมอีกครั้ง
npx bugpatrol --once --force
#ตัวอย่าง Configuration สำหรับ Workshop
ตัวอย่างที่เหมาะกับการทดลองใน Local Machine
version: 1

app:
  platform: web
  source: .
  setup:
    - run: npm run dev
      background: true
      readyWhen: 'Local:|ready'
  connect:
    url: http://localhost:3000
  instructions: .bugpatrol/instructions.md
  secrets:
    - TEST_EMAIL
    - TEST_PASSWORD

agents:
  explorer:
    maxSteps: 80
    use: codex

  judge:
    use: codex

  fixer:
    enabled: false
    verify: npm test
    commitMessage: 'fix: {title}'
    retest:
      enabled: true
      prepare: npm install
      attempts: 2
    use: codex

  github:
    enabled: false
    pullRequests: draft
    issueMinSeverity: major
    labels:
      - bugpatrol

  memory:
    enabled: true

  checks:
    - usability/contrast
    - layout/overflow
    - rendering/broken-imagery

  patrol:
    intervalMinutes: 30
    cycles: 0
    pull: origin/main
เมื่อทดสอบ Explorer และ Judge จนมั่นใจแล้ว ค่อยเปลี่ยน
fixer:
  enabled: true
และหลังจากตรวจสอบ publish --dry-run แล้วจึงเปิด
github:
  enabled: true
#คำสั่ง Bugpatrol ที่ควรรู้
| Command | ใช้งาน |
|---|---|
npx bugpatrol init |
สร้าง Configuration |
npx bugpatrol explore |
ให้ Explorer สำรวจระบบ |
npx bugpatrol explore --goal "..." |
สำรวจตามเป้าหมาย |
npx bugpatrol judge |
วิเคราะห์ Finding |
npx bugpatrol issue list |
ดูรายการ Issue |
npx bugpatrol fix |
ให้ Fixer แก้ Bug |
npx bugpatrol retest --issue <id> |
ทดสอบ Fix ซ้ำ |
npx bugpatrol publish --dry-run |
Preview PR/Issue |
npx bugpatrol publish |
Publish ไป GitHub |
npx bugpatrol ci --wait |
ติดตาม CI |
npx bugpatrol github sync |
Sync GitHub State |
npx bugpatrol dashboard |
เปิด Dashboard |
npx bugpatrol --once |
รัน 1 Patrol Cycle |
npx bugpatrol --once --force |
ทดสอบ Commit เดิมใหม่ |
npx bugpatrol |
Continuous Patrol |
npx bugpatrol replay <routine-id> |
Replay Routine โดยไม่ใช้ Model |
npx bugpatrol memory list |
ดู Agent Memory |
npx bugpatrol worktrees clean |
ล้าง Worktree ที่เสร็จแล้ว |
#การใช้ Bugpatrol ร่วมกับ Coding Agent
Bugpatrol มี Skill สำหรับ Coding Agent ด้วย
ติดตั้ง Skill
npx skills add agent-labs-dev/bugpatrol
จากนั้นสามารถสั่ง Coding Agent เช่น
Set up Bugpatrol for this repo.
Skill นี้ออกแบบมาเพื่อช่วย Agent ตั้งค่า Bugpatrol ให้เหมาะกับ Repository ปัจจุบัน
#ตัวอย่าง Workflow ที่แนะนำสำหรับทีมพัฒนา
flowchart TD
    A[Developer pushes code] --> B[Bugpatrol Explore]
    B --> C[Judge findings]
    C --> D{Bug?}

    D -->|No| E[Dismiss]
    D -->|Yes| F[Create internal issue]

    F --> G{Fixer enabled?}
    G -->|No| H[Human reviews issue]
    G -->|Yes| I[AI Fixer]

    I --> J[Run verify command]
    J --> K[Retest in running app]

    K --> L{Verified?}
    L -->|No| I
    L -->|Yes| M[Draft GitHub PR]

    M --> N[CI]
    N --> O[Human Code Review]
    O --> P[Merge]
Workflow แบบนี้ยังคงให้ Human เป็นผู้อนุมัติขั้นสุดท้ายก่อน Merge
#แนวทางการใช้งานอย่างปลอดภัย
#1. ใช้ Test Account
ไม่ควรให้ AI Agent ใช้บัญชีผู้ใช้งานจริง
ควรสร้าง
bugpatrol-test@example.com
และใช้ Test Data โดยเฉพาะ
#2. หลีกเลี่ยง Production
Explorer สามารถ Click และกรอกข้อมูลได้ หาก Configuration ผิดอาจเกิดการเปลี่ยนแปลงข้อมูลจริง
ควรใช้
- Local Environment
- Development Environment
- Staging Environment
- Disposable Test Database
#3. ระบุสิ่งต้องห้ามใน instructions.md
เช่น
## Never do these things

- Never delete an organization.
- Never invite a real email address.
- Never submit a real payment.
- Never modify production settings.
#4. เปิด Fixer ทีหลัง
ช่วงเริ่มต้นควรใช้
fixer:
  enabled: false
เพื่อศึกษาพฤติกรรมของ Explorer และ Judge ก่อน
#5. เปิด GitHub ทีหลัง
ช่วงแรกใช้
github:
  enabled: false
จากนั้นทดลอง
npx bugpatrol publish --dry-run
ก่อนเปิด Publishing จริง
#6. ใช้ Draft Pull Request
pullRequests: draft
ทำให้ทีมยังสามารถทำ Code Review ก่อน Merge
#7. กำหนด verify
ตัวอย่าง
verify: npm run lint && npm run typecheck && npm test
เพื่อลดความเสี่ยงจาก Fix ที่ดูเหมือนถูกต้องแต่ทำให้ระบบส่วนอื่นเสีย
#Bugpatrol ต่างจาก Playwright Test อย่างไร
Playwright เป็น Framework สำหรับสร้าง Automated Test ที่มี Test Case ชัดเจน เช่น
Given → When → Then
ส่วน Bugpatrol เน้น Agentic Exploratory Testing
Explore → Observe → Reason → Report → Fix → Retest
ดังนั้นทั้งสองเครื่องมือไม่จำเป็นต้องแทนที่กัน
แนวทางที่น่าสนใจคือ
Playwright Test
      +
Bugpatrol Explorer/Judge
      +
Unit/Integration Tests
      +
CI/CD
Playwright Test ใช้เป็น Regression Test ที่ Deterministic ส่วน Bugpatrol ใช้ช่วยค้นหาปัญหาที่ทีมอาจยังไม่ได้เขียน Test Case ครอบคลุม
#เหมาะกับงานประเภทใด
Bugpatrol เหมาะกับ
- Web Application ที่มี UI จำนวนมาก
- SaaS
- Internal Tools
- Dashboard
- CRUD Application
- Application ที่ Release บ่อย
- ทีมที่ต้องการ Exploratory Testing ต่อเนื่อง
- Project ที่ต้องการทดลอง Agentic Software Engineering
- งานวิจัย AI for Software Testing
- งานวิจัย Self-Healing หรือ Autonomous Bug Fixing
#ประเด็นน่าสนใจสำหรับงานวิจัย
Bugpatrol สามารถใช้เป็นฐานสำหรับงานวิจัยได้หลายหัวข้อ เช่น
LLM-Based Exploratory Testing
Multi-Agent Software Testing
Autonomous Bug Detection and Repair
LLM-Based UI Testing
Self-Healing Software Testing
Agentic AI for Software Engineering
ตัวอย่าง Experimental Pipeline
flowchart LR
    A[Web Application] --> B[Bug Injection]
    B --> C[Bugpatrol]
    C --> D[Explorer]
    D --> E[Judge]
    E --> F[Fixer]
    F --> G[Retest]

    G --> H[Metrics]

    H --> I[Bug Detection Rate]
    H --> J[Precision]
    H --> K[Repair Success Rate]
    H --> L[Retest Pass Rate]
    H --> M[Token Cost]
    H --> N[Execution Time]
สามารถเปรียบเทียบ Model หรือ Framework หลายแบบภายใต้ Bug ชุดเดียวกันได้
#ข้อดีของ Bugpatrol
- ใช้ AI Agent หลายบทบาทแทน Agent ตัวเดียว
- รองรับการสำรวจ UI แบบอัตโนมัติ
- เห็น Console Error และ Failed Request
- มี Judge ลด False Positive
- มี Fixer สำหรับแก้ Source Code
- มี Retest หลัง Fix
- ใช้ Git Worktree แยกการแก้ไข
- รองรับ GitHub PR และ Issue
- มี Dashboard
- มี Memory
- รองรับหลาย LLM Provider
- สามารถทำ Continuous Patrol ได้
#สิ่งที่ควรระวัง
Bugpatrol เป็น Agentic System จึงมีความไม่แน่นอนมากกว่า Test Automation แบบ Deterministic
ประเด็นที่ควรควบคุม ได้แก่
- Token Cost
- False Positive
- Agent Hallucination
- Destructive Action
- Test Data
- Secret Management
- Fix Quality
- CI Verification
- Pull Request Review
- Runtime Duration
จึงไม่ควรใช้ Bugpatrol แทน Unit Test, Integration Test หรือ Regression Test ทั้งหมด
แนวคิดที่เหมาะกว่าคือใช้ Bugpatrol เป็น AI QA Layer เพิ่มเติมบน Testing Pipeline เดิม
#สรุป
Bugpatrol เป็นตัวอย่างที่น่าสนใจของการนำ Agentic AI มาใช้กับ Software Testing และ Software Engineering
แทนที่จะมีเพียง Agent ที่สร้าง Test Case ระบบแบ่งหน้าที่เป็น
Explorer
   ↓
Judge
   ↓
Fixer
   ↓
Retest
   ↓
GitHub
สำหรับการเริ่มต้นใช้งาน แนะนำลำดับดังนี้
npx bugpatrol init
npx bugpatrol explore
npx bugpatrol judge
npx bugpatrol dashboard
เมื่อมั่นใจแล้วจึงเปิด Fixer
npx bugpatrol fix
จากนั้น Preview GitHub Report
npx bugpatrol publish --dry-run
และเมื่อพร้อมจึงเปิด Continuous Patrol
npx bugpatrol
Bugpatrol จึงเหมาะทั้งสำหรับทีมพัฒนาที่ต้องการเพิ่ม AI เข้าไปใน QA Workflow และสำหรับการศึกษาแนวคิด Multi-Agent Software Testing, Autonomous Bug Detection และ Automated Program Repair
#แหล่งอ้างอิง
- GitHub Repository: https://github.com/agent-labs-dev/bugpatrol
- Getting Started: https://github.com/agent-labs-dev/bugpatrol/blob/main/docs/getting-started.md
- Configuration: https://github.com/agent-labs-dev/bugpatrol/blob/main/docs/configuration.md
- Commands: https://github.com/agent-labs-dev/bugpatrol/blob/main/docs/commands.md
- GitHub Integration: https://github.com/agent-labs-dev/bugpatrol/blob/main/docs/github.md
- Dashboard: https://github.com/agent-labs-dev/bugpatrol/blob/main/docs/dashboard.md
- Models: https://github.com/agent-labs-dev/bugpatrol/blob/main/docs/models.md