
- การใช้งาน Playwright CLI สำหรับ Browser Automation และ AI Coding Agents
- 1. จุดเด่นของ Playwright CLI
- 2. Playwright CLI ต่างจาก Playwright Test CLI อย่างไร
- 3. Playwright CLI กับ Playwright MCP
- 4. Requirements
- 5. การติดตั้ง Playwright CLI
- 6. Initialize Workspace
- 7. ติดตั้ง Browser
- 8. ติดตั้ง Skills สำหรับ Coding Agent
- 9. Quick Start
- 10. Core Workflow ของ Playwright CLI
- 11. Accessibility Snapshot และ Element Reference
- 12. ใช้ find เพื่อลด Context
- 13. Navigation Commands
- 14. Interaction Commands
- 15. Screenshot และ PDF
- 16. Browser Sessions
- 17. Dashboard
- 18. Storage และ Authentication
- 19. Network Inspection
- 20. Network Mocking
- 21. Console และ JavaScript
- 22. Tracing
- 23. Video Recording
- 24. Generate Locator
- 25. Highlight Element
- 26. ตัวอย่าง Login Workflow
- 27. ใช้ Playwright CLI กับ AI Coding Agent
- 28. ใช้งานโดยไม่ติดตั้ง Skills
- 29. Agentic Testing Workflow
- 30. Multi-user Testing ด้วย Named Sessions
- 31. JSON และ Raw Output
- 32. Best Practices
- 33. Workflow สำหรับทีม Software Testing
- 34. Command Cheat Sheet
- 35. สรุป
#การใช้งาน Playwright CLI สำหรับ Browser Automation และ AI Coding Agents
ในงานพัฒนาเว็บยุคที่ AI Coding Agents เข้ามาช่วยเขียนโค้ด ทดสอบระบบ และวิเคราะห์ข้อผิดพลาด เครื่องมือ Browser Automation ก็เริ่มถูกออกแบบให้ทำงานร่วมกับ Agent ได้โดยตรงมากขึ้น
Playwright CLI หรือแพ็กเกจ @playwright/cli เป็น Command-Line Interface สำหรับ Browser Automation ที่ Playwright ออกแบบมาโดยเฉพาะสำหรับ coding agents เช่น Claude Code, GitHub Copilot, Cursor และ Agent อื่นที่สามารถเรียกใช้ Shell Command ได้
จุดสำคัญคือ Agent สามารถเปิด Browser อ่านสถานะของหน้าเว็บ คลิก กรอกข้อมูล ตรวจสอบ Network เก็บ Screenshot บันทึก Trace และจัดการ Browser Session ผ่านคำสั่ง CLI ที่มีขนาดกระชับ ช่วยลด Context ที่ LLM ต้องใช้ระหว่างทำงาน
บทความนี้อ้างอิงเอกสาร Playwright Agent CLI ณ วันที่ 22 กันยายน 2026
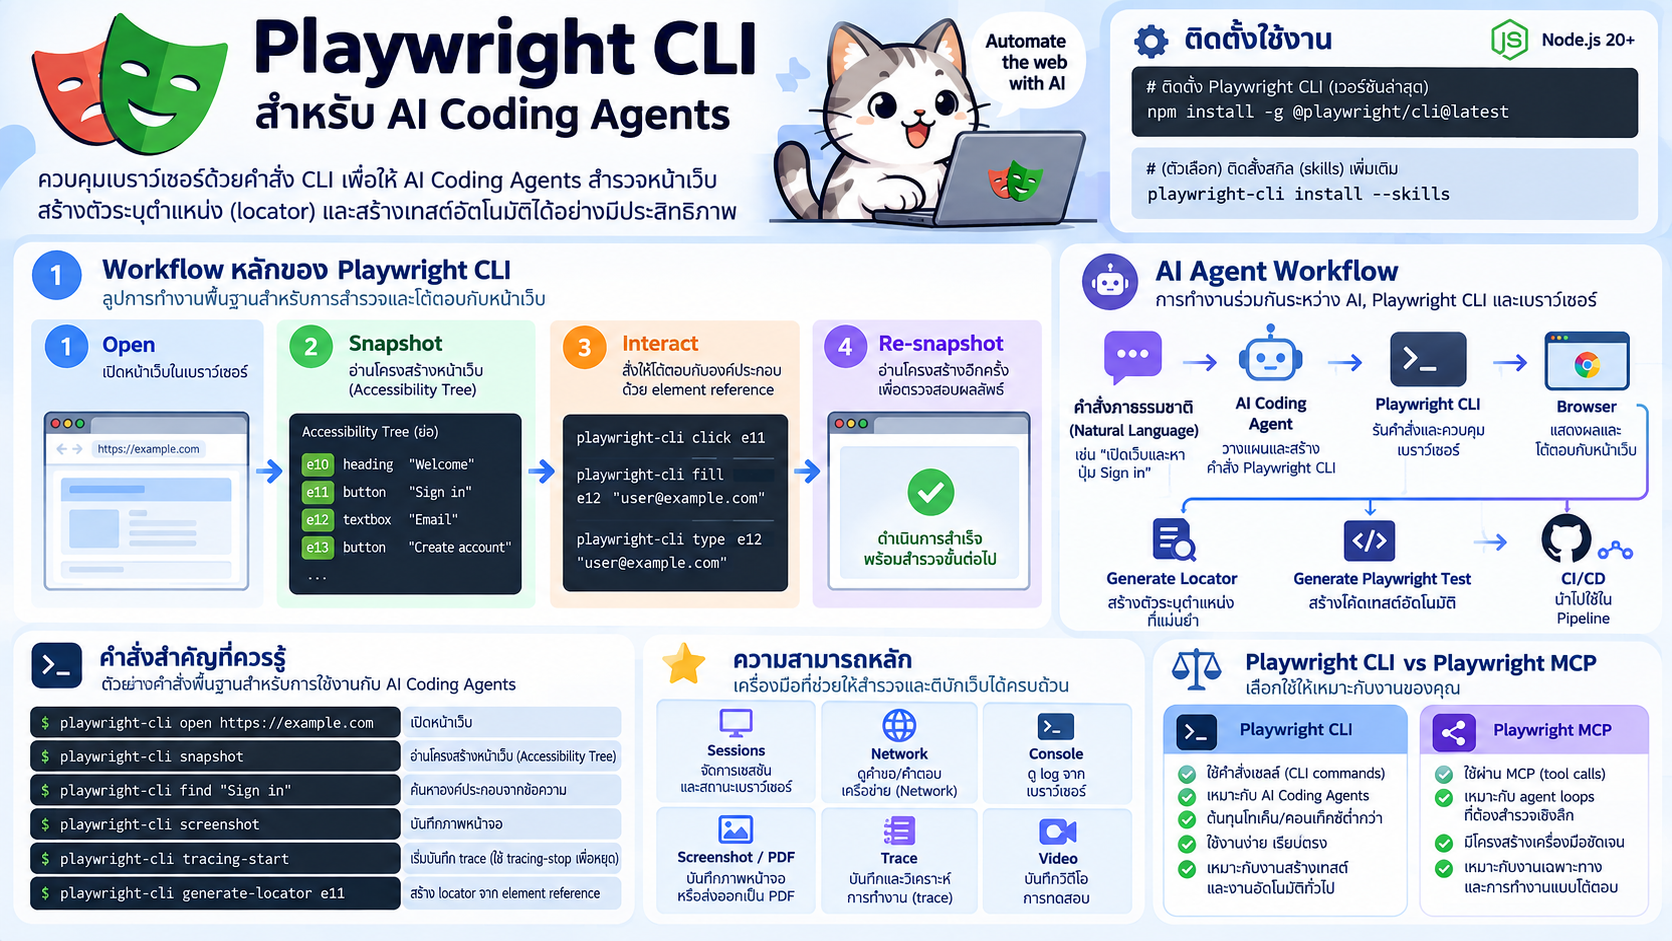
เอกสารอ้างอิงหลัก:
- https://playwright.dev/agent-cli/introduction
- https://playwright.dev/agent-cli/installation
- https://playwright.dev/agent-cli/quick-start
- https://playwright.dev/agent-cli/skills
- https://playwright.dev/agent-cli/capabilities
#Playwright CLI คืออะไร
Playwright CLI เป็น CLI สำหรับ Browser Automation ที่เน้นการใช้งานโดย coding agents โดย Agent จะเรียกคำสั่งผ่าน Shell เช่น
playwright-cli open https://demo.playwright.dev/todomvc --headed
playwright-cli type "Buy groceries"
playwright-cli press Enter
playwright-cli snapshot
playwright-cli screenshot
หลังแต่ละคำสั่ง CLI จะคืนสถานะของหน้าเว็บ พร้อม Accessibility Snapshot และ Element Reference ที่ Agent สามารถนำไปใช้กับคำสั่งต่อไปได้
ตัวอย่างเชิงแนวคิด:
- textbox "Email" [ref=e10]
- textbox "Password" [ref=e11]
- button "Sign in" [ref=e12]
จากนั้นใช้ Ref เหล่านี้ได้ เช่น
playwright-cli fill e10 "admin@example.com"
playwright-cli fill e11 "password123"
playwright-cli click e12
แนวทางนี้ช่วยให้ Agent ไม่ต้องรับ DOM หรือ HTML ขนาดใหญ่ของทั้งหน้าเข้า Context ทุกครั้ง
#1. จุดเด่นของ Playwright CLI
Playwright CLI มีแนวคิดสำคัญสำหรับ Agentic Browser Automation ดังนี้
- Token-efficient — Output กระชับ ช่วยลด Context ที่โมเดลต้องใช้
- Skill-based — Agent สามารถติดตั้ง Skill เพื่อเรียนรู้ Workflow และ Command ที่เกี่ยวข้อง
- Daemon architecture — Browser Process ทำงานต่อเนื่องระหว่างคำสั่ง
- Ref-based interaction — ใช้ Accessibility Snapshot และ Element Ref เพื่อควบคุม Element
- Cross-browser — รองรับ Chrome, Firefox, WebKit และ Microsoft Edge
- Sessions — สามารถแยก Browser Instance และ State หลายชุดได้
- Developer tools — มีคำสั่งสำหรับ Console, Network, Screenshot, PDF, Trace และ Video
#2. Playwright CLI ต่างจาก Playwright Test CLI อย่างไร
ชื่อของสองเครื่องมือนี้ใกล้กัน แต่เป้าหมายต่างกัน
#Playwright CLI
ตัวอย่าง:
playwright-cli open https://example.com
หรือถ้าใช้ Playwright ที่ติดตั้งอยู่ใน Project:
npx playwright cli open https://example.com
เหมาะสำหรับ
- AI Coding Agent
- Browser Exploration
- Interactive Browser Automation
- Debug UI
- วิเคราะห์ Network
- ตรวจสอบ Console
- Test Generation
- เก็บ Screenshot / Trace / Video
#Playwright Test CLI
ใช้คำสั่ง:
npx playwright test
เหมาะสำหรับ
- Automated Test Suite
- Regression Testing
- CI/CD
- Parallel Test
- Test Reporter
- Repeatable E2E Testing
จึงสามารถมอง Workflow ได้ว่า
playwright-cli
    ↓
Explore / Inspect / Debug / Generate Test
    ↓
npx playwright test
    ↓
Regression Test / CI/CD
#3. Playwright CLI กับ Playwright MCP
Playwright CLI และ Playwright MCP สามารถใช้กับ AI Agent ได้ทั้งคู่ แต่ Architecture ต่างกัน
| หัวข้อ | Playwright CLI | Playwright MCP |
|---|---|---|
| การเรียกใช้ | Shell Command | MCP Tool Call |
| เหมาะกับ | Coding Agent ที่ทำงานกับ Codebase | Specialized Agentic Loop / Exploratory Automation |
| Context Cost | ต่ำกว่า | สูงกว่า เพราะมี Tool Schema และ Snapshot ใน Context |
| Element Interaction | Snapshot + Ref | Structured MCP Tools |
| Default Mode | Headless | Headed |
| Setup | npm package | MCP Client Configuration |
Playwright CLI จึงเหมาะกับ Coding Agent ที่ต้องแบ่ง Context ไปใช้ทั้งกับ Codebase, การ Reasoning และ Browser Automation
#4. Requirements
Playwright CLI ต้องการ
Node.js 20 หรือใหม่กว่า
ตรวจสอบเวอร์ชัน:
node --version
npm --version
Coding Agent ที่เอกสารระบุว่าสามารถใช้ Skills ได้ เช่น
- Claude Code
- GitHub Copilot
- Cursor
- Coding Agent อื่นที่รองรับ Local Skills
#5. การติดตั้ง Playwright CLI
#วิธีที่ 1: ติดตั้งแบบ Global
npm install -g @playwright/cli@latest
ตรวจสอบ:
playwright-cli --version
ดูคำสั่งทั้งหมด:
playwright-cli --help
#วิธีที่ 2: ใช้ Playwright ที่มีอยู่ใน Project
ตรวจสอบว่า Project มี Playwright อยู่แล้วหรือไม่:
npx --no-install playwright --version
จากนั้นใช้:
npx playwright cli --help
ตามเอกสารทางการ คำสั่ง
playwright-cli <command>
สามารถใช้รูปแบบ
npx playwright cli <command>
แทนได้เมื่อใช้ Playwright จาก Project
#6. Initialize Workspace
รัน:
playwright-cli install
คำสั่งนี้ใช้ Initialize Workspace โดยจะสร้าง Directory .playwright ใน Current Working Directory เพิ่มลง .gitignore และดาวน์โหลด Browser ที่ตั้งค่าไว้หากยังไม่มี
ตัวอย่างโครงสร้าง:
my-project/
├── src/
├── tests/
├── package.json
├── .playwright/
└── .gitignore
#7. ติดตั้ง Browser
Playwright CLI สามารถดาวน์โหลด Browser อัตโนมัติเมื่อใช้งานครั้งแรก แต่สามารถติดตั้งเองได้
playwright-cli install-browser
ติดตั้ง Firefox โดยเฉพาะ:
playwright-cli install-browser firefox
Linux ที่ต้องการ System Dependencies:
playwright-cli install-browser --with-deps
ดูรายการ Browser:
playwright-cli install-browser --list
#8. ติดตั้ง Skills สำหรับ Coding Agent
Playwright CLI มีระบบ Skills เพื่อให้ Coding Agent เข้าใจ Command Surface และ Workflow ของ Playwright CLI
สำหรับ Claude Code:
playwright-cli install --skills
หรือ:
playwright-cli install --skills=claude
จะติดตั้งไว้ที่:
.claude/skills/playwright-cli
สำหรับ Agent ที่ใช้ .agents/skills:
playwright-cli install --skills=agents
จะติดตั้งไว้ที่:
.agents/skills/playwright-cli
ติดตั้งแบบ Global:
playwright-cli install --skills -g
Skills ครอบคลุมหัวข้อ เช่น
- Browser Interaction
- Snapshot และ Ref
- Session Management
- Request Mocking
- Storage State
- Test Generation
- Tracing
- Video Recording
- การรัน Playwright Code
#9. Quick Start
เปิด TodoMVC แบบเห็น Browser:
playwright-cli open https://demo.playwright.dev/todomvc/ --headed
พิมพ์ Todo:
playwright-cli type "Buy groceries"
กด Enter:
playwright-cli press Enter
เพิ่มรายการที่สอง:
playwright-cli type "Water flowers"
playwright-cli press Enter
ดู Snapshot:
playwright-cli snapshot
ถ้า Checkbox มี Ref เช่น e21:
playwright-cli check e21
จับ Screenshot:
playwright-cli screenshot
ปิด Browser:
playwright-cli close
e21เป็นเพียงตัวอย่าง Ref ต้องใช้ค่าที่ได้จาก Snapshot ของ Session ปัจจุบัน
#10. Core Workflow ของ Playwright CLI
Workflow หลักคือ
Open
  ↓
Snapshot
  ↓
อ่าน Element Refs
  ↓
Interact
  ↓
Re-snapshot
  ↓
Validate / Continue
เขียนเป็น Mermaid ได้ดังนี้
flowchart LR
    A[Open Browser] --> B[Snapshot]
    B --> C[Read Element Refs]
    C --> D[Click / Fill / Type]
    D --> E[Updated Snapshot]
    E --> F{Finished?}
    F -- No --> C
    F -- Yes --> G[Screenshot / Trace / Close]
หลักสำคัญคือหลัง Interaction หน้าเว็บอาจเปลี่ยนและ Ref อาจเปลี่ยนตาม จึงควรใช้ State หรือ Snapshot ล่าสุดเสมอ
#11. Accessibility Snapshot และ Element Reference
เมื่อเปิดหน้าเว็บ:
playwright-cli open https://example.com
หรือรัน:
playwright-cli snapshot
CLI จะคืนข้อมูล Current Page และ Snapshot ของ Accessibility Tree พร้อม Ref
ตัวอย่างเชิงแนวคิด:
- textbox "Email" [ref=e10]
- textbox "Password" [ref=e11]
- button "Sign in" [ref=e12]
จากนั้นใช้ Ref:
playwright-cli fill e10 "admin@example.com"
playwright-cli fill e11 "password123"
playwright-cli click e12
หลัง Click หรือ Navigation ควรอ่าน State ใหม่ก่อนใช้ Ref ต่อ
#12. ใช้ find เพื่อลด Context
ถ้าหน้าเว็บมี Accessibility Tree ขนาดใหญ่ สามารถใช้ find เพื่อค้นหาเฉพาะ Element ที่ต้องการ
playwright-cli find "Sign in"
รองรับ Regular Expression:
playwright-cli find --regex "/sign (in|up)/i"
แนวทางนี้มีประโยชน์สำหรับ AI Agent เพราะช่วยลดข้อมูลที่ต้องประมวลผล
#13. Navigation Commands
เปิด Browser:
playwright-cli open https://example.com
ไป URL ใหม่:
playwright-cli goto https://example.com/login
ย้อนกลับ:
playwright-cli go-back
ไปข้างหน้า:
playwright-cli go-forward
Reload:
playwright-cli reload
#14. Interaction Commands
#Click
playwright-cli click e15
Double Click:
playwright-cli dblclick e15
#Fill
playwright-cli fill e20 "user@example.com"
#Type
playwright-cli type "Hello Playwright"
type จะพิมพ์ข้อความไปยัง Editable Element ที่กำลัง Focus
#Keyboard
playwright-cli press Enter
playwright-cli press Tab
playwright-cli press Escape
#Checkbox
playwright-cli check e30
ยกเลิก:
playwright-cli uncheck e30
#Select
playwright-cli select e40 "Thailand"
#Hover
playwright-cli hover e50
#15. Screenshot และ PDF
จับ Screenshot:
playwright-cli screenshot
จับเฉพาะ Element:
playwright-cli screenshot e15
บันทึกหน้าเป็น PDF:
playwright-cli pdf
เหมาะกับ
- Test Evidence
- Bug Report
- Visual Inspection
- Training Material
- Agent-generated Report
#16. Browser Sessions
Playwright CLI รองรับ Browser Session หลายชุดโดยแยก State ออกจากกัน
Session ของ Admin:
playwright-cli -s=admin open https://example.com
Session ของ User:
playwright-cli -s=user open https://example.com
ดู Session:
playwright-cli list
ปิด Session ปัจจุบัน:
playwright-cli close
ปิดทั้งหมด:
playwright-cli close-all
หาก Process ค้าง:
playwright-cli kill-all
เหมาะกับการทดสอบหลาย Role เช่น
Admin
User
Guest
Teacher
Student
Buyer
Seller
#17. Dashboard
Playwright CLI มีคำสั่ง:
playwright-cli show
ใช้เปิด Dashboard สำหรับตรวจสอบ Browser Sessions และช่วยดูว่า Agent กำลังทำอะไรระหว่าง Browser Automation
#18. Storage และ Authentication
หลัง Login แล้วสามารถบันทึก Browser State ได้
playwright-cli state-save auth.json
Session ใหม่สามารถ Load:
playwright-cli state-load auth.json
Workflow:
Login
  ↓
Save State
  ↓
Close Browser
  ↓
New Session
  ↓
Load State
  ↓
Continue Testing
CLI ยังมีคำสั่งจัดการ Cookies และ Web Storage เช่น
playwright-cli cookie-list
playwright-cli localstorage-list
playwright-cli sessionstorage-list
#19. Network Inspection
ดู Network Requests:
playwright-cli requests
ดูรายละเอียด Request:
playwright-cli request 0
ดู Request Headers:
playwright-cli request-headers 0
ดู Request Body:
playwright-cli request-body 0
ดู Response Headers:
playwright-cli response-headers 0
ดู Response Body:
playwright-cli response-body 0
เหมาะสำหรับตรวจสอบ
- REST API
- GraphQL
- Authentication Headers
- Payload
- Backend Response
- Failed API Request
#20. Network Mocking
CLI รองรับการ Intercept Request ผ่าน Route
playwright-cli route "**/api/users"
ดูรายการ Route:
playwright-cli route-list
ยกเลิก Route:
playwright-cli unroute "**/api/users"
เหมาะสำหรับทดสอบ
- API Error
- Empty State
- Network Failure
- Backend Unavailable
- Frontend Error Handling
สำหรับ Syntax และ Option ของการ Mock Response ควรตรวจสอบจาก Help ของ Version ที่ใช้งาน:
playwright-cli --help route
#21. Console และ JavaScript
ดู Browser Console:
playwright-cli console
เช่นดู Error ขึ้นไป:
playwright-cli console error
Evaluate JavaScript:
playwright-cli eval "() => document.title"
รัน Playwright Code:
playwright-cli run-code "async page => await page.title()"
ตรวจสอบ Syntax ของ Version ปัจจุบัน:
playwright-cli --help run-code
#22. Tracing
เริ่ม Trace:
playwright-cli tracing-start
ทำ Workflow ตามต้องการ แล้วหยุด:
playwright-cli tracing-stop
Trace มีประโยชน์มากกับการวิเคราะห์ Failure เพราะช่วยเก็บข้อมูลลำดับการทำงานของ Browser เพื่อใช้ Debug ภายหลัง
#23. Video Recording
เริ่มบันทึก Video:
playwright-cli video-start demo.webm
เพิ่ม Chapter:
playwright-cli video-chapter "Login"
หยุด:
playwright-cli video-stop
เหมาะสำหรับ
- Demo
- Training
- Bug Reproduction
- Test Evidence
#24. Generate Locator
เมื่อพบ Element แล้ว สามารถขอ Locator ได้
playwright-cli generate-locator e15
Feature นี้เป็นจุดเชื่อมระหว่าง Browser Exploration กับ Automated Test
Agent สำรวจ UI
      ↓
พบ Element
      ↓
Generate Locator
      ↓
สร้าง Playwright Test
#25. Highlight Element
ใช้:
playwright-cli highlight e15
เพื่อช่วยตรวจสอบว่า Ref ที่กำลังใช้อยู่ตรงกับ UI Element ที่ต้องการหรือไม่
#26. ตัวอย่าง Login Workflow
เปิดหน้า Login:
playwright-cli open https://example.com/login --headed
อ่าน Snapshot:
playwright-cli snapshot
สมมติพบ:
Email      e10
Password   e11
Login      e12
กรอกข้อมูล:
playwright-cli fill e10 "admin@example.com"
playwright-cli fill e11 "password123"
playwright-cli click e12
อ่าน State ใหม่:
playwright-cli snapshot
ค้นหา Dashboard:
playwright-cli find "Dashboard"
เก็บหลักฐาน:
playwright-cli screenshot
บันทึก Authentication State:
playwright-cli state-save auth.json
ปิด Browser:
playwright-cli close
#27. ใช้ Playwright CLI กับ AI Coding Agent
หลังติดตั้ง Skills สามารถสั่ง Agent ด้วย Natural Language ได้ เช่น
Use Playwright CLI to test the login flow.

Open https://example.com/login.

Test:
1. valid login
2. invalid password
3. empty email
4. empty password

For failing scenarios:
- capture screenshots
- inspect console errors
- inspect failed network requests
- report the observed behavior
Agent จะสามารถใช้คำสั่ง Playwright CLI เพื่อดำเนิน Workflow ตามเป้าหมายได้
#28. ใช้งานโดยไม่ติดตั้ง Skills
Playwright CLI สามารถใช้งานได้แม้ไม่ได้ติดตั้ง Skills
ตัวอย่าง Prompt:
Test the add-todo flow on
https://demo.playwright.dev/todomvc
using playwright-cli.

Check playwright-cli --help
for available commands.
Agent สามารถค้นหา Command จาก:
playwright-cli --help
หรือดู Help รายคำสั่ง:
playwright-cli --help screenshot
#29. Agentic Testing Workflow
flowchart TD
    A[Developer gives testing goal] --> B[AI Coding Agent]
    B --> C[playwright-cli open]
    C --> D[Accessibility Snapshot]
    D --> E[Agent analyzes refs]
    E --> F[click / fill / type]
    F --> G[Updated Snapshot]
    G --> H{Expected state?}
    H -- No --> I[Collect Screenshot / Console / Network / Trace]
    H -- Yes --> J[Continue Scenario]
    I --> K[Analyze Failure]
    J --> L[Generate Playwright Test]
ตัวอย่าง Prompt:
Use Playwright CLI to inspect the registration workflow.

Test successful and invalid submissions.

For each issue:
- capture screenshot
- inspect console errors
- inspect failed API requests
- identify the affected element
- propose a Playwright Test regression case
#30. Multi-user Testing ด้วย Named Sessions
ตัวอย่างระบบ Approval
เปิด Session ของ Admin:
playwright-cli -s=admin open https://example.com --headed
เปิด Session ของ User:
playwright-cli -s=user open https://example.com --headed
ตรวจสอบ Admin:
playwright-cli -s=admin snapshot
ตรวจสอบ User:
playwright-cli -s=user snapshot
เหมาะกับ
- Chat Application
- Approval Workflow
- Buyer / Seller
- Teacher / Student
- Admin / User
- Collaborative Application
#31. JSON และ Raw Output
CLI มี Global Options ที่เหมาะกับ Scripting
JSON:
playwright-cli list --json
Raw Output:
playwright-cli --raw snapshot
Redirect ไป File:
playwright-cli --raw snapshot > before.yml
เหมาะกับ
- Shell Script
- CI Pipeline
- Custom Agent Workflow
- Data Processing
#32. Best Practices
#32.1 ใช้ Snapshot ก่อน Interaction
ไม่ควรเดา Ref ของ Element
ควรเริ่มจาก:
playwright-cli snapshot
แล้วใช้ Ref ที่พบ:
playwright-cli click <ref>
#32.2 ใช้ State ล่าสุดหลัง UI เปลี่ยน
Ref อาจเปลี่ยนหลัง
- Navigation
- Modal เปิด/ปิด
- Form Submit
- SPA Re-render
- Dynamic Content Update
ดังนั้นควรใช้ Snapshot หรือ State ล่าสุดก่อน Interaction ถัดไป
#32.3 ใช้ find กับหน้าใหญ่
ถ้าต้องการ Element เดียว:
playwright-cli find "Checkout"
ช่วยลดข้อมูลที่ Agent ต้องอ่าน
#32.4 ใช้ Named Session สำหรับหลาย Role
-s=admin
-s=user
-s=guest
ช่วยให้ Authentication และ Browser State แยกจากกันชัดเจน
#32.5 เก็บ Evidence เมื่อเกิด Failure
แนะนำให้เก็บ
Screenshot
Console
Network
Trace
Video
เพื่อช่วยวิเคราะห์ Root Cause
#32.6 แยก Exploration ออกจาก Regression Test
Playwright CLI เหมาะกับการสำรวจระบบและ Agent Interaction
เมื่อ Workflow เสถียรแล้ว ควรสร้าง Playwright Test เช่น
import { test, expect } from '@playwright/test';

test('user can login', async ({ page }) => {
  await page.goto('https://example.com/login');

  await page.getByLabel('Email').fill('admin@example.com');
  await page.getByLabel('Password').fill('password123');

  await page.getByRole('button', { name: 'Login' }).click();

  await expect(page.getByText('Dashboard')).toBeVisible();
});
จากนั้นรัน:
npx playwright test
และนำไปใช้ใน CI/CD
#33. Workflow สำหรับทีม Software Testing
แนวทางที่แนะนำ:
1. Explore
   AI Agent + Playwright CLI
          ↓
2. Diagnose
   Snapshot + Console + Network + Trace
          ↓
3. Generate
   Locator + Playwright Test
          ↓
4. Automate
   GitHub Actions / GitLab CI / Jenkins
Playwright CLI จึงไม่ได้มาแทน Playwright Test แต่ทำหน้าที่เป็น Agentic Layer สำหรับการสำรวจ Debug และสร้าง Test ก่อนนำเข้าสู่ Automated Regression Suite
#34. Command Cheat Sheet
| งาน | คำสั่ง |
|---|---|
| Help | playwright-cli --help |
| Version | playwright-cli --version |
| Initialize | playwright-cli install |
| Install Skills | playwright-cli install --skills |
| Install Browser | playwright-cli install-browser |
| Open | playwright-cli open <url> |
| Open Headed | playwright-cli open <url> --headed |
| Navigate | playwright-cli goto <url> |
| Snapshot | playwright-cli snapshot |
| Find | playwright-cli find "text" |
| Click | playwright-cli click <ref> |
| Fill | playwright-cli fill <ref> "value" |
| Type | playwright-cli type "text" |
| Press Key | playwright-cli press Enter |
| Check | playwright-cli check <ref> |
| Screenshot | playwright-cli screenshot |
playwright-cli pdf |
|
| Sessions | playwright-cli list |
| Dashboard | playwright-cli show |
| Save State | playwright-cli state-save auth.json |
| Load State | playwright-cli state-load auth.json |
| Requests | playwright-cli requests |
| Console | playwright-cli console |
| Start Trace | playwright-cli tracing-start |
| Stop Trace | playwright-cli tracing-stop |
| Generate Locator | playwright-cli generate-locator <ref> |
| Highlight | playwright-cli highlight <ref> |
| Close | playwright-cli close |
| Close All | playwright-cli close-all |
#35. สรุป
Playwright CLI เป็น Browser Automation CLI ที่ออกแบบโดยคำนึงถึง AI Coding Agents โดยตรง จุดเด่นคือใช้ Shell Command ที่กระชับ, Accessibility Snapshot, Element Ref, Skills และ Persistent Browser Process ทำให้ Agent สามารถทำงานกับ Browser โดยใช้ Context อย่างมีประสิทธิภาพ
เหมาะกับงาน
- Browser Exploration
- Agentic Testing
- UI Debugging
- Test Case Execution แบบ Interactive
- Network และ Console Inspection
- Test Generation
- Multi-user Workflow
- Authentication State Reuse
- Screenshot / Trace / Video Evidence
แนวทางการใช้งานที่เหมาะสมคือ
Natural Language
       ↓
AI Coding Agent
       ↓
Playwright CLI
       ↓
Browser Exploration
       ↓
Generate Locator / Test
       ↓
Playwright Test
       ↓
CI/CD
เมื่อนำ Playwright CLI มาใช้ร่วมกับ Playwright Test จะได้ Workflow ที่ครอบคลุมตั้งแต่ สำรวจระบบด้วย Agent → วิเคราะห์ Failure → สร้าง Regression Test → รันอัตโนมัติใน CI/CD ซึ่งเหมาะกับกระบวนการพัฒนาและทดสอบ Software แบบ Agentic ในปัจจุบัน
#References
-
Playwright CLI — Introduction
https://playwright.dev/agent-cli/introduction -
Playwright CLI — Installation
https://playwright.dev/agent-cli/installation -
Playwright CLI — Quick Start
https://playwright.dev/agent-cli/quick-start -
Playwright CLI — Skills
https://playwright.dev/agent-cli/skills -
Playwright CLI — Command Reference
https://playwright.dev/agent-cli/capabilities