
- 1. gRPC คืออะไร
- 2. gRPC ต่างจาก REST อย่างไร
- 3. Architecture ที่จะสร้าง
- Workshop: Laravel gRPC Server
- 4. สิ่งที่ต้องมี
- 5. สร้าง Laravel Project
- 6. ติดตั้ง RoadRunner Laravel Bridge
- 7. ติดตั้งเครื่องมือสำหรับ Generate gRPC PHP Code
- 8. สร้าง Protocol Buffer Contract
- 9. Generate PHP Classes จาก .proto
- 10. เพิ่ม Namespace ให้ Composer Autoload
- 11. Implement gRPC Service ใน Laravel
- 12. Register gRPC Service กับ Laravel Bridge
- 13. ตั้งค่า RoadRunner
- 14. Start gRPC Server
- 15. ทดสอบด้วย grpcurl
- Workshop 2: gRPC + Laravel Eloquent
- 18. Validation และ Error Handling
- 19. Authentication ด้วย Metadata
- 20. Logging Interceptor
- 21. gRPC Streaming
- 22. Health Check
- 23. TLS / mTLS
- 24. Production Architecture
- 25. Folder Structure ที่แนะนำ
- 26. Versioning ของ gRPC API
- 27. Testing Strategy
- 28. ข้อดีของ Laravel + gRPC
- 29. ข้อควรระวัง
- 30. เมื่อไรควรใช้ Laravel gRPC
- 31. สรุป
- Quick Command Summary
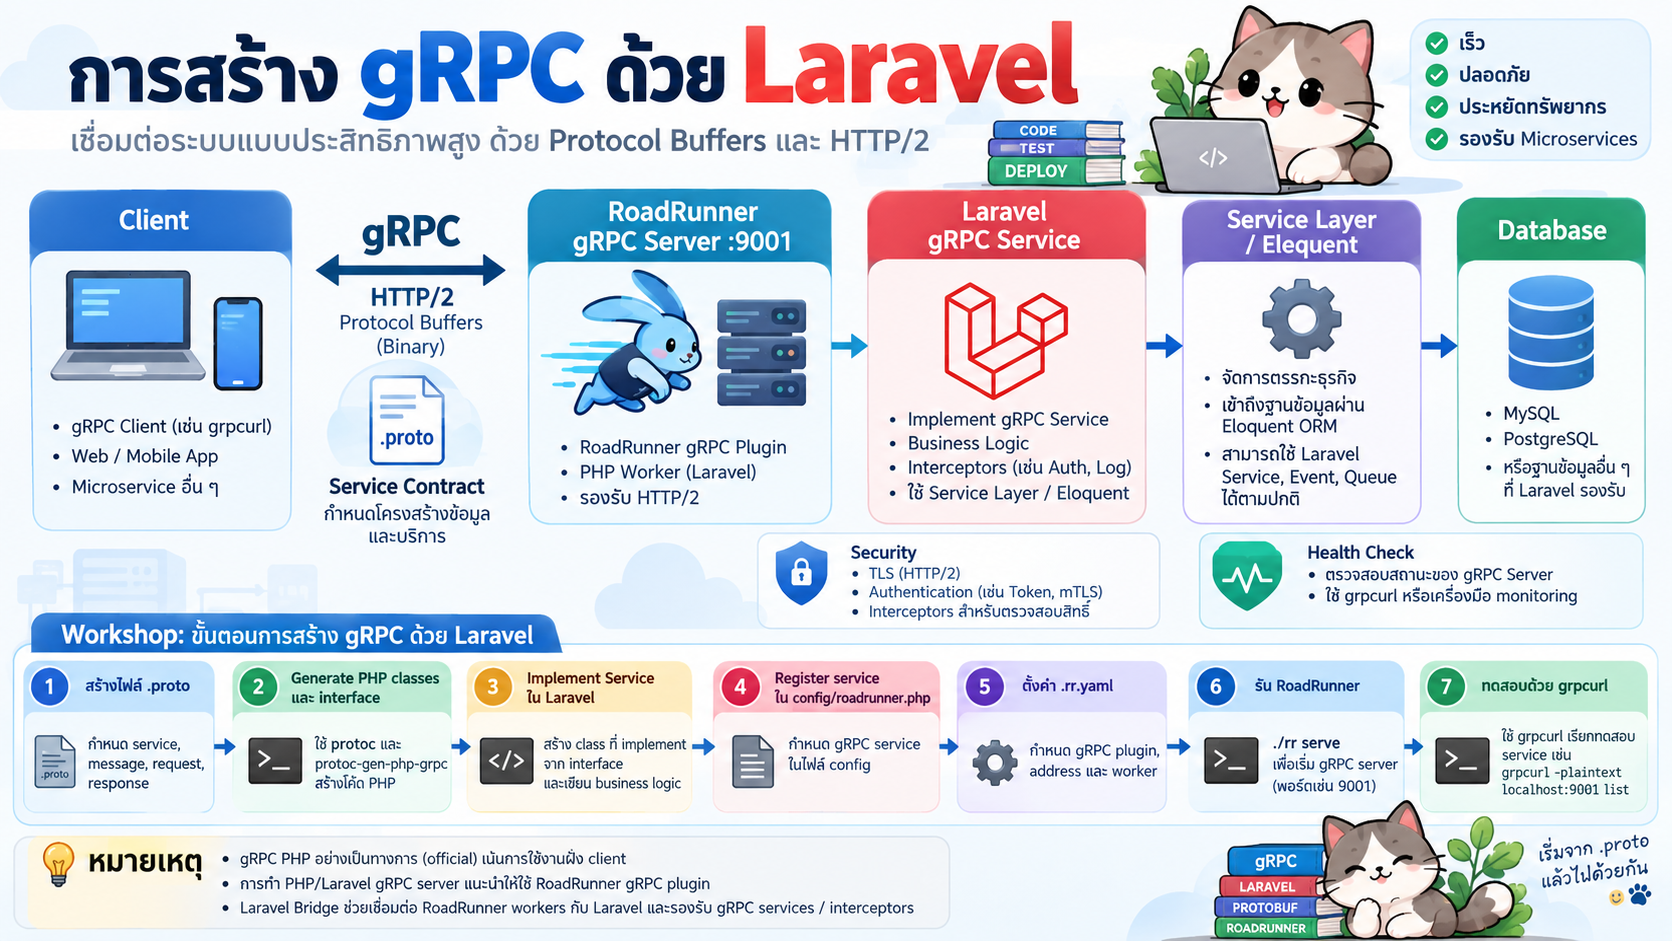
การพัฒนา API ด้วย Laravel มักเริ่มจาก REST API ที่สื่อสารผ่าน HTTP และ JSON แต่เมื่อระบบมีลักษณะเป็น Microservices, ต้องเรียกใช้งาน service ภายในจำนวนมาก หรือให้ความสำคัญกับ contract ที่ชัดเจนและ payload ที่กะทัดรัด gRPC เป็นอีกทางเลือกที่น่าสนใจ
บทความนี้จะสร้าง gRPC Server ด้วย Laravel โดยใช้ RoadRunner gRPC plugin และ Laravel Bridge พร้อม workshop แบบ Unary RPC ตั้งแต่การสร้าง .proto ไปจนถึงการทดสอบ service ด้วย grpcurl
หมายเหตุสำคัญ: gRPC PHP SDK อย่างเป็นทางการเน้นการสร้าง PHP client และเอกสาร official ระบุว่า PHP ไม่ได้สร้าง gRPC server โดยตรง ดังนั้น workshop นี้ใช้ RoadRunner เป็น gRPC application server แล้วส่ง request เข้า Laravel worker
#1. gRPC คืออะไร
gRPC คือ Remote Procedure Call framework ที่ทำให้ client เรียก method ของ service ที่อยู่คนละ process หรือคนละเครื่องได้คล้ายกับการเรียก method ภายในโปรแกรม
โดยทั่วไป gRPC ใช้:
- Protocol Buffers (Protobuf) เป็น Interface Definition Language และรูปแบบข้อมูล
- HTTP/2 เป็น transport
.protoเป็น contract กลางระหว่าง client และ server- Generated code ช่วยลดการเขียน DTO และ client stub ด้วยตนเอง
ตัวอย่างแนวคิด:
Client
   |
   |  gRPC / HTTP/2 / Protobuf
   v
RoadRunner gRPC Server :9001
   |
   v
Laravel gRPC Service
   |
   +--> Service Layer
   +--> Eloquent
   +--> Database
#2. gRPC ต่างจาก REST อย่างไร
| ประเด็น | REST | gRPC |
|---|---|---|
| Contract | OpenAPI เป็นตัวเลือก | .proto เป็นแกนหลัก |
| Transport | HTTP/1.1 หรือ HTTP/2 | HTTP/2 |
| Payload | มักใช้ JSON | Protocol Buffers |
| Human-readable | อ่านง่าย | ต้อง decode |
| Code generation | มีหรือไม่มีก็ได้ | เป็น workflow หลัก |
| Streaming | ต้องใช้เทคนิคเพิ่มเติม | รองรับโดย design |
| Browser | ใช้ง่าย | มักใช้ gRPC-Web / gateway |
| Internal microservices | ใช้ได้ | เหมาะมาก |
ไม่ได้หมายความว่า gRPC ต้องแทน REST เสมอไป ระบบจริงสามารถใช้ทั้งสองแบบได้ เช่น
Web / Mobile
     |
   REST
     |
API Gateway
     |
     +------ gRPC ------ User Service
     +------ gRPC ------ Order Service
     +------ gRPC ------ Payment Service
#3. Architecture ที่จะสร้าง
Workshop นี้สร้าง service ชื่อ Greeter มี method SayHello
+----------------+
| grpcurl/client |
+--------+-------+
         |
         | HTTP/2 + Protobuf
         v
+------------------------+
| RoadRunner gRPC :9001  |
+-----------+------------+
            |
            v
+------------------------+
| Laravel Worker         |
| GreeterService         |
+-----------+------------+
            |
            v
+------------------------+
| Laravel Service Layer  |
| Eloquent / Database    |
+------------------------+
#Workshop: Laravel gRPC Server
#4. สิ่งที่ต้องมี
ตัวอย่างนี้สมมติว่ามี:
- PHP ที่รองรับ Laravel รุ่นที่ใช้งาน
- Composer
- Laravel project
- Protocol Buffers Compiler (
protoc) - RoadRunner
grpcurlสำหรับทดสอบ
ตรวจสอบ PHP:
php -v
ตรวจสอบ Composer:
composer --version
ตรวจสอบ protoc:
protoc --version
#ติดตั้ง protoc บน macOS
brew install protobuf
#Ubuntu / Debian
sudo apt update
sudo apt install -y protobuf-compiler
#5. สร้าง Laravel Project
หากยังไม่มี project:
composer create-project laravel/laravel laravel-grpc
cd laravel-grpc
ทดสอบ Laravel:
php artisan about
#6. ติดตั้ง RoadRunner Laravel Bridge
ติดตั้ง integration package:
composer require roadrunner-php/laravel-bridge
publish configuration:
php artisan vendor:publish \
  --provider='Spiral\RoadRunnerLaravel\ServiceProvider' \
  --tag=config
ดาวน์โหลด RoadRunner binary:
./vendor/bin/dload get rr
เมื่อติดตั้งสำเร็จ root ของ project จะมี RoadRunner binary เช่น:
laravel-grpc/
├── app/
├── config/
├── proto/
├── public/
├── vendor/
├── .rr.yaml
└── rr
#7. ติดตั้งเครื่องมือสำหรับ Generate gRPC PHP Code
ติดตั้ง RoadRunner CLI และ Protobuf runtime:
composer require spiral/roadrunner-cli google/protobuf
ดาวน์โหลด protoc-gen-php-grpc:
./vendor/bin/rr download-protoc-binary
RoadRunner ใช้ plugin นี้สร้าง PHP service interface จาก .proto
#8. สร้าง Protocol Buffer Contract
สร้าง directory:
mkdir -p proto generated
สร้างไฟล์:
proto/greeter.proto
เนื้อหา:
syntax = "proto3";

package helloworld;

option php_namespace = "GRPC\\Greeter";
option php_metadata_namespace = "GRPC\\GPBMetadata";

service Greeter {
  rpc SayHello (HelloRequest) returns (HelloReply) {}
}

message HelloRequest {
  string name = 1;
}

message HelloReply {
  string message = 1;
}
Contract นี้ระบุว่า:
SayHello(HelloRequest) -> HelloReply
โดย request มี name และ response มี message
#9. Generate PHP Classes จาก .proto
บน macOS/Linux อาจใช้คำสั่ง:
protoc \
  --plugin=protoc-gen-php-grpc=./protoc-gen-php-grpc \
  --php_out=./generated \
  --php-grpc_out=./generated \
  proto/greeter.proto
หาก binary อยู่ใน PATH สามารถใช้:
protoc \
  --plugin=protoc-gen-php-grpc \
  --php_out=./generated \
  --php-grpc_out=./generated \
  proto/greeter.proto
หลัง generate จะได้ไฟล์ประมาณนี้:
generated/
└── GRPC/
    ├── GPBMetadata/
    └── Greeter/
        ├── GreeterInterface.php
        ├── HelloRequest.php
        └── HelloReply.php
ชื่อไฟล์จริงอาจแตกต่างเล็กน้อยตามเวอร์ชันของ generator แต่แนวคิดคือจะได้ message classes และ service interface
#10. เพิ่ม Namespace ให้ Composer Autoload
แก้ composer.json
{
  "autoload": {
    "psr-4": {
      "App\\": "app/",
      "GRPC\\": "generated/GRPC/"
    }
  }
}
จากนั้น:
composer dump-autoload
#11. Implement gRPC Service ใน Laravel
สร้าง directory:
mkdir -p app/GRPC
สร้างไฟล์:
app/GRPC/GreeterService.php
<?php

namespace App\GRPC;

use GRPC\Greeter\GreeterInterface;
use GRPC\Greeter\HelloReply;
use GRPC\Greeter\HelloRequest;
use Spiral\RoadRunner\GRPC;

final class GreeterService implements GreeterInterface
{
    public function SayHello(
        GRPC\ContextInterface $ctx,
        HelloRequest $in
    ): HelloReply {
        $name = trim($in->getName());

        if ($name === '') {
            $name = 'Laravel';
        }

        return new HelloReply([
            'message' => "Hello {$name} from Laravel gRPC!",
        ]);
    }
}
จุดสำคัญคือ class ของ Laravel implement interface ที่ generate จาก .proto
final class GreeterService implements GreeterInterface
ดังนั้น .proto จึงทำหน้าที่เป็น contract ระหว่าง client กับ server
#12. Register gRPC Service กับ Laravel Bridge
เปิด:
config/roadrunner.php
เพิ่ม service mapping ในส่วน grpc:
'grpc' => [
    'services' => [
        \GRPC\Greeter\GreeterInterface::class =>
            \App\GRPC\GreeterService::class,
    ],
],
แนวคิดคือ:
Generated Interface
       |
       v
GreeterInterface
       |
       | implemented by
       v
Laravel GreeterService
#13. ตั้งค่า RoadRunner
สร้างหรือแก้ไฟล์ .rr.yaml
version: "3"

rpc:
  listen: "tcp://127.0.0.1:6001"

server:
  command: "php vendor/bin/rr-worker start"

grpc:
  listen: "tcp://0.0.0.0:9001"
  proto:
    - "proto/greeter.proto"
  pool:
    num_workers: 4
    max_jobs: 1000

logs:
  level: debug
  mode: development
gRPC server จะ listen ที่:
localhost:9001
#14. Start gRPC Server
รัน:
./rr serve
แนวทางการทำงาน:
RoadRunner
   |
   +--> สร้าง Laravel workers
   |
   +--> เปิด gRPC :9001
   |
   +--> รับ HTTP/2 request
   |
   +--> ส่ง message ไป Laravel worker
#15. ทดสอบด้วย grpcurl
ติดตั้งบน macOS:
brew install grpcurl
เรียก SayHello โดยระบุ .proto:
grpcurl \
  -plaintext \
  -import-path proto \
  -proto greeter.proto \
  -d '{"name":"Naruapon"}' \
  localhost:9001 \
  helloworld.Greeter/SayHello
response ที่คาดหวัง:
{
  "message": "Hello Naruapon from Laravel gRPC!"
}
#Workshop 2: gRPC + Laravel Eloquent
ตัวอย่างต่อไปเพิ่ม UserService เพื่ออ่านข้อมูลจากฐานข้อมูล
#16. สร้าง User Contract
ไฟล์:
proto/user.proto
syntax = "proto3";

package user;

option php_namespace = "GRPC\\User";
option php_metadata_namespace = "GRPC\\UserMetadata";

service UserService {
  rpc GetUser (GetUserRequest) returns (UserReply) {}
}

message GetUserRequest {
  int64 id = 1;
}

message UserReply {
  int64 id = 1;
  string name = 2;
  string email = 3;
}
Generate อีกครั้ง:
protoc \
  --plugin=protoc-gen-php-grpc=./protoc-gen-php-grpc \
  --php_out=./generated \
  --php-grpc_out=./generated \
  proto/user.proto

composer dump-autoload
#17. Implement UserService
สร้าง:
app/GRPC/UserService.php
<?php

namespace App\GRPC;

use App\Models\User;
use GRPC\User\GetUserRequest;
use GRPC\User\UserReply;
use GRPC\User\UserServiceInterface;
use Spiral\RoadRunner\GRPC;

final class UserService implements UserServiceInterface
{
    public function GetUser(
        GRPC\ContextInterface $ctx,
        GetUserRequest $in
    ): UserReply {
        $user = User::query()->findOrFail($in->getId());

        return new UserReply([
            'id' => $user->id,
            'name' => $user->name,
            'email' => $user->email,
        ]);
    }
}
จากนั้น register:
'grpc' => [
    'services' => [
        \GRPC\Greeter\GreeterInterface::class =>
            \App\GRPC\GreeterService::class,

        \GRPC\User\UserServiceInterface::class =>
            \App\GRPC\UserService::class,
    ],
],
และเพิ่ม proto ใน .rr.yaml:
grpc:
  listen: "tcp://0.0.0.0:9001"
  proto:
    - "proto/greeter.proto"
    - "proto/user.proto"
restart server:
./rr serve
ทดสอบ:
grpcurl \
  -plaintext \
  -import-path proto \
  -proto user.proto \
  -d '{"id":1}' \
  localhost:9001 \
  user.UserService/GetUser
ตัวอย่าง response:
{
  "id": "1",
  "name": "Alice",
  "email": "alice@example.com"
}
#18. Validation และ Error Handling
gRPC ไม่ควรส่ง error เป็น JSON แบบ REST เช่น:
{
  "error": true,
  "message": "User not found"
}
ควรใช้ gRPC Status Code เช่น:
INVALID_ARGUMENTNOT_FOUNDUNAUTHENTICATEDPERMISSION_DENIEDINTERNALUNAVAILABLE
ใน production ควรสร้าง exception mapping หรือ interceptor เพื่อแปลง Laravel/domain exception ให้เป็น gRPC status ที่เหมาะสม
ตัวอย่าง conceptual flow:
ModelNotFoundException
        |
        v
gRPC Exception Mapper
        |
        v
NOT_FOUND
#19. Authentication ด้วย Metadata
REST มักใช้:
Authorization: Bearer TOKEN
gRPC สามารถส่งข้อมูลผ่าน metadata ได้เช่นกัน
authorization: Bearer TOKEN
แนวทางที่เหมาะคือใช้ gRPC Interceptor ตรวจสอบ token ก่อนเข้าสู่ service method
Client
  |
  | metadata: authorization
  v
Authentication Interceptor
  |
  +--> Invalid -> UNAUTHENTICATED
  |
  v
Laravel gRPC Service
Laravel Bridge รองรับ global interceptor และ service-specific interceptor ทำให้สามารถแยก authentication, logging, validation และ caching ออกจาก business logic ได้
#20. Logging Interceptor
ตัวอย่างแนวคิด:
<?php

namespace App\GRPC\Interceptors;

use Spiral\Interceptors\Context\CallContextInterface;
use Spiral\Interceptors\HandlerInterface;
use Spiral\Interceptors\InterceptorInterface;

final class LoggingInterceptor implements InterceptorInterface
{
    public function intercept(
        CallContextInterface $context,
        HandlerInterface $handler
    ): mixed {
        $method = $context->getTarget()->getPath();

        logger()->info('gRPC request', [
            'method' => $method,
        ]);

        $response = $handler->handle($context);

        logger()->info('gRPC response', [
            'method' => $method,
        ]);

        return $response;
    }
}
register เป็น global interceptor:
'grpc' => [
    'services' => [
        // ...
    ],

    'interceptors' => [
        \App\GRPC\Interceptors\LoggingInterceptor::class,
    ],
],
#21. gRPC Streaming
gRPC ออกแบบให้รองรับ 4 รูปแบบหลัก:
1. Unary RPC
Client ------ Request ------> Server
Client <----- Response ------ Server

2. Server Streaming
Client ------ Request ------> Server
Client <----- Response 1 ---- Server
Client <----- Response 2 ---- Server
Client <----- Response 3 ---- Server

3. Client Streaming
Client ------ Request 1 ----> Server
Client ------ Request 2 ----> Server
Client ------ Request 3 ----> Server
Client <----- Response ------ Server

4. Bidirectional Streaming
Client <-----> Server
       stream
สำหรับระบบ Laravel ควรเริ่มจาก Unary RPC ก่อน และใช้ streaming เมื่อ use case ต้องการจริง เช่น telemetry, event stream หรือข้อมูลขนาดใหญ่ต่อเนื่อง
#22. Health Check
RoadRunner gRPC server มี standard gRPC health service ทำให้เหมาะกับระบบ container และ Kubernetes
ตัวอย่างตรวจสุขภาพ:
grpc-health-probe -addr=127.0.0.1:9001
แนวคิด Kubernetes:
livenessProbe:
  exec:
    command:
      - grpc-health-probe
      - -addr=:9001
  initialDelaySeconds: 5
  periodSeconds: 10
#23. TLS / mTLS
Production ไม่ควรใช้ -plaintext
RoadRunner รองรับ TLS configuration เช่น:
grpc:
  listen: "tcp://0.0.0.0:9001"

  proto:
    - "proto/greeter.proto"

  tls:
    key: "certs/server-key.pem"
    cert: "certs/server-cert.pem"
และสามารถเพิ่ม mTLS:
  tls:
    key: "certs/server-key.pem"
    cert: "certs/server-cert.pem"
    root_ca: "certs/ca.pem"
    client_auth_type: require_and_verify_client_cert
#24. Production Architecture
ตัวอย่าง deployment:
                 +------------------+
                 | API Gateway      |
                 | Kong / Envoy     |
                 +--------+---------+
                          |
          +---------------+---------------+
          |                               |
          v                               v
+--------------------+          +--------------------+
| Laravel REST API   |          | Laravel gRPC      |
| Nginx / Octane     |          | RoadRunner :9001  |
+---------+----------+          +---------+----------+
          |                               |
          +---------------+---------------+
                          |
                          v
                    +-----------+
                    | Database  |
                    +-----------+
หรือใน microservices:
Frontend
   |
   v
API Gateway
   |
   +---- REST ---- Laravel BFF
   |
   +---- gRPC ---- User Service
   |
   +---- gRPC ---- Order Service
   |
   +---- gRPC ---- Payment Service
#25. Folder Structure ที่แนะนำ
laravel-grpc/
├── app/
│   ├── GRPC/
│   │   ├── GreeterService.php
│   │   ├── UserService.php
│   │   └── Interceptors/
│   │       ├── AuthenticationInterceptor.php
│   │       └── LoggingInterceptor.php
│   ├── Models/
│   └── Services/
├── config/
│   └── roadrunner.php
├── generated/
│   └── GRPC/
├── proto/
│   ├── greeter.proto
│   └── user.proto
├── tests/
├── .rr.yaml
├── composer.json
└── rr
หลักการสำคัญคือแยก:
.proto contract
      ↓
Generated interface / message
      ↓
Transport implementation
      ↓
Application service
      ↓
Domain / Eloquent
ไม่ควรใส่ business logic จำนวนมากไว้ใน gRPC handler โดยตรง
#26. Versioning ของ gRPC API
แนะนำให้ version package ตั้งแต่เริ่มต้น เช่น:
package user.v1;
ตัวอย่าง:
syntax = "proto3";

package user.v1;

service UserService {
  rpc GetUser(GetUserRequest) returns (UserReply);
}
เมื่อพัฒนา version ใหม่:
user.v1.UserService
user.v2.UserService
Protocol Buffers มีหลักสำคัญคือ อย่านำ field number ที่ใช้งานแล้วกลับมาใช้ใหม่
เช่น:
message UserReply {
  int64 id = 1;
  string name = 2;
  string email = 3;
}
ถ้าเลิกใช้ email = 3 ควร reserve:
message UserReply {
  reserved 3;
  reserved "email";

  int64 id = 1;
  string name = 2;
}
#27. Testing Strategy
ระบบ gRPC ควรมี test หลายระดับ
Unit Test
   |
   v
Laravel Application Service
   |
   v
Integration Test
   |
   v
gRPC Service Handler
   |
   v
Contract / End-to-End Test
   |
   v
RoadRunner gRPC Endpoint
ตัวอย่าง pipeline:
Git Push
   |
   v
Lint .proto
   |
   v
Generate PHP
   |
   v
composer test
   |
   v
Start RoadRunner
   |
   v
grpcurl Smoke Test
   |
   v
Build Container
#28. ข้อดีของ Laravel + gRPC
#Contract ชัดเจน
.proto ทำหน้าที่เป็น interface ระหว่าง service
#Payload กะทัดรัด
Protocol Buffers เป็น binary format และโดยทั่วไปมี overhead ต่ำกว่า JSON
#Code generation
สามารถ generate client/server contract สำหรับหลายภาษา เช่น Go, Java, Python, PHP และ C#
#เหมาะกับ Microservices
service ภายในสามารถสื่อสารแบบ strongly-defined contract
#Streaming
gRPC รองรับ streaming เป็นส่วนหนึ่งของ protocol
#Observability
RoadRunner รองรับ metrics และ OpenTelemetry integration สำหรับ gRPC
#29. ข้อควรระวัง
#PHP official gRPC server limitation
PHP gRPC SDK ทางการเน้น client ดังนั้น Laravel server ต้องอาศัย application server/integration เพิ่มเติม เช่น RoadRunner
#Debug ยากกว่า JSON
Protobuf เป็น binary จึงควรใช้เครื่องมือ เช่น:
- grpcurl
- grpc-client-cli
- grpcui
- Postman gRPC client
#Schema governance
ต้องควบคุม .proto ให้ดี โดยเฉพาะ field number และ breaking changes
#Browser
Browser ไม่ได้เรียก native gRPC แบบ backend-to-backend ได้ตรงไปตรงมาเสมอไป หากต้องให้ browser เรียกควรพิจารณา gRPC-Web หรือ API gateway
#Long-running workers
RoadRunner ใช้ persistent workers จึงต้องระวัง state ที่ค้างข้าม request และ dependency ที่ไม่ได้ออกแบบสำหรับ long-running process
#30. เมื่อไรควรใช้ Laravel gRPC
เหมาะกับ:
✓ Internal microservices
✓ Service-to-service communication
✓ ระบบที่ต้องการ typed contract
✓ Backend ที่มีหลายภาษา
✓ High-throughput internal APIs
✓ Streaming use cases
REST อาจเหมาะกว่าเมื่อ:
✓ Public API
✓ Browser-first API
✓ CRUD ทั่วไป
✓ ต้องการ debug ด้วย JSON ง่าย ๆ
✓ Third-party integration ที่รองรับ REST เป็นหลัก
#31. สรุป
การสร้าง gRPC ด้วย Laravel สามารถทำได้โดยให้ RoadRunner ทำหน้าที่เป็น gRPC server และใช้ Laravel Bridge เชื่อม worker เข้ากับ Laravel application
workflow หลักคือ:
1. สร้าง Laravel Project
      ↓
2. ติดตั้ง RoadRunner Laravel Bridge
      ↓
3. เขียน .proto
      ↓
4. Generate PHP message + interface
      ↓
5. Implement service ใน Laravel
      ↓
6. Register service ใน config/roadrunner.php
      ↓
7. ตั้งค่า .rr.yaml
      ↓
8. ./rr serve
      ↓
9. ทดสอบด้วย grpcurl
แนวทางนี้เหมาะกับการยกระดับ Laravel จาก REST-centric backend ไปสู่ระบบ distributed application หรือ microservices ที่ต้องการ contract ชัดเจน ประสิทธิภาพการสื่อสารดี และรองรับหลายภาษา
#Quick Command Summary
# Laravel
composer create-project laravel/laravel laravel-grpc
cd laravel-grpc

# Laravel + RoadRunner integration
composer require roadrunner-php/laravel-bridge
php artisan vendor:publish \
  --provider='Spiral\RoadRunnerLaravel\ServiceProvider' \
  --tag=config

# Download RoadRunner
./vendor/bin/dload get rr

# Code generation tools
composer require spiral/roadrunner-cli google/protobuf
./vendor/bin/rr download-protoc-binary

# Generate code
mkdir -p proto generated
protoc \
  --plugin=protoc-gen-php-grpc=./protoc-gen-php-grpc \
  --php_out=./generated \
  --php-grpc_out=./generated \
  proto/greeter.proto

composer dump-autoload

# Run
./rr serve
#อ้างอิง
- gRPC PHP Basics: https://grpc.io/docs/languages/php/basics/
- gRPC Core Concepts: https://grpc.io/docs/what-is-grpc/core-concepts/
- RoadRunner gRPC Documentation: https://docs.roadrunner.dev/docs/grpc/grpc
- RoadRunner Laravel Bridge: https://github.com/roadrunner-php/laravel-bridge
- Laravel Documentation: https://laravel.com/docs