- 1. GKE Autopilot คืออะไร
- 2. สิ่งที่จะได้จาก Workshop
- 3. สิ่งที่ต้องเตรียม
- 4. กำหนดตัวแปรสำหรับ Workshop
- 5. เปิดใช้งาน Kubernetes Engine API
- 6. สร้าง GKE Autopilot Cluster
- 7. เชื่อมต่อ Cluster
- 8. สร้าง Namespace
- 9. สร้าง Web Application
- 10. ตรวจสอบ Pod
- 11. สร้าง Service แบบ LoadBalancer
- 12. ทดสอบ Application
- 13. ทดลอง Manual Scaling
- 14. ทดลอง Horizontal Pod Autoscaler
- 15. ตรวจสอบ Log
- 16. Troubleshooting
- 17. Deployment Update และ Rollout
- 18. GKE Standard vs GKE Autopilot
- 19. Resource Requests กับค่าใช้จ่าย
- 20. Cleanup
- 21. Workshop Challenge
- 22. สรุป
- References
บทความ Workshop สำหรับเรียนรู้การสร้าง Kubernetes Cluster แบบ GKE Autopilot ตั้งแต่เริ่มต้น การ Deploy Web Application การเปิดบริการด้วย LoadBalancer การ Scale และการลบทรัพยากรหลังทดลอง
#1. GKE Autopilot คืออะไร
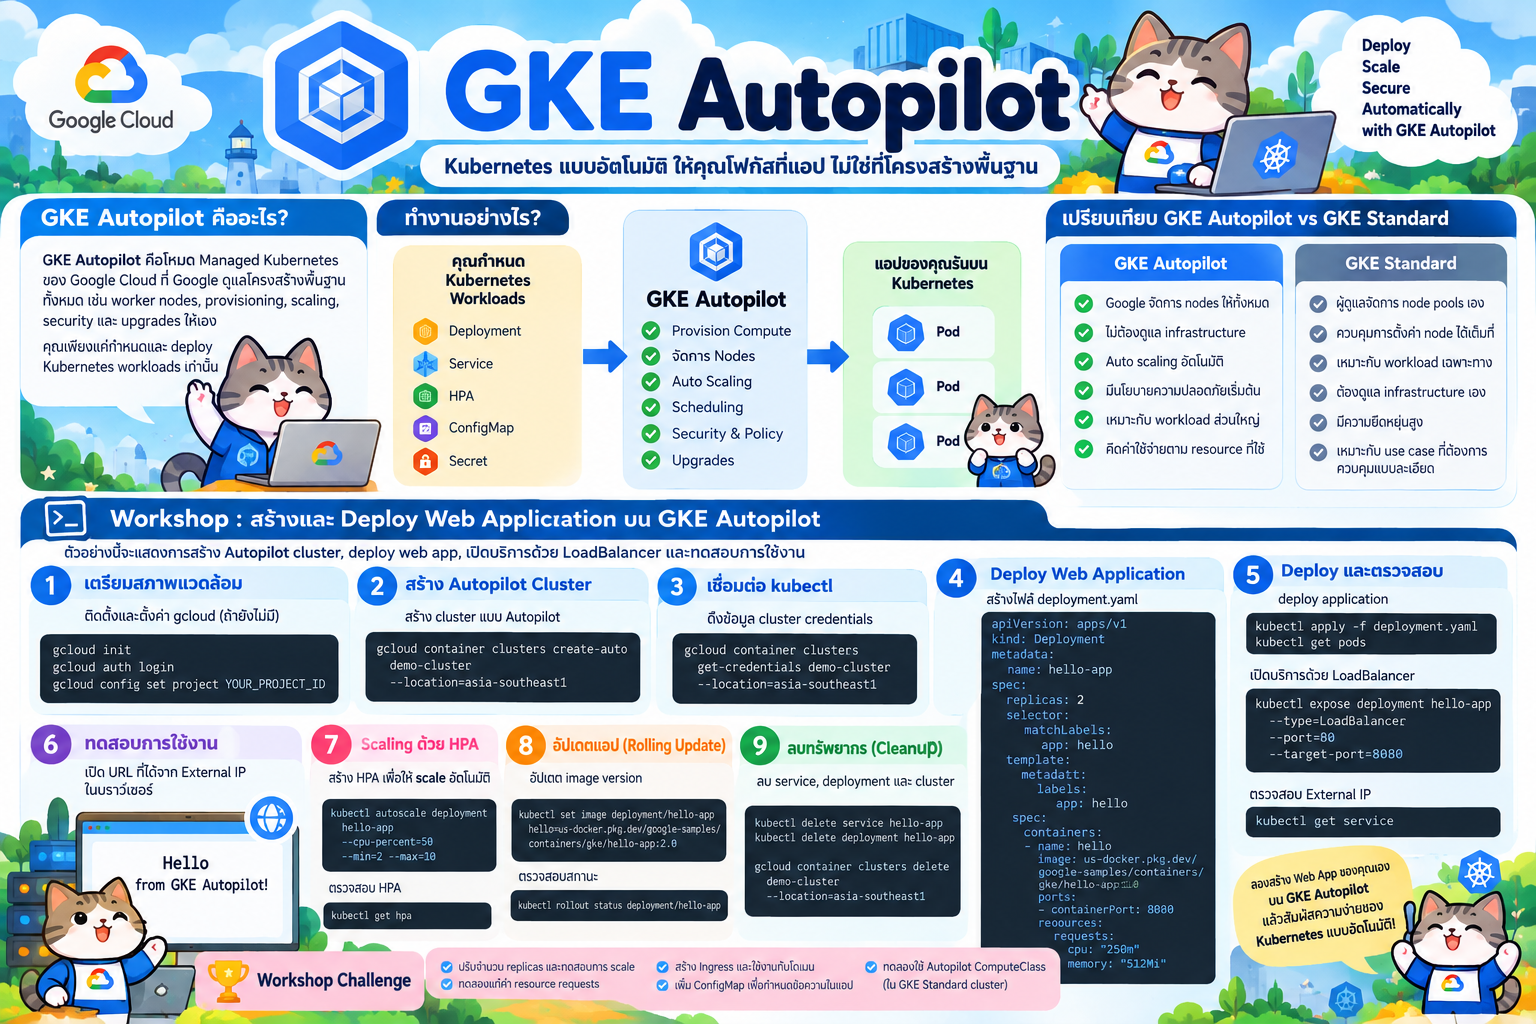
Google Kubernetes Engine (GKE) เป็นบริการ Managed Kubernetes ของ Google Cloud ส่วน Autopilot เป็นโหมดที่ Google จัดการโครงสร้างพื้นฐานของ Cluster ให้มากขึ้น เช่น การจัดเตรียมและบริหาร Nodes การปรับขนาด Infrastructure และการตั้งค่าพื้นฐานด้านความปลอดภัย
แนวคิดหลักคือ ผู้พัฒนามุ่งเน้นที่ Workload เช่น Deployment, Pod, Service และ Horizontal Pod Autoscaler แทนการบริหาร Worker Node โดยตรง
Developer
   |
   v
Kubernetes Manifest
   |
   v
+-----------------------+
|     GKE Autopilot     |
|-----------------------|
| Provision Resources   |
| Manage Nodes          |
| Scheduling            |
| Scaling               |
| Security              |
| Cluster Operations    |
+-----------------------+
   |
   v
Pods / Containers
สำหรับ general-purpose Autopilot workloads ระบบคิดค่า compute ตาม resource requests ของ Pod เป็นหลัก ขณะที่ workload ที่เลือก hardware เฉพาะ เช่น machine series หรือ accelerator อาจใช้ node-based billing ดังนั้นควรตรวจสอบ Pricing ปัจจุบันก่อนใช้งานจริง
#2. สิ่งที่จะได้จาก Workshop
หลังจบ Workshop นี้ ผู้เรียนจะสามารถ:
- เตรียม Google Cloud สำหรับใช้งาน GKE
- สร้าง GKE Autopilot Cluster
- เชื่อมต่อ Cluster ด้วย
kubectl - Deploy Web Application ด้วย Kubernetes Deployment
- สร้าง Service แบบ LoadBalancer
- ตรวจสอบ Pod, Deployment และ Service
- Scale Application
- ทดลอง Horizontal Pod Autoscaler
- ตรวจสอบ Log และรายละเอียดของ Workload
- Cleanup ทรัพยากรเพื่อลดค่าใช้จ่าย
#3. สิ่งที่ต้องเตรียม
ต้องมี:
- Google Cloud Account
- Google Cloud Project ที่เปิด Billing
- Google Cloud CLI (
gcloud) kubectl- สิทธิ์ IAM ที่เพียงพอสำหรับสร้างและใช้งาน GKE
สามารถใช้ Google Cloud Shell แทนการติดตั้งเครื่องมือบนเครื่องส่วนตัวได้
ตรวจสอบ CLI:
gcloud version
kubectl version --client
Login:
gcloud auth login
ดูรายการ Project:
gcloud projects list
#4. กำหนดตัวแปรสำหรับ Workshop
กำหนด Project ID และ Region เพื่อให้คำสั่งส่วนถัดไปสั้นและแก้ไขได้ง่าย
export PROJECT_ID="YOUR_PROJECT_ID"
export REGION="asia-southeast1"
export CLUSTER_NAME="autopilot-workshop"
ตั้งค่า Project:
gcloud config set project $PROJECT_ID
ตั้งค่า Region:
gcloud config set compute/region $REGION
ตรวจสอบ:
gcloud config list
เปลี่ยน
YOUR_PROJECT_IDเป็น Project ID จริงของผู้เรียน
#5. เปิดใช้งาน Kubernetes Engine API
gcloud services enable container.googleapis.com
ตรวจสอบ:
gcloud services list --enabled \
  --filter="name:container.googleapis.com"
#6. สร้าง GKE Autopilot Cluster
ใช้คำสั่ง:
gcloud container clusters create-auto $CLUSTER_NAME \
  --location=$REGION \
  --project=$PROJECT_ID
คำสั่งหลักของ Autopilot คือ:
gcloud container clusters create-auto
ต่างจาก GKE Standard ที่มักสร้าง Cluster ด้วย:
gcloud container clusters create
รอจน Cluster สร้างเสร็จ แล้วตรวจสอบ:
gcloud container clusters list
ดูรายละเอียด:
gcloud container clusters describe $CLUSTER_NAME \
  --location=$REGION
#7. เชื่อมต่อ Cluster
ดาวน์โหลด credentials:
gcloud container clusters get-credentials $CLUSTER_NAME \
  --location=$REGION \
  --project=$PROJECT_ID
ตรวจสอบ Kubernetes context:
kubectl config current-context
ดู Nodes:
kubectl get nodes
ดู Pods ทั้ง Cluster:
kubectl get pods -A
ใน Autopilot ผู้ใช้ไม่จำเป็นต้องสร้างหรือบริหาร Node Pool แบบเดียวกับการบริหาร GKE Standard ทั่วไป เพราะ GKE จะจัดเตรียม compute infrastructure ให้สอดคล้องกับ Workload
#8. สร้าง Namespace
สร้าง Namespace สำหรับ Workshop:
kubectl create namespace workshop
ตรวจสอบ:
kubectl get namespaces
ตั้ง namespace เริ่มต้นของ context ปัจจุบัน:
kubectl config set-context --current --namespace=workshop
#9. สร้าง Web Application
สร้างไฟล์:
deployment.yaml
เนื้อหา:
apiVersion: apps/v1
kind: Deployment
metadata:
  name: hello-app
spec:
  replicas: 2
  selector:
    matchLabels:
      app: hello-app
  template:
    metadata:
      labels:
        app: hello-app
    spec:
      containers:
        - name: hello-app
          image: us-docker.pkg.dev/google-samples/containers/gke/hello-app:1.0
          ports:
            - containerPort: 8080
          resources:
            requests:
              cpu: "250m"
              memory: "512Mi"
            limits:
              cpu: "500m"
              memory: "512Mi"
จุดสำคัญสำหรับ Autopilot คือควรกำหนด resources.requests ให้สอดคล้องกับทรัพยากรที่ Application ต้องการ เพราะ Autopilot ใช้ resource requests เพื่อจัดเตรียม infrastructure และมีการบังคับใช้ค่า minimum/maximum ตาม compute configuration หากไม่ระบุ Autopilot สามารถกำหนดค่า default ให้ได้
Deploy:
kubectl apply -f deployment.yaml
ตรวจสอบ:
kubectl get deployments
kubectl get pods
ติดตามสถานะ:
kubectl get pods -w
กด Ctrl+C เพื่อหยุดการติดตาม
#10. ตรวจสอบ Pod
แสดงรายละเอียด:
kubectl describe pod <POD_NAME>
หรือหา Pod:
kubectl get pods -o wide
ดู resource requests:
kubectl get pod <POD_NAME> \
  -o jsonpath='{.spec.containers[*].resources}'
#11. สร้าง Service แบบ LoadBalancer
สร้างไฟล์:
service.yaml
apiVersion: v1
kind: Service
metadata:
  name: hello-service
spec:
  type: LoadBalancer
  selector:
    app: hello-app
  ports:
    - protocol: TCP
      port: 80
      targetPort: 8080
Deploy:
kubectl apply -f service.yaml
ตรวจสอบ:
kubectl get services
หรือ:
kubectl get svc hello-service
ช่วงแรก EXTERNAL-IP อาจเป็น:
<pending>
รอจน Google Cloud จัดเตรียม Load Balancer และ External IP สำเร็จ
ติดตาม:
kubectl get svc hello-service -w
#12. ทดสอบ Application
เก็บ External IP:
export EXTERNAL_IP=$(kubectl get svc hello-service \
  -o jsonpath='{.status.loadBalancer.ingress[0].ip}')
ตรวจสอบ:
echo $EXTERNAL_IP
ทดสอบ:
curl http://$EXTERNAL_IP
หรือเปิด Browser:
http://EXTERNAL_IP
Architecture:
Internet
   |
   v
Google Cloud Load Balancer
   |
   v
Kubernetes Service
   |
   +-------------------+
   |                   |
   v                   v
Pod #1               Pod #2
hello-app            hello-app
#13. ทดลอง Manual Scaling
ดูจำนวน Pod:
kubectl get pods
Scale จาก 2 เป็น 5 replicas:
kubectl scale deployment hello-app --replicas=5
ตรวจสอบ:
kubectl get deployment
kubectl get pods
ลดกลับ:
kubectl scale deployment hello-app --replicas=2
#14. ทดลอง Horizontal Pod Autoscaler
สร้าง HPA:
kubectl autoscale deployment hello-app \
  --cpu-percent=60 \
  --min=2 \
  --max=10
ตรวจสอบ:
kubectl get hpa
รายละเอียด:
kubectl describe hpa hello-app
HPA ทำหน้าที่ปรับจำนวน Pods ตาม metric ส่วน Autopilot จะจัดการ compute infrastructure ที่รองรับ Pods เหล่านั้น จึงเป็นคนละระดับของการ scaling
Traffic increases
       |
       v
      HPA
       |
       v
More Pods requested
       |
       v
GKE Autopilot
       |
       v
Provision / adjust compute capacity
การใช้ CPU-based HPA ต้องมี metrics ที่พร้อมใช้งาน และควรกำหนด CPU requests ให้เหมาะสม
#15. ตรวจสอบ Log
หา Pod:
kubectl get pods
ดู Log:
kubectl logs <POD_NAME>
ติดตามแบบ Real-time:
kubectl logs -f <POD_NAME>
ดู Log จาก Deployment:
kubectl logs deployment/hello-app
#16. Troubleshooting
#Pod ไม่ Running
kubectl get pods
kubectl describe pod <POD_NAME>
ตรวจสอบ Events:
kubectl get events \
  --sort-by=.metadata.creationTimestamp
#Application เข้าไม่ได้
ตรวจสอบ Service:
kubectl get svc
ตรวจสอบ EndpointSlice:
kubectl get endpointslices
ตรวจสอบ selector:
kubectl describe svc hello-service
ตรวจสอบ labels ของ Pods:
kubectl get pods --show-labels
#Image Pull Error
kubectl describe pod <POD_NAME>
มองหาเหตุการณ์ประเภท:
ErrImagePull
ImagePullBackOff
#17. Deployment Update และ Rollout
เปลี่ยน image:
kubectl set image deployment/hello-app \
  hello-app=us-docker.pkg.dev/google-samples/containers/gke/hello-app:2.0
ตรวจสอบ rollout:
kubectl rollout status deployment/hello-app
ดู history:
kubectl rollout history deployment/hello-app
หากต้องการย้อนกลับ:
kubectl rollout undo deployment/hello-app
#18. GKE Standard vs GKE Autopilot
| ประเด็น | Standard | Autopilot |
|---|---|---|
| การควบคุม Nodes | สูง | GKE จัดการให้เป็นหลัก |
| Node Pools | ผู้ใช้บริหาร | ลดภาระการบริหาร |
| Infrastructure provisioning | ผู้ใช้กำหนดมากกว่า | อิงตาม Workload |
| Kubernetes API | ใช้ | ใช้ |
| Deployment / Service | ใช้ | ใช้ |
| เหมาะกับ | ต้องการควบคุม Infrastructure ละเอียด | เน้น Application/Workload |
| Operational overhead | สูงกว่า | ต่ำกว่า |
Autopilot ไม่ได้หมายความว่า Kubernetes concepts หายไป ผู้พัฒนายังคงต้องเข้าใจ Deployment, Service, ConfigMap, Secret, requests/limits, probes, HPA, networking และ observability
#19. Resource Requests กับค่าใช้จ่าย
สำหรับ general-purpose Autopilot workload ค่า compute มีความสัมพันธ์กับทรัพยากรที่ Pod request ดังนั้นไม่ควรกำหนด CPU และ Memory สูงเกินความจำเป็น
ตัวอย่าง:
resources:
  requests:
    cpu: "250m"
    memory: "512Mi"
Autopilot สามารถปรับ requests ที่ต่ำกว่าข้อกำหนดขั้นต่ำ หรือเติม default requests หากไม่ได้ระบุ ดังนั้น production workload ควรวัดการใช้งานจริงแล้วทำ resource sizing อย่างเหมาะสม
Workload ที่ร้องขอ hardware เฉพาะ เช่น GPU หรือ machine series อาจใช้รูปแบบการคิดค่าบริการแบบ node-based แทน จึงควรตรวจสอบ GKE Pricing ก่อน deploy ระบบจริง
#20. Cleanup
ลบ Application:
kubectl delete -f service.yaml
kubectl delete -f deployment.yaml
ลบ HPA หากยังอยู่:
kubectl delete hpa hello-app
ลบ Namespace:
kubectl delete namespace workshop
หากไม่ใช้ Cluster ต่อ ให้ลบ Cluster เพื่อหลีกเลี่ยงค่าใช้จ่ายที่ไม่จำเป็น:
gcloud container clusters delete $CLUSTER_NAME \
  --location=$REGION \
  --project=$PROJECT_ID
ตอบ:
Y
ตรวจสอบ:
gcloud container clusters list
#21. Workshop Challenge
ให้นักศึกษาทดลอง:
- เปลี่ยน
replicasเป็น 3 - เปลี่ยน CPU request เป็นค่าที่เหมาะกับ Application
- เพิ่ม
readinessProbe - เพิ่ม
livenessProbe - สร้าง HPA ช่วง 2–10 Pods
- Update container image และตรวจสอบ Rolling Update
- ทดลอง
kubectl rollout undo - ตรวจสอบ Logs และ Events
- อธิบายความแตกต่างระหว่าง Pod scaling กับ infrastructure scaling ใน Autopilot
ตัวอย่าง Probe:
livenessProbe:
  httpGet:
    path: /
    port: 8080
  initialDelaySeconds: 10
  periodSeconds: 10

readinessProbe:
  httpGet:
    path: /
    port: 8080
  initialDelaySeconds: 5
  periodSeconds: 5
#22. สรุป
GKE Autopilot ลดงานด้าน Kubernetes infrastructure operations โดยให้ Google Cloud จัดเตรียมและบริหาร compute infrastructure ตามความต้องการของ workload ผู้พัฒนาจึงสามารถมุ่งเน้น Kubernetes manifests และ application lifecycle ได้มากขึ้น
Workflow ของ Workshop นี้คือ:
Google Cloud Project
        |
        v
Enable GKE API
        |
        v
Create Autopilot Cluster
        |
        v
kubectl
        |
        v
Deployment
        |
        v
Service / LoadBalancer
        |
        v
Internet
สำหรับ Production ควรศึกษาต่อเรื่อง IAM และ least privilege, Workload Identity Federation for GKE, Secret management, Ingress/Gateway, TLS, HPA, Pod Disruption Budget, observability, logging และ CI/CD/GitOps
#References
-
Google Cloud Documentation — GKE Autopilot overview
https://docs.cloud.google.com/kubernetes-engine/docs/concepts/autopilot-overview -
Google Cloud Documentation — Create an Autopilot cluster
https://docs.cloud.google.com/kubernetes-engine/docs/how-to/creating-an-autopilot-cluster -
Google Cloud Documentation — Deploy an app to a GKE cluster
https://docs.cloud.google.com/kubernetes-engine/docs/deploy-app-cluster -
Google Cloud Documentation — Resource requests in Autopilot
https://docs.cloud.google.com/kubernetes-engine/docs/concepts/autopilot-resource-requests -
Google Kubernetes Engine pricing
https://cloud.google.com/kubernetes-engine/pricing
หมายเหตุ: บริการ Cloud, Kubernetes versions, resource limits และ Pricing สามารถเปลี่ยนแปลงได้ ควรตรวจสอบเอกสาร Google Cloud เวอร์ชันล่าสุดก่อนนำไปใช้ใน Production