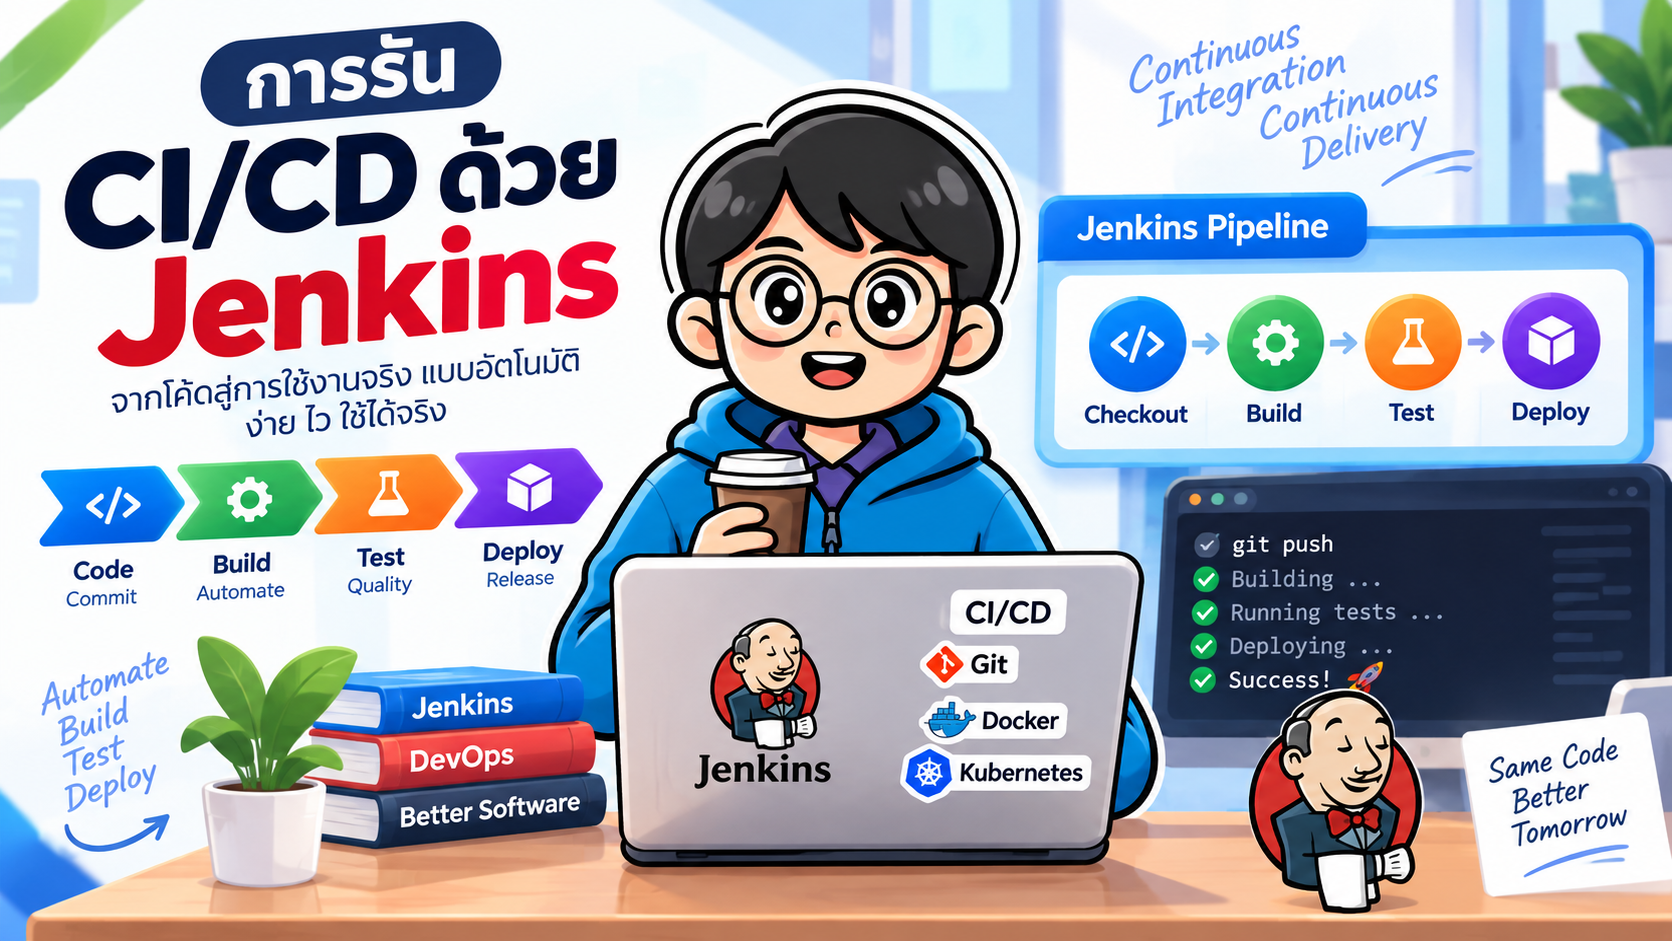
- การรัน CI/CD ด้วย Jenkins
- 2. องค์ประกอบสำคัญของ Jenkins
- 3. Declarative Pipeline และ Scripted Pipeline
- 4. ติดตั้ง Jenkins ด้วย Docker
- 5. Plugins ที่มักใช้กับ CI/CD
- 6. สร้างโปรเจกต์ตัวอย่าง
- 7. Dockerfile
- 8. Jenkinsfile สำหรับ CI ขั้นพื้นฐาน
- 9. เพิ่ม Docker Build
- 10. จัดการ Credentials อย่างถูกต้อง
- 11. Push Docker Image
- 12. Deploy ด้วย Docker Compose
- 13. Jenkinsfile แบบ CI/CD ครบ Flow
- 14. เชื่อม Jenkins กับ GitHub
- 15. Multibranch Pipeline
- 16. เพิ่ม Code Quality ด้วย SonarQube
- 17. Deploy ไป Kubernetes
- 18. Jenkins + GitOps
- 19. Manual Approval ก่อน Production
- 20. Testing Strategy ใน Pipeline
- 21. Parallel Testing
- 22. Test Report
- 23. Environment แยก Dev / Staging / Production
- 24. Rollback
- 25. Pipeline Architecture ที่แนะนำ
- 26. Best Practices
- 27. Checklist สำหรับ Jenkins CI/CD
- 28. สรุป
- แหล่งอ้างอิง
#การรัน CI/CD ด้วย Jenkins
Jenkins เป็น Automation Server แบบโอเพนซอร์สที่นิยมใช้สร้างกระบวนการ CI/CD (Continuous Integration / Continuous Delivery หรือ Deployment) โดยสามารถเชื่อมต่อกับ Git repository เพื่อให้ระบบทำงานอัตโนมัติเมื่อมีการ push code หรือเปิด Pull Request เช่น
Developer
   |
   | git push
   v
GitHub / GitLab
   |
   | Webhook
   v
Jenkins Pipeline
   |
   +--> Checkout
   +--> Install Dependencies
   +--> Unit Test
   +--> Build
   +--> Code Quality / Security Scan
   +--> Build Docker Image
   +--> Push Image
   +--> Deploy
   v
Application Server / Kubernetes / Cloud
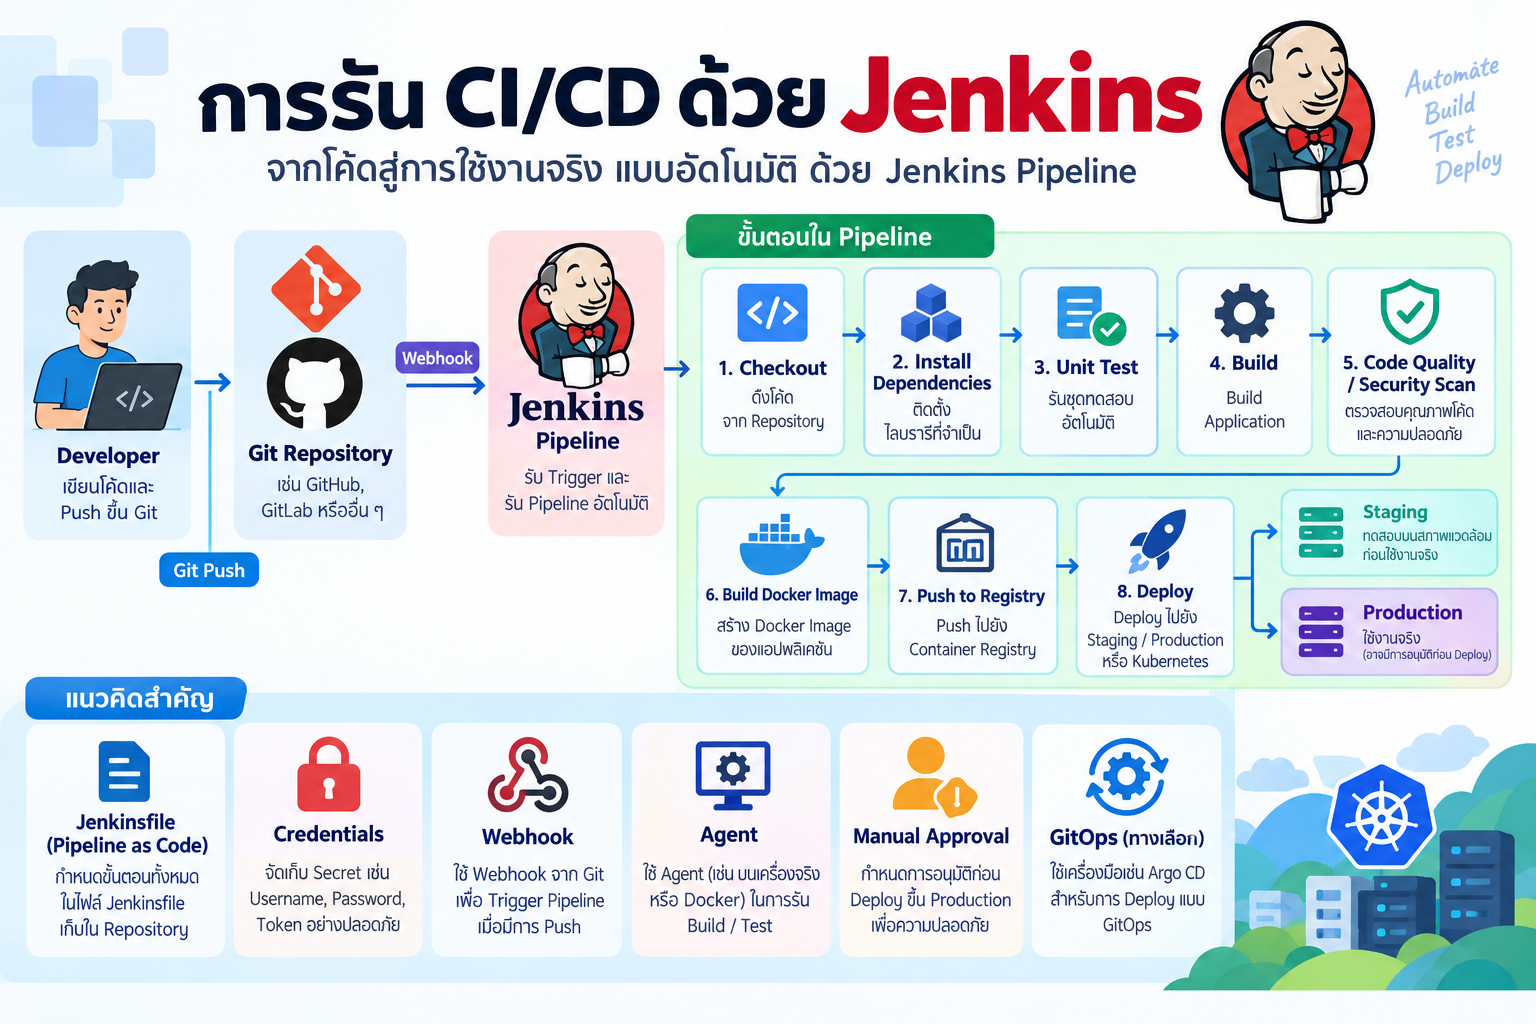
แนวทางที่เหมาะกับโครงการสมัยใหม่คือเก็บ Pipeline ไว้ในไฟล์ Jenkinsfile ภายใน source repository หรือแนวคิด Pipeline as Code ซึ่งช่วยให้แก้ไข pipeline ผ่าน Git, ทำ code review และตรวจสอบประวัติการเปลี่ยนแปลงได้
#1. CI/CD คืออะไร
#Continuous Integration — CI
CI คือการรวมโค้ดจากนักพัฒนาหลายคนเข้าสู่ repository อย่างสม่ำเสมอ และให้ระบบตรวจสอบโดยอัตโนมัติ เช่น
- Checkout source code
- ติดตั้ง dependencies
- Compile หรือ Build
- Unit Test
- Integration Test
- Lint
- Code Quality Scan
- Security Scan
ตัวอย่าง flow:
git push
   |
   v
Jenkins
   |
   +--> Build
   +--> Test
   +--> Scan
   |
   +--> PASS
   |      |
   |      v
   |   Create Artifact
   |
   +--> FAIL
          |
          v
       Stop Pipeline
#Continuous Delivery / Continuous Deployment — CD
หลัง CI ผ่าน Jenkins สามารถดำเนินการต่อ เช่น
- สร้าง Docker image
- Push image ไป Docker Hub / GHCR / ECR
- Deploy ไป Development หรือ Staging
- รอ Manual Approval ก่อน Production
- Deploy ไป Production อัตโนมัติ
- Deploy ผ่าน Kubernetes, Helm หรือ GitOps
#2. องค์ประกอบสำคัญของ Jenkins
#Jenkins Controller
Controller ทำหน้าที่จัดการ configuration, job, pipeline, credentials, plugins และ scheduling
#Jenkins Agent
Agent คือเครื่องหรือ container ที่รับงานไปประมวลผล เช่น
- Linux VM
- Docker container
- Windows machine
- Kubernetes Pod
- Cloud VM
ระบบจริงควรแยกงาน build/test ออกจาก controller ให้ agent เป็นผู้รัน workload
#Job
งานที่ Jenkins ต้องรัน เช่น Build, Test หรือ Deploy
#Pipeline
ลำดับขั้นตอน CI/CD ที่ประกอบด้วยหลาย stage
#Jenkinsfile
ไฟล์ source code สำหรับกำหนด Pipeline เช่น
pipeline {
    agent any

    stages {
        stage('Build') {
            steps {
                echo 'Building...'
            }
        }

        stage('Test') {
            steps {
                echo 'Testing...'
            }
        }

        stage('Deploy') {
            steps {
                echo 'Deploying...'
            }
        }
    }
}
#3. Declarative Pipeline และ Scripted Pipeline
Jenkins รองรับ Pipeline หลัก 2 รูปแบบ
#Declarative Pipeline
เหมาะกับโครงการส่วนใหญ่ เพราะโครงสร้างชัดเจนและอ่านง่าย
pipeline {
    agent any

    stages {
        stage('Build') {
            steps {
                sh 'npm run build'
            }
        }
    }
}
#Scripted Pipeline
ยืดหยุ่นสูงและใช้ Groovy มากกว่า เหมาะกับ workflow ที่ซับซ้อนมาก
node {
    stage('Build') {
        sh 'npm run build'
    }
}
บทความนี้ใช้ Declarative Pipeline เป็นหลัก
#4. ติดตั้ง Jenkins ด้วย Docker
Jenkins มี official image คือ jenkins/jenkins และสามารถใช้ LTS image สำหรับการใช้งานทั่วไปได้
สร้าง volume:
docker volume create jenkins_home
รัน Jenkins:
docker run -d \
  --name jenkins \
  --restart unless-stopped \
  -p 8080:8080 \
  -p 50000:50000 \
  -v jenkins_home:/var/jenkins_home \
  jenkins/jenkins:lts-jdk21
เปิดเว็บ:
http://localhost:8080
ดู initial admin password:
docker exec jenkins \
  cat /var/jenkins_home/secrets/initialAdminPassword
หมายเหตุ: หาก Pipeline ต้อง build Docker image ควรใช้ Jenkins agent ที่ติดตั้ง Docker/BuildKit หรือสร้าง Jenkins image/agent ที่มี Docker CLI ตามสถาปัตยกรรมที่เหมาะสม ไม่ควรสมมติว่า official Jenkins image มี Docker CLI มาให้แล้ว
#5. Plugins ที่มักใช้กับ CI/CD
ไปที่
Manage Jenkins
  -> Plugins
ตัวอย่าง plugin ที่พบบ่อย:
| Plugin | การใช้งาน |
|---|---|
| Pipeline | สร้าง Pipeline |
| Git | Checkout repository |
| GitHub | เชื่อมต่อ GitHub |
| Credentials Binding | ใช้งาน secret ใน Pipeline |
| Docker Pipeline | ทำงานร่วมกับ Docker |
| JUnit | แสดงผล test report |
| SSH Agent | ใช้ SSH key ในขั้นตอน deploy |
ติดตั้งเฉพาะ plugin ที่จำเป็น และอัปเดต Jenkins/plugins อย่างสม่ำเสมอเพื่อลด attack surface
#6. สร้างโปรเจกต์ตัวอย่าง
ตัวอย่างโครงสร้าง Node.js application:
jenkins-demo/
|
+-- src/
|   +-- app.js
|
+-- test/
|   +-- app.test.js
|
+-- package.json
+-- package-lock.json
+-- Dockerfile
+-- Jenkinsfile
ตัวอย่าง package.json
{
  "name": "jenkins-demo",
  "version": "1.0.0",
  "scripts": {
    "test": "jest --ci --coverage",
    "build": "echo Build completed",
    "start": "node src/app.js"
  },
  "dependencies": {
    "express": "^5.0.0"
  },
  "devDependencies": {
    "jest": "^30.0.0"
  }
}
#7. Dockerfile
FROM node:22-alpine

WORKDIR /app

COPY package*.json ./
RUN npm ci --omit=dev

COPY src ./src

EXPOSE 3000

CMD ["npm", "start"]
ทดลอง build:
docker build -t jenkins-demo:local .
#8. Jenkinsfile สำหรับ CI ขั้นพื้นฐาน
pipeline {
    agent any

    options {
        timestamps()
        disableConcurrentBuilds()
    }

    stages {
        stage('Checkout') {
            steps {
                checkout scm
            }
        }

        stage('Install') {
            steps {
                sh 'npm ci'
            }
        }

        stage('Test') {
            steps {
                sh 'npm test'
            }
        }

        stage('Build') {
            steps {
                sh 'npm run build'
            }
        }
    }

    post {
        success {
            echo 'CI passed'
        }

        failure {
            echo 'CI failed'
        }

        always {
            archiveArtifacts artifacts: 'coverage/**/*', allowEmptyArchive: true
        }
    }
}
Pipeline จะทำงานตามลำดับ
Checkout
   |
   v
Install
   |
   v
Test
   |
   v
Build
หาก stage ใดล้มเหลว stage หลังจากนั้นจะไม่ดำเนินการตาม flow ปกติ
#9. เพิ่ม Docker Build
เมื่อ Jenkins agent มี Docker CLI และเข้าถึง Docker daemon หรือ build service ที่กำหนดไว้แล้ว สามารถเพิ่ม stage:
stage('Docker Build') {
    steps {
        sh 'docker build -t myapp:${BUILD_NUMBER} .'
    }
}
${BUILD_NUMBER} เป็น environment variable ที่ Jenkins สร้างให้กับ build
ตัวอย่าง image:
myapp:1
myapp:2
myapp:3
ช่วยหลีกเลี่ยงการใช้ latest เป็นตัวระบุ artifact เพียงอย่างเดียว
#10. จัดการ Credentials อย่างถูกต้อง
ไม่ควรเขียน password หรือ token ลงใน Jenkinsfile
ตัวอย่างที่ไม่ควรทำ:
environment {
    PASSWORD = '123456'
}
ควรบันทึก secret ที่
Manage Jenkins
  -> Credentials
สมมติสร้าง credential ID:
dockerhub-credentials
จากนั้นเรียกใช้ผ่าน Jenkins credentials binding
environment {
    DOCKER_CREDS = credentials('dockerhub-credentials')
}
หากเป็น Username/Password credential จะมีตัวแปรที่ Jenkins จัดเตรียมให้ เช่น
DOCKER_CREDS_USR
DOCKER_CREDS_PSW
ใช้งาน:
stage('Docker Login') {
    steps {
        sh '''
          echo "$DOCKER_CREDS_PSW" | \
          docker login -u "$DOCKER_CREDS_USR" --password-stdin
        '''
    }
}
ควรจำกัด scope ของ credentials และสิทธิ์ของ token ให้ต่ำที่สุดเท่าที่งานจำเป็นต้องใช้
#11. Push Docker Image
กำหนด environment:
environment {
    IMAGE_NAME = 'username/jenkins-demo'
    IMAGE_TAG  = "${BUILD_NUMBER}"
}
Build:
stage('Docker Build') {
    steps {
        sh 'docker build -t $IMAGE_NAME:$IMAGE_TAG .'
    }
}
Push:
stage('Docker Push') {
    steps {
        sh 'docker push $IMAGE_NAME:$IMAGE_TAG'
    }
}
Pipeline:
Code
 |
 v
Test
 |
 v
Build
 |
 v
Docker Image
 |
 v
Registry
#12. Deploy ด้วย Docker Compose
สมมติ deployment server มี compose.yaml
services:
  web:
    image: username/jenkins-demo:${IMAGE_TAG}
    ports:
      - "80:3000"
    restart: unless-stopped
Jenkins สามารถ SSH ไปที่ deployment server แล้วสั่ง update service
stage('Deploy') {
    steps {
        sshagent(credentials: ['deploy-server-key']) {
            sh '''
              ssh -o StrictHostKeyChecking=yes deploy@server.example.com \
                "cd /opt/myapp && IMAGE_TAG=${BUILD_NUMBER} docker compose pull && IMAGE_TAG=${BUILD_NUMBER} docker compose up -d"
            '''
        }
    }
}
ในระบบจริงควรจัดการ known_hosts ล่วงหน้าแทนการปิด host key verification
#13. Jenkinsfile แบบ CI/CD ครบ Flow
pipeline {
    agent any

    options {
        timestamps()
        disableConcurrentBuilds()
    }

    environment {
        IMAGE_NAME = 'username/jenkins-demo'
        IMAGE_TAG  = "${BUILD_NUMBER}"
        DOCKER_CREDS = credentials('dockerhub-credentials')
    }

    stages {
        stage('Checkout') {
            steps {
                checkout scm
            }
        }

        stage('Install') {
            steps {
                sh 'npm ci'
            }
        }

        stage('Unit Test') {
            steps {
                sh 'npm test'
            }
        }

        stage('Build') {
            steps {
                sh 'npm run build'
            }
        }

        stage('Docker Build') {
            steps {
                sh 'docker build -t $IMAGE_NAME:$IMAGE_TAG .'
            }
        }

        stage('Docker Push') {
            steps {
                sh '''
                  echo "$DOCKER_CREDS_PSW" | \
                  docker login -u "$DOCKER_CREDS_USR" --password-stdin
                  docker push "$IMAGE_NAME:$IMAGE_TAG"
                  docker logout
                '''
            }
        }

        stage('Deploy') {
            when {
                branch 'main'
            }
            steps {
                sshagent(credentials: ['deploy-server-key']) {
                    sh '''
                      ssh deploy@server.example.com \
                        "cd /opt/myapp && IMAGE_TAG=${BUILD_NUMBER} docker compose pull && IMAGE_TAG=${BUILD_NUMBER} docker compose up -d"
                    '''
                }
            }
        }
    }

    post {
        success {
            echo "Deployment completed: ${IMAGE_NAME}:${IMAGE_TAG}"
        }

        failure {
            echo "Pipeline failed: ${BUILD_TAG}"
        }

        always {
            cleanWs()
        }
    }
}
cleanWs()ต้องมี Workspace Cleanup plugin หากไม่ติดตั้งสามารถตัดส่วนนี้ออกหรือใช้คำสั่ง cleanup แบบอื่น
#14. เชื่อม Jenkins กับ GitHub
แนวทางทั่วไปคือให้ GitHub แจ้ง Jenkins ผ่าน Webhook เมื่อมีการ push
Developer
   |
   | git push
   v
GitHub
   |
   | Webhook
   v
Jenkins
   |
   v
Pipeline
บน GitHub:
Repository
  -> Settings
  -> Webhooks
  -> Add webhook
Payload URL โดยทั่วไปของ Jenkins GitHub plugin:
https://jenkins.example.com/github-webhook/
Content type:
application/json
จากนั้นตั้ง Jenkins Job ให้รับ webhook trigger ตาม plugin และ job type ที่ใช้งาน
สำหรับ Jenkins ที่เปิดสู่ Internet ควรใช้ HTTPS, reverse proxy, authentication/authorization ที่เหมาะสม และไม่เปิด administrative endpoint โดยไม่จำเป็น
#15. Multibranch Pipeline
หากมีหลาย branch เช่น
main
feature/login
feature/payment
fix/security
ควรพิจารณา Multibranch Pipeline เพราะ Jenkins สามารถค้นหา branch ที่มี Jenkinsfile และสร้าง pipeline ของแต่ละ branch ได้
ตัวอย่าง:
Repository
 |
 +-- main
 |    +-- Jenkinsfile
 |
 +-- feature/login
 |    +-- Jenkinsfile
 |
 +-- feature/payment
      +-- Jenkinsfile
เหมาะกับ workflow แบบ Pull Request และ branch-based development
#16. เพิ่ม Code Quality ด้วย SonarQube
Flow สามารถขยายเป็น
Checkout
   |
   v
Install
   |
   v
Test
   |
   v
SonarQube
   |
   v
Build
   |
   v
Docker
   |
   v
Deploy
ตัวอย่างแนวคิด:
stage('Code Quality') {
    steps {
        withSonarQubeEnv('sonarqube') {
            sh 'sonar-scanner'
        }
    }
}
สามารถใช้ Quality Gate เป็นเงื่อนไขก่อนสร้าง artifact หรือ deploy ต่อ
#17. Deploy ไป Kubernetes
Jenkins สามารถ deploy ไป Kubernetes ด้วย kubectl หรือ Helm เช่น
stage('Deploy Kubernetes') {
    steps {
        sh '''
          kubectl set image deployment/web \
            web=$IMAGE_NAME:$IMAGE_TAG

          kubectl rollout status deployment/web
        '''
    }
}
หรือ Helm:
stage('Deploy Helm') {
    steps {
        sh '''
          helm upgrade --install myapp ./helm/myapp \
            --set image.repository=$IMAGE_NAME \
            --set image.tag=$IMAGE_TAG
        '''
    }
}
#18. Jenkins + GitOps
ในสถาปัตยกรรม GitOps ไม่จำเป็นต้องให้ Jenkins เข้าถึง Kubernetes cluster โดยตรง
Jenkins ทำหน้าที่
Build
 |
 v
Test
 |
 v
Build Image
 |
 v
Push Registry
 |
 v
Update Deployment Git Repository
จากนั้น Argo CD หรือ Flux ทำหน้าที่ sync configuration ไป Kubernetes
Developer
   |
   v
Application Git
   |
   v
Jenkins
   |
   +--> Test
   +--> Build Image
   +--> Push Registry
   +--> Update image tag
             |
             v
         GitOps Repo
             |
             v
          Argo CD
             |
             v
         Kubernetes
แนวทางนี้ช่วยแยก CI และ CD ชัดเจน และทำให้ desired state ของ deployment ถูกบันทึกใน Git
#19. Manual Approval ก่อน Production
หากต้องการ Continuous Delivery แทนการ deploy production ทันที สามารถเพิ่ม approval
stage('Approval') {
    when {
        branch 'main'
    }
    steps {
        input message: 'Deploy to production?', ok: 'Deploy'
    }
}
จากนั้นค่อย deploy production
Build
 |
 v
Test
 |
 v
Staging
 |
 v
Approval
 |
 v
Production
#20. Testing Strategy ใน Pipeline
Pipeline ที่ดีควรแยก test ตามระดับ
Unit Test
   |
   v
Integration Test
   |
   v
API Test
   |
   v
UI / E2E Test
   |
   v
Security / Quality Gate
ตัวอย่าง:
stage('Unit Test') {
    steps {
        sh 'npm run test:unit'
    }
}

stage('API Test') {
    steps {
        sh 'npm run test:api'
    }
}

stage('E2E Test') {
    steps {
        sh 'npm run test:e2e'
    }
}
#21. Parallel Testing
หาก test หลายชุดไม่ขึ้นต่อกัน สามารถรันพร้อมกัน
stage('Tests') {
    parallel {
        stage('Unit') {
            steps {
                sh 'npm run test:unit'
            }
        }

        stage('API') {
            steps {
                sh 'npm run test:api'
            }
        }

        stage('E2E') {
            steps {
                sh 'npm run test:e2e'
            }
        }
    }
}
ช่วยลดเวลารวมของ pipeline เมื่อ agent/compute เพียงพอ
#22. Test Report
หากใช้ JUnit XML report:
post {
    always {
        junit 'reports/**/*.xml'
    }
}
ทำให้ Jenkins แสดงแนวโน้มผลการทดสอบและรายละเอียด test ที่ fail ได้จากหน้า build
#23. Environment แยก Dev / Staging / Production
ตัวอย่าง:
feature/*
   |
   v
CI only

main
   |
   v
Dev
   |
   v
Staging
   |
   v
Approval
   |
   v
Production
สามารถใช้ when เพื่อควบคุม stage
stage('Deploy Production') {
    when {
        branch 'main'
    }

    steps {
        sh './deploy-production.sh'
    }
}
#24. Rollback
ทุก deployment ควรสามารถย้อนกลับไป artifact/image รุ่นก่อนหน้าได้
ตัวอย่าง Docker image:
myapp:101
myapp:102
myapp:103
หาก 103 มีปัญหา:
docker pull username/myapp:102
หรือ Kubernetes:
kubectl rollout undo deployment/web
การใช้ immutable/versioned artifacts ทำให้ rollback ตรวจสอบได้ง่ายกว่าการอ้าง latest อย่างเดียว
#25. Pipeline Architecture ที่แนะนำ
                    GitHub
                       |
                       | Webhook
                       v
                  +---------+
                  | Jenkins |
                  +---------+
                       |
          +------------+-------------+
          |            |             |
          v            v             v
        Test        SonarQube      Build
                                      |
                                      v
                                 Docker Image
                                      |
                                      v
                                  Registry
                                      |
                         +------------+------------+
                         |                         |
                         v                         v
                      Staging                  GitOps Repo
                                                   |
                                                   v
                                                Argo CD
                                                   |
                                                   v
                                              Kubernetes
#26. Best Practices
#1. เก็บ Jenkinsfile ใน Git
project/
  +-- src/
  +-- tests/
  +-- Dockerfile
  +-- Jenkinsfile
ทำให้ pipeline versioning ไปพร้อม source code
#2. ห้ามฝัง Secret ใน Repository
ใช้ Jenkins Credentials หรือ external secret manager
#3. แยก Controller กับ Agent
ไม่ควรรัน workload จำนวนมากบน controller
#4. ใช้ Immutable Artifact
เช่น
myapp:git-a1b2c3d
หรือ
myapp:build-108
#5. Fail Fast
จัด stage ให้ test ราคาถูกและเร็วอยู่ก่อนขั้นตอนที่แพง เช่น Docker build หรือ deploy
Lint
 |
 v
Unit Test
 |
 v
Integration Test
 |
 v
Build Image
 |
 v
Deploy
#6. ใช้ Least Privilege
token, SSH key และ service account ควรมีสิทธิ์เท่าที่จำเป็น
#7. สำรอง Jenkins Configuration
ข้อมูลสำคัญมักอยู่ใน JENKINS_HOME รวมถึง job configuration และข้อมูล Jenkins อื่น ๆ ควรมี backup/restore procedure ที่ทดสอบแล้ว
#8. ดูแล Plugin อย่างระมัดระวัง
ติดตั้งเฉพาะ plugin ที่ต้องใช้ ตรวจสอบ security advisory และทดสอบการอัปเดตก่อน production
#9. จำกัด Production Deployment
ใช้ branch protection, approval หรือ role-based access control ตามความเสี่ยงของระบบ
#10. แยก CI กับ Deployment Logic
เก็บ logic ที่ซับซ้อนใน script, Makefile หรือ shared library แทนการทำ Jenkinsfile ยาวเกินไป
#27. Checklist สำหรับ Jenkins CI/CD
[ ] Source Code อยู่ใน Git
[ ] มี Jenkinsfile
[ ] Jenkins เชื่อมกับ Git repository
[ ] มี Webhook หรือ SCM trigger
[ ] Install dependencies แบบ reproducible
[ ] มี Unit Test
[ ] มี Integration/API/E2E Test ตามความเหมาะสม
[ ] เก็บ Test Report
[ ] มี Code Quality / Security Scan
[ ] Build artifact หรือ container image
[ ] ใช้ versioned image/tag
[ ] เก็บ Secret ใน Credentials
[ ] Push artifact ไป Registry
[ ] Deploy Dev/Staging
[ ] Production มี policy/approval ที่เหมาะสม
[ ] มี Health Check
[ ] มี Rollback Strategy
[ ] มี Logging และ Monitoring
[ ] สำรอง Jenkins configuration
#28. สรุป
Jenkins สามารถเป็นศูนย์กลางของ CI/CD pipeline ตั้งแต่รับ source code ไปจนถึง build, test, scan, package และ deploy โดยหัวใจสำคัญคือการออกแบบ Pipeline as Code ผ่าน Jenkinsfile และแยก credentials ออกจาก source code
Flow พื้นฐาน:
Git Push
   |
   v
Jenkins
   |
   v
Checkout
   |
   v
Install
   |
   v
Test
   |
   v
Build
   |
   v
Docker Build
   |
   v
Push Registry
   |
   v
Deploy
สำหรับระบบขนาดใหญ่ สามารถพัฒนาต่อเป็น
Jenkins
  |
  +-- CI
  |    +-- Test
  |    +-- Quality Gate
  |    +-- Security Scan
  |    +-- Build Image
  |
  +-- Artifact Registry
  |
  +-- GitOps Repository
       |
       v
     Argo CD
       |
       v
   Kubernetes
แนวทางนี้เหมาะกับ DevOps workflow สมัยใหม่ เพราะแยกขั้นตอนตรวจสอบโค้ด การสร้าง artifact และการ deploy ออกจากกันอย่างชัดเจน
#แหล่งอ้างอิง
- Jenkins Pipeline: https://www.jenkins.io/doc/book/pipeline/
- Using a Jenkinsfile: https://www.jenkins.io/doc/book/pipeline/jenkinsfile/
- Pipeline Syntax: https://www.jenkins.io/doc/book/pipeline/syntax/
- Installing Jenkins: https://www.jenkins.io/doc/book/installing/
- Installing Jenkins with Docker: https://www.jenkins.io/doc/book/installing/docker/
- Using Environment Variables: https://www.jenkins.io/doc/pipeline/tour/environment/