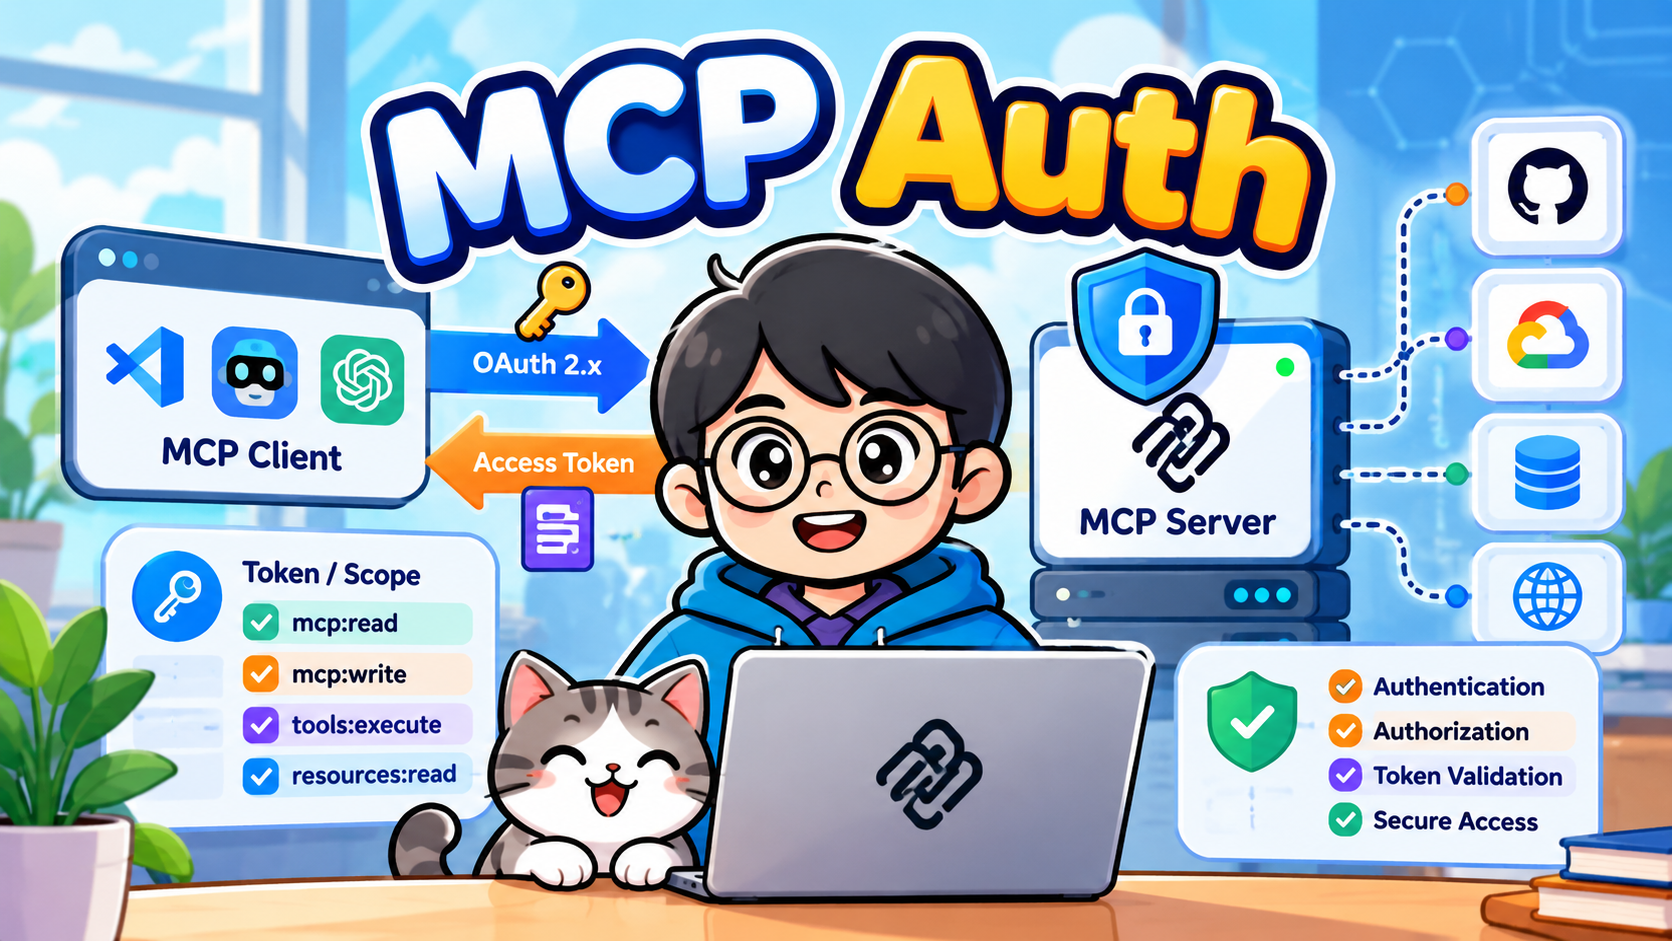
- 1. MCP Auth คืออะไร
- 2. Architecture
- 3. stdio กับ Remote HTTP ต่างกันอย่างไร
- 4. Authorization Flow
- 5. Workshop Lab
- 6. ตัวอย่าง Authorization Middleware แบบ Conceptual
- 7. Per-server vs Per-tool Authorization
- 8. Scope Design
- 9. Authentication ไม่เท่ากับ Authorization
- 10. Token Security
- 11. HTTP Status ที่ควรรู้
- 12. Production Checklist
- 13. สรุป Authentication Flow
- 14. แบบฝึกหัด
- 15. แนวทางต่อยอด
- References
Workshop ภาษาไทย: ปกป้อง Remote MCP Server ด้วย OAuth 2.x, Bearer Token, Protected Resource Metadata และ Scope
#1. MCP Auth คืออะไร
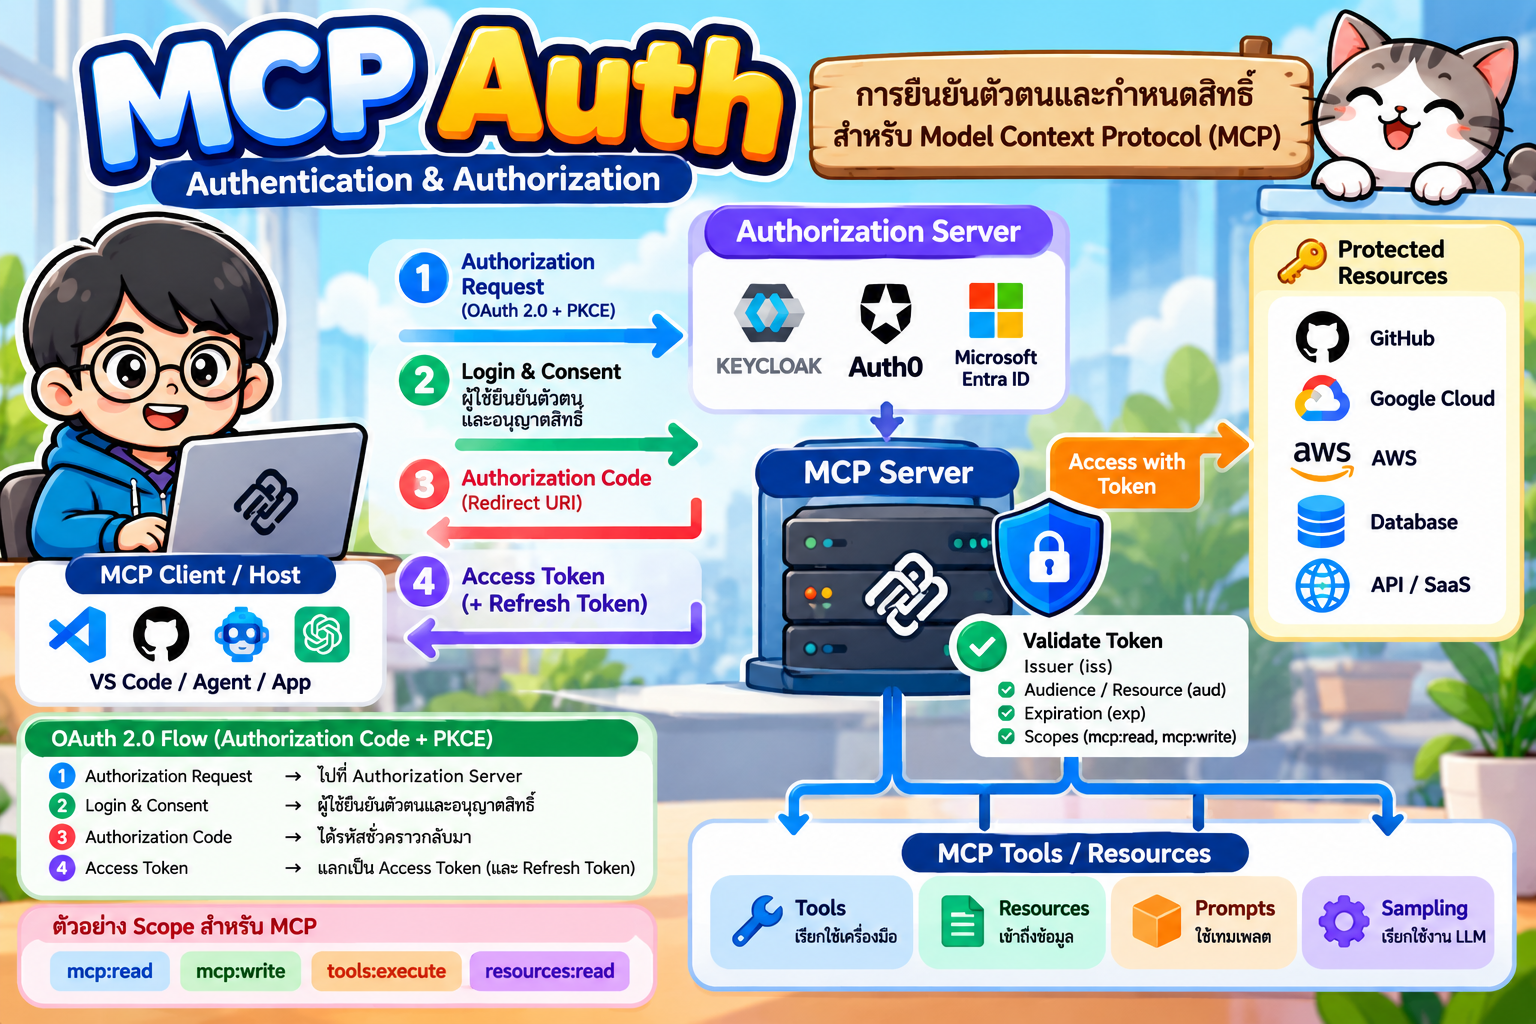
Model Context Protocol (MCP) ทำให้ AI application เชื่อมต่อกับ Tools, Resources และ Prompts จาก MCP Server ได้ เมื่อ MCP Server รันแบบ local ผ่าน stdio ตัว client มักเป็นผู้เริ่ม subprocess โดยตรง จึงมี trust boundary ต่างจาก Remote MCP Server
เมื่อเปิด MCP ผ่าน Streamable HTTP เราควรปฏิบัติต่อ MCP Server เสมือน Web API/Resource Server ที่ต้องตรวจสอบ access token ก่อนอนุญาตให้เรียกข้อมูลหรือเครื่องมือที่มีสิทธิ์จำกัด
แนวคิดสำคัญ:
- Authentication — ผู้ใช้/client คือใคร
- Authorization — identity นั้นมีสิทธิ์ทำอะไร
- Authorization Server / IdP — login และออก token
- MCP Server / Resource Server — รับและตรวจ token
- MCP Client/Host — ขอสิทธิ์และแนบ token มากับ request
- Scope — จำกัดสิทธิ์ เช่น
mcp:read,mcp:write
#2. Architecture
flowchart LR
    U[User] --> C[MCP Client / Host]
    C -->|1. Request| M[Remote MCP Server]
    M -->|2. 401 + WWW-Authenticate| C
    C -->|3. OAuth Authorization| A[Authorization Server / IdP]
    A -->|4. Access Token| C
    C -->|5. Bearer Token| M
    M -->|6. Validate token + scopes| V[Token/JWT Verifier]
    M -->|7. Authorized tool call| T[MCP Tools / Resources]
#3. stdio กับ Remote HTTP ต่างกันอย่างไร
| ประเด็น | Local stdio |
Remote Streamable HTTP |
|---|---|---|
| Network exposure | โดยทั่วไปไม่มี HTTP endpoint | มี endpoint ผ่าน network |
| Process | Client เปิด subprocess | Server ทำงานแยก |
| OAuth | โดยทั่วไปไม่ใช่ MCP transport auth หลัก | เหมาะ/จำเป็นสำหรับ protected resource |
| Bearer token | มักไม่ต้องใช้ระหว่าง MCP client-server | ใช้กับ protected endpoint |
| TLS | ไม่เกี่ยวกับ stdio transport | Production ควรใช้ HTTPS |
| Scope | มักอาศัย OS/process permissions | กำหนด fine-grained authorization ได้ |
#4. Authorization Flow
สมมติ MCP endpoint คือ:
https://mcp.example.com/mcp
#Step 1 — Client เรียก MCP Server
POST /mcp HTTP/1.1
Host: mcp.example.com
Content-Type: application/json
ถ้า resource ต้องใช้ authorization แต่ request ไม่มี token server จะปฏิเสธ
#Step 2 — Server ส่ง OAuth challenge
ตัวอย่างแนวคิด:
HTTP/1.1 401 Unauthorized
WWW-Authenticate: Bearer resource_metadata="https://mcp.example.com/.well-known/oauth-protected-resource"
จุดสำคัญคือ 401 ต้องเกิดที่ HTTP authorization boundary ไม่ใช่ส่ง tool result ว่า “login required”
#Step 3 — Protected Resource Metadata
Client อ่าน metadata เช่น:
{
  "resource": "https://mcp.example.com/mcp",
  "authorization_servers": [
    "https://auth.example.com"
  ],
  "scopes_supported": [
    "mcp:read",
    "mcp:write"
  ]
}
endpoint โดยทั่วไป:
/.well-known/oauth-protected-resource
metadata บอกว่า MCP resource นี้เชื่อถือ Authorization Server ใด และรองรับ scope อะไร
#Step 4 — Authorization Server Discovery
Client ทำ discovery ของ Authorization Server เพื่อค้นหา authorization endpoint, token endpoint และความสามารถอื่นที่เกี่ยวข้อง
#Step 5 — User Authorization
สำหรับ interactive client แนวทางสำคัญคือ Authorization Code flow พร้อม PKCE
User
  ↓
MCP Client
  ↓
Authorization Server
  ↓ login / consent
Authorization Server
  ↓ authorization code
MCP Client
  ↓ exchange code
Authorization Server
  ↓
Access Token
#Step 6 — Client เรียก MCP ใหม่
POST /mcp HTTP/1.1
Host: mcp.example.com
Authorization: Bearer <access_token>
Content-Type: application/json
#Step 7 — MCP Server ตรวจ Token
อย่างน้อยควรตรวจ:
signature / token validity
issuer
audience/resource binding
expiration
required scopes
ห้ามเชื่อ JWT เพียงเพราะ decode payload ได้
#5. Workshop Lab
#เป้าหมาย
สร้างระบบจำลองที่มี:
MCP Client
    |
    | Bearer Token
    v
Remote MCP Server
    |
    +-- public tool
    |
    +-- protected read tool
    |
    +-- protected write tool
กำหนด scopes:
mcp:read
mcp:write
#Lab 1 — ทดลอง request โดยไม่มี token
curl -i https://mcp.example.com/mcp
ผลที่คาดหวังสำหรับ protected server/resource:
HTTP/1.1 401 Unauthorized
WWW-Authenticate: Bearer ...
#Lab 2 — ตรวจ Protected Resource Metadata
curl https://mcp.example.com/.well-known/oauth-protected-resource
ตรวจว่า resource, authorization_servers และ scopes_supported ถูกต้อง
#Lab 3 — เรียกด้วย Access Token
curl \
  -H "Authorization: Bearer $ACCESS_TOKEN" \
  https://mcp.example.com/mcp
อย่า hard-code access token ลง source code, Git repository หรือไฟล์ที่ commit ขึ้นระบบ version control
#6. ตัวอย่าง Authorization Middleware แบบ Conceptual
ตัวอย่างต่อไปนี้จงใจเป็น framework-neutral เพื่อเน้นหลัก security:
async function requireAuth(req, requiredScopes = []) {
  const header = req.headers.authorization;

  if (!header?.startsWith("Bearer ")) {
    throw unauthorized();
  }

  const token = header.substring("Bearer ".length);

  const claims = await verifyAccessToken(token);

  if (!claims) {
    throw unauthorized();
  }

  for (const scope of requiredScopes) {
    if (!claims.scopes.includes(scope)) {
      throw insufficientScope(scope);
    }
  }

  return claims;
}
Protected tool:
async function deleteDocument(req) {
  const identity = await requireAuth(req, ["mcp:write"]);

  return deleteForAuthorizedUser(identity.subject);
}
หลักสำคัญคือ authorization ต้องบังคับใช้ฝั่ง server ไม่ใช่เพียงซ่อน tool จาก UI
#7. Per-server vs Per-tool Authorization
#Per-server
ทุก request ไป /mcp ต้องมี token
เหมาะเมื่อ:
- tools ทั้งหมดเป็นข้อมูลภายใน
- ทุก operation ต้องรู้ identity
- ต้องการ security model ที่เรียบง่าย
#Per-tool
บาง tools เป็น public และบาง tools ต้อง login
ตัวอย่าง:
get_public_document      -> public
get_my_profile           -> mcp:read
update_my_profile        -> mcp:write
เมื่อ client เรียก protected tool โดยไม่มีสิทธิ์ server ต้อง challenge ผ่าน HTTP authorization mechanism
#8. Scope Design
หลีกเลี่ยง scope กว้างเกินไป เช่น:
admin
everything
full_access
ควรออกแบบตาม capability:
documents:read
documents:write
profile:read
profile:write
orders:read
orders:create
หลักการคือ Least Privilege
ผู้ใช้/client ควรได้รับเฉพาะสิทธิ์ที่จำเป็นต่อ operation
#9. Authentication ไม่เท่ากับ Authorization
ตัวอย่าง token:
{
  "sub": "user-1001",
  "scope": "documents:read"
}
token นี้อาจพิสูจน์ identity ได้ แต่ไม่ได้แปลว่าสามารถ:
delete_document
ได้ เพราะ operation อาจต้องการ:
documents:write
ดังนั้น MCP Server ต้องตรวจทั้ง:
Token valid?
      ↓
Correct resource/audience?
      ↓
Required scope?
      ↓
Application-level policy?
      ↓
Execute tool
#10. Token Security
#ไม่ควรทำ
Client → MCP Server → ส่ง token เดิมต่อไป Backend API ทุกระบบ
โดยอัตโนมัติ
Access token ควรถูกจำกัดให้ใช้กับ resource ที่ออกแบบไว้ การส่ง token ต่อโดยไม่ตรวจ audience/resource และ trust boundary เพิ่มความเสี่ยง token leakage และ confused-deputy problems
#ควรทำ
Client
  |
  | Token for MCP Resource
  v
MCP Server
  |
  | server-side credential /
  | delegated token designed for downstream resource
  v
Backend API
กำหนด credential boundary ของแต่ละ service ให้ชัดเจน
#11. HTTP Status ที่ควรรู้
| Status | ความหมาย |
|---|---|
401 Unauthorized |
ไม่มี token หรือ authentication/token ไม่ผ่าน |
403 Forbidden |
authenticated แล้ว แต่ไม่มีสิทธิ์ที่ต้องการ |
403 insufficient_scope |
token ไม่มี scope ที่ operation ต้องใช้ |
#12. Production Checklist
- ใช้ HTTPS/TLS
- ใช้ OAuth-compliant Authorization Server/IdP
- publish Protected Resource Metadata
- validate token signature
- validate issuer
- validate audience/resource
- validate expiration
- enforce scopes server-side
- ใช้ least privilege
- ไม่ log access token
- ไม่ hard-code secrets
- ไม่ส่ง token ต่อ downstream โดยพลการ
- เก็บ audit log ของ sensitive tool calls โดยไม่บันทึก secret
- ทดสอบ 401 และ insufficient-scope cases
- อัปเดต MCP SDK และตรวจ specification revision ที่ระบบรองรับ
#13. สรุป Authentication Flow
1. MCP Client
       |
       | Request protected MCP resource
       v
2. MCP Server
       |
       | 401 + WWW-Authenticate
       v
3. Protected Resource Metadata
       |
       | authorization_servers
       v
4. Authorization Server
       |
       | Login + Consent
       | OAuth + PKCE
       v
5. Access Token
       |
       v
6. MCP Client
       |
       | Authorization: Bearer ...
       v
7. MCP Server
       |
       | Validate token
       | Validate resource/audience
       | Validate scopes
       v
8. MCP Tool / Resource
#14. แบบฝึกหัด
- สร้าง
public_infoที่ไม่ต้อง login - สร้าง
read_profileที่ต้องมีprofile:read - สร้าง
update_profileที่ต้องมีprofile:write - ทดลองเรียกโดยไม่มี token
- ทดลอง token ที่หมดอายุ
- ทดลอง token ที่มี
profile:readแล้วเรียกupdate_profile - ตรวจว่า server คืน 401/403 ได้เหมาะสม
- ตรวจว่า access token ไม่ปรากฏใน application logs
#15. แนวทางต่อยอด
Workshop นี้สามารถต่อยอดกับ:
- Keycloak
- Microsoft Entra ID
- Auth0
- Okta
- GitHub/Google identity integration ผ่าน authorization architecture ที่เหมาะสม
- API Gateway / reverse proxy
- MCP Server บน Kubernetes
- Fine-grained authorization เช่น RBAC/ABAC
#References
- Model Context Protocol documentation — Authorization
- MCP SDK documentation — authorization and bearer-token middleware
- OAuth 2.0 Protected Resource Metadata (RFC 9728)
- OAuth 2.0 Authorization Server Metadata (RFC 8414)
- OAuth 2.0 Authorization Code + PKCE security guidance
หมายเหตุ: MCP และ SDK มีการพัฒนาอย่างต่อเนื่อง ควรตรวจ specification revision และ SDK documentation ปัจจุบันก่อนนำตัวอย่างไปใช้ใน production