- 1. Spring AI คืออะไร?
- 2. สิ่งที่จะสร้าง
- 3. เครื่องมือที่ต้องเตรียม
- 4. ตั้งค่า Gradle Kotlin DSL
- 5. ตั้งค่า API Key อย่างปลอดภัย
- 6. โครงสร้างโปรเจกต์
- 7. สร้าง Spring Boot Application
- 8. สร้าง DTO สำหรับ API
- 9. เรียก LLM ผ่าน ChatClient
- 10. สร้าง Tool Calling ด้วย Kotlin
- 11. สร้าง REST Controller
- 12. เรียกใช้งานและทดสอบ API
- 13. Unit Test ฟังก์ชัน Tool โดยไม่เรียก LLM
- 14. ต่อยอดจาก Chatbot ไปสู่ RAG
- 15. แก้ปัญหาที่พบบ่อย (Troubleshooting)
- 16. แนวทางสำหรับ Production
- 17. สรุป
- เอกสารอ้างอิง
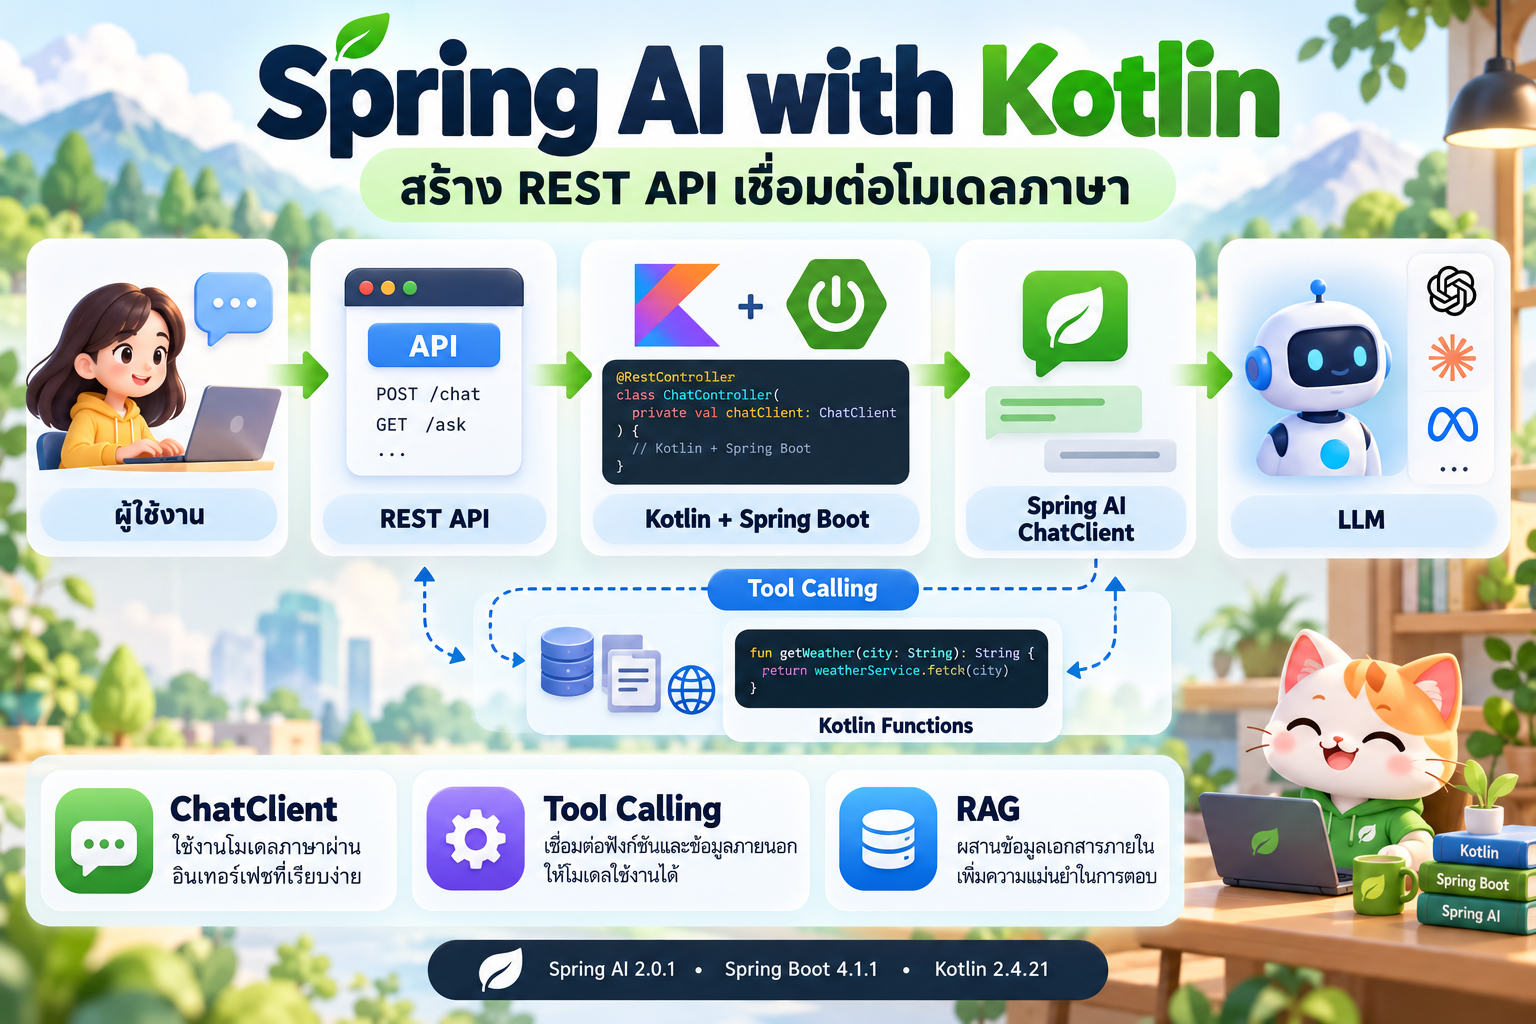
ผลลัพธ์การเรียนรู้: เมื่อจบ Workshop ผู้อ่านจะสร้าง API สำหรับสนทนากับ LLM ได้, เปิดให้โมเดลเรียกฟังก์ชัน Kotlin ผ่าน Tool Calling ได้อย่างมีขอบเขต, ทดสอบ REST API ด้วย curl ได้ และเข้าใจแนวทางต่อยอดเป็น RAG
Workshop สำหรับผู้เริ่มต้นถึงระดับกลาง — สร้าง Backend ที่รับคำถามผ่าน HTTP และตอบด้วย Large Language Model (LLM) โดยเขียนด้วย Kotlin ทั้งหมด พร้อมต่อยอดให้โมเดลเรียกใช้ฟังก์ชันของระบบผ่าน Tool Calling
#1. Spring AI คืออะไร?
Spring AI เป็นเฟรมเวิร์กในระบบนิเวศ Spring สำหรับพัฒนาแอปพลิเคชัน Generative AI โดยจัดเตรียม API ที่เป็นมาตรฐานเพื่อเรียกโมเดล, การออกแบบ Prompt, Tool Calling, Chat Memory, Retrieval-Augmented Generation (RAG) และการเชื่อมต่อ Vector Database
เมื่อใช้ร่วมกับ Kotlin จะได้ข้อดีของภาษาที่มีไวยากรณ์กระชับ, data class, Null Safety, Constructor Injection และความสามารถในการเรียกใช้ Java libraries ได้โดยตรง
#Spring AI ช่วยอะไรได้บ้าง?
| ความสามารถ | ประโยชน์ |
|---|---|
| ChatClient | เรียก LLM ด้วย Fluent API โดยไม่ต้องเขียน HTTP client เอง |
| Prompt | จัดการ System/User Instructions และตัวแปรใน Prompt |
| Tool Calling | เปิดให้โมเดลร้องขอการใช้ฟังก์ชัน Kotlin ที่โปรแกรมอนุญาต |
| Advisors | เพิ่มแนวปฏิบัติร่วม เช่น Memory, Logging และ RAG |
| Vector Store | ค้นหาข้อความที่เกี่ยวข้องเพื่อใช้ตอบจากเอกสาร |
| Observability | เชื่อมต่อการติดตาม Metrics/Tracing สำหรับ AI workloads |
เวอร์ชันอ้างอิง ณ 14 ตุลาคม 2026: Spring AI 2.0.1, Spring Boot 4.1.1, Kotlin 2.4.21, JDK 21 โดย Spring AI 2.0.x รองรับ Spring Boot 4.0.x และ 4.1.x [1]–[4]
บทความนี้เลือก OpenAI เป็นผู้ให้บริการตัวอย่าง แต่ Spring AI ยังรองรับผู้ให้บริการและโครงสร้างพื้นฐานอื่น ๆ ด้วย การใช้ OpenAI API จริงอาจมีค่าใช้จ่ายตามปริมาณการใช้งาน
#2. สิ่งที่จะสร้าง
REST API 2 เส้นทาง:
POST /api/chat— สนทนากับโมเดลด้วยChatClientPOST /api/chat/courses— ให้ AI เลือกเรียก Tool เพื่อค้นข้อมูลวิชาตัวอย่างจาก Kotlin function
flowchart LR
    U[ผู้ใช้งาน / Postman] --> API[Spring Boot REST Controller]
    API --> S[ChatService - Kotlin]
    S --> C[Spring AI ChatClient]
    C --> M[OpenAI LLM]
    M -. ขอใช้ Tool เมื่อจำเป็น .-> T[CourseTools - Kotlin]
    T -. ผลลัพธ์กลับสู่โมเดล .-> M
    M --> C --> S --> API --> U
หมายเหตุ: Spring AI เป็นตัวกลางจัดการการส่ง Tool Definition และการประมวลผล Tool Calling; โมเดลไม่ได้เรียก Kotlin function โดยตรงหรือมีสิทธิ์เข้าถึงระบบโดยอัตโนมัติ

#3. เครื่องมือที่ต้องเตรียม
- Java 21 และ IntelliJ IDEA (Community/Ultimate) หรือ IDE ที่รองรับ Kotlin + Gradle
- Gradle 8.14 ขึ้นไปในสาย 8.x หรือ 9.x (หรือ Wrapper ที่ Spring Initializr สร้างให้)
- OpenAI API Key สำหรับทดสอบ
curlหรือ Postman
เริ่มจาก Spring Initializr เลือก Gradle - Kotlin, Kotlin, Spring Boot 4.1.x, Java 21, Package com.example.springaikotlin; ติดตั้ง dependencies Spring Web MVC, Validation, OpenAI และ Kotlin support หรือใช้ไฟล์โปรเจกต์ตัวอย่างที่แนบกับบทความนี้
#4. ตั้งค่า Gradle Kotlin DSL
สร้างหรือปรับแก้ build.gradle.kts ดังนี้:
plugins {
    kotlin("jvm") version "2.4.21"
    kotlin("plugin.spring") version "2.4.21"
    id("org.springframework.boot") version "4.1.1"
    id("io.spring.dependency-management") version "1.1.7"
}

group = "com.example"
version = "0.0.1-SNAPSHOT"

repositories { mavenCentral() }

kotlin { jvmToolchain(21) }

dependencies {
    implementation(platform("org.springframework.ai:spring-ai-bom:2.0.1"))
    implementation("org.springframework.boot:spring-boot-starter-webmvc")
    implementation("org.springframework.boot:spring-boot-starter-validation")
    implementation("org.springframework.ai:spring-ai-starter-model-openai")
    implementation("tools.jackson.module:jackson-module-kotlin")
    implementation("org.jetbrains.kotlin:kotlin-reflect")

    testImplementation("org.springframework.boot:spring-boot-starter-webmvc-test")
    testImplementation(kotlin("test"))
}

tasks.withType<Test> { useJUnitPlatform() }
spring-ai-bom ช่วยจัดการเวอร์ชัน Spring AI dependencies ให้เข้าชุดกัน ส่วน spring-ai-starter-model-openai คือชื่อ Starter ที่ใช้ใน Spring AI รุ่นใหม่ แทนชื่อที่ใช้ในเวอร์ชันเก่า [1], [5]
#5. ตั้งค่า API Key อย่างปลอดภัย
src/main/resources/application.yml
spring:
  application:
    name: spring-ai-kotlin-demo
  ai:
    openai:
      api-key: ${OPENAI_API_KEY}
      chat:
        model: gpt-5-mini

server:
  port: 8080
อย่าใส่ API Key จริงลงใน Git Repository ไฟล์
.envไม่ได้ถูกโหลดโดย Spring Boot ให้อัตโนมัติ ในตัวอย่างนี้ จึงควรกำหนด Environment Variable โดยตรง หรือใช้ระบบ Secrets Manager
macOS / Linux:
export OPENAI_API_KEY="your-api-key"
Windows PowerShell:
$env:OPENAI_API_KEY = "your-api-key"
ใช้ชื่อ property spring.ai.openai.chat.model ตามเอกสารของ Spring AI 2.0.1 [6] ไม่ใช่ชื่อ property ของตัวอย่างบางเวอร์ชันก่อนหน้า
#6. โครงสร้างโปรเจกต์
spring-ai-kotlin-demo/
├── build.gradle.kts
├── settings.gradle.kts
├── src/
│   ├── main/
│   │   ├── kotlin/com/example/springaikotlin/
│   │   │   ├── SpringAiKotlinApplication.kt
│   │   │   ├── ChatDto.kt
│   │   │   ├── ChatController.kt
│   │   │   ├── ChatService.kt
│   │   │   └── CourseTools.kt
│   │   └── resources/application.yml
│   └── test/kotlin/com/example/springaikotlin/
│       └── CourseToolsTest.kt
└── README.md
#7. สร้าง Spring Boot Application
ไฟล์ SpringAiKotlinApplication.kt:
package com.example.springaikotlin

import org.springframework.boot.autoconfigure.SpringBootApplication
import org.springframework.boot.runApplication

@SpringBootApplication
class SpringAiKotlinApplication

fun main(args: Array<String>) {
    runApplication<SpringAiKotlinApplication>(*args)
}
#8. สร้าง DTO สำหรับ API
ไฟล์ ChatDto.kt:
package com.example.springaikotlin

import jakarta.validation.constraints.NotBlank

data class ChatRequest(
    @field:NotBlank(message = "message must not be blank")
    val message: String
)

data class ChatReply(val answer: String)
@field:NotBlank ระบุให้ Bean Validation ตรวจที่ Java field ที่สร้างจาก Kotlin property
#9. เรียก LLM ผ่าน ChatClient
ไฟล์ ChatService.kt:
package com.example.springaikotlin

import org.springframework.ai.chat.client.ChatClient
import org.springframework.stereotype.Service

@Service
class ChatService(builder: ChatClient.Builder, private val courseTools: CourseTools) {
    private val chatClient = builder.defaultSystem(
        "ตอบเป็นภาษาไทยอย่างกระชับ ระบุเมื่อไม่ทราบข้อมูล และไม่แต่งข้อเท็จจริง"
    ).build()

    fun ask(message: String): String =
        chatClient.prompt()
            .user(message)
            .call()
            .content()
            ?: "ไม่พบคำตอบจากโมเดล"

    fun askWithCourseTool(message: String): String =
        chatClient.prompt()
            .user(message)
            .tools(courseTools)
            .call()
            .content()
            ?: "ไม่พบคำตอบจากโมเดล"
}
อธิบายองค์ประกอบสำคัญ:
ChatClient.Builderถูกสร้างให้ผ่าน Spring Boot Auto-configurationdefaultSystem(...)ระบุขอบเขตคำตอบเริ่มต้นให้โมเดลprompt().user(message)ส่งคำถามของผู้ใช้call().content()ส่งคำขอแบบ Synchronous แล้วรับข้อความกลับ?:คือ Kotlin Elvis Operator ใช้กำหนดข้อความสำรองเมื่อ API คืนnull
การรับข้อความด้วย call() เป็น Blocking I/O จึงต้องออกแบบ Timeout, Rate Limit และ Thread Utilization สำหรับระบบที่มี Concurrent Requests สูง [7]
#10. สร้าง Tool Calling ด้วย Kotlin
ตัวอย่างนี้จำลองข้อมูลรายวิชาในระบบสาธิต ไม่ใช่ข้อมูลหลักสูตรจริง
สร้างไฟล์ CourseTools.kt:
package com.example.springaikotlin

import org.springframework.ai.tool.annotation.Tool
import org.springframework.stereotype.Component

@Component
class CourseTools {
    @Tool(description = "Look up a sample software engineering course using its course code")
    fun lookupCourse(courseCode: String): String = when (courseCode.trim().uppercase()) {
        "SE101" -> "SE101: Introduction to Software Engineering, 3 credits"
        "SE202" -> "SE202: Software Testing, 3 credits"
        "SE303" -> "SE303: Cloud Native Development, 3 credits"
        else -> "Course not found in demo catalog"
    }
}
Flow ของ Tool Calling
sequenceDiagram
    participant U as User
    participant A as Kotlin API
    participant M as LLM
    participant T as CourseTools
    U->>A: "วิชา SE202 เรียนอะไร?"
    A->>M: Prompt + Tool Definition
    M-->>A: ขอเรียก lookupCourse("SE202")
    A->>T: เรียก Kotlin function
    T-->>A: "Software Testing, 3 credits"
    A->>M: ส่งผลลัพธ์ Tool
    M-->>A: คำตอบภาษาไทย
    A-->>U: JSON Response
.tools(courseTools) จะเปิด Tool ให้ เฉพาะคำขอนั้น; การตัดสินใจเรียก Tool ขึ้นอยู่กับโมเดลและ Prompt, ไม่ได้รับประกันว่าจะเรียกทุกครั้ง [8]
ข้อควรระวัง: สำหรับ Tool ที่แก้ไขฐานข้อมูลหรือทำธุรกรรม ควรตรวจ Authorization และ Input Validation ในระดับ Application เสมอ ห้ามอาศัย Prompt เป็นมาตรการควบคุมสิทธิ์เพียงอย่างเดียว
#11. สร้าง REST Controller
ไฟล์ ChatController.kt:
package com.example.springaikotlin

import jakarta.validation.Valid
import org.springframework.web.bind.annotation.PostMapping
import org.springframework.web.bind.annotation.RequestBody
import org.springframework.web.bind.annotation.RequestMapping
import org.springframework.web.bind.annotation.RestController

@RestController
@RequestMapping("/api/chat")
class ChatController(private val chatService: ChatService) {
    @PostMapping
    fun ask(@Valid @RequestBody request: ChatRequest): ChatReply =
        ChatReply(chatService.ask(request.message))

    @PostMapping("/courses")
    fun askAboutCourses(@Valid @RequestBody request: ChatRequest): ChatReply =
        ChatReply(chatService.askWithCourseTool(request.message))
}
#12. เรียกใช้งานและทดสอบ API
หากมี Gradle Wrapper (gradlew) ซึ่งปกติ Spring Initializr สร้างให้:
./gradlew bootRun
บน Windows ใช้ gradlew.bat bootRun; หากใช้ ZIP โปรเจกต์ตัวอย่างที่ไม่มี Wrapper ต้องติดตั้ง Gradle และรัน gradle bootRun หรือสร้าง Wrapper ด้วย gradle wrapper ก่อน
ทดสอบ Chat API:
curl -X POST http://localhost:8080/api/chat \
  -H 'Content-Type: application/json' \
  -d '{"message":"อธิบาย Kotlin Coroutines แบบสั้น ๆ"}'
ตัวอย่างโครงสร้างผลลัพธ์ (ข้อความจริงขึ้นอยู่กับโมเดล):
{
  "answer": "Kotlin Coroutines เป็นแนวทางจัดการงานแบบ asynchronous โดยใช้ suspend functions..."
}
ทดสอบ Tool Calling:
curl -X POST http://localhost:8080/api/chat/courses \
  -H 'Content-Type: application/json' \
  -d '{"message":"วิชา SE202 เรียนเกี่ยวกับอะไร?"}'
คาดหวัง: โมเดลอาจเรียก lookupCourse("SE202") แล้วสรุปว่าเป็นวิชา Software Testing 3 หน่วยกิต ทั้งนี้ตัวอย่างด้านบน ไม่ได้เป็นผลจากการรัน API จริง และข้อความ/การเรียก Tool อาจแตกต่างกัน
#13. Unit Test ฟังก์ชัน Tool โดยไม่เรียก LLM
ไฟล์ CourseToolsTest.kt:
package com.example.springaikotlin

import kotlin.test.Test
import kotlin.test.assertContains
import kotlin.test.assertEquals

class CourseToolsTest {
    private val tools = CourseTools()

    @Test
    fun knownCourseReturnsCourseName() {
        assertContains(tools.lookupCourse("se202"), "Software Testing")
    }

    @Test
    fun unknownCourseIsHandled() {
        assertEquals("Course not found in demo catalog", tools.lookupCourse("unknown"))
    }
}
./gradlew test
สำหรับ Integration Test แนะนำให้ใช้ Mock ChatModel/HTTP stub แทนการยิง API จริงเพื่อลดค่าใช้จ่ายและความไม่แน่นอนของคำตอบ
#14. ต่อยอดจาก Chatbot ไปสู่ RAG
RAG คือการ ค้นคืนข้อมูลที่เกี่ยวข้อง จากเอกสารภายใน แล้วแนบเป็น Context ให้โมเดลก่อนสร้างคำตอบ เหมาะกับ FAQ, คู่มือระบบ, ระเบียบหลักสูตร และเอกสาร Software Engineering
flowchart TD
    D[เอกสาร Markdown / PDF] --> P[Chunking]
    P --> E[Embedding Model]
    E --> V[(Vector Database)]
    Q[คำถามผู้ใช้] --> R[Similarity Search]
    V --> R
    R --> X[Retrieved Context]
    Q --> C[Spring AI ChatClient + RAG Advisor]
    X --> C
    C --> L[LLM]
    L --> O[คำตอบ + อ้างอิงเอกสาร]
แนวทางต่อยอดใน Spring AI คือเพิ่ม Vector Store เช่น Qdrant และใช้ QuestionAnswerAdvisor ดึงเอกสารที่เกี่ยวข้องเข้ามาใน Prompt ทั้งนี้จำเป็นต้องจัดเตรียม Embedding Model, การนำเอกสารเข้า Vector Store และการจัดการ Metadata ก่อน [9]
ตัวอย่างการใช้ Advisor เมื่อมี VectorStore bean พร้อมแล้ว:
import org.springframework.ai.chat.client.ChatClient
import org.springframework.ai.chat.client.advisor.vectorstore.QuestionAnswerAdvisor
import org.springframework.ai.vectorstore.VectorStore

fun askDocument(chatClient: ChatClient, vectorStore: VectorStore, question: String): String? {
    val advisor = QuestionAnswerAdvisor.builder(vectorStore).build()
    return chatClient.prompt()
        .user(question)
        .advisors(advisor)
        .call()
        .content()
}
Snippet นี้เป็น แนวทางขยาย ไม่ใช่ส่วนที่พร้อมทำงานในโปรเจกต์ Chatbot ขั้นต้น เพราะต้องมี Vector Store และข้อมูล Embedding ก่อน
#15. แก้ปัญหาที่พบบ่อย (Troubleshooting)
| อาการ | สาเหตุที่ควรตรวจสอบ | แนวทางแก้ไข |
|---|---|---|
Could not resolve ...spring-ai... |
BOM/Dependency หรือ Repository ไม่ตรงกัน | ใช้ Spring AI 2.0.1, ตั้ง mavenCentral() และตรวจชื่อ spring-ai-starter-model-openai |
OPENAI_API_KEY ไม่มีค่า |
ไม่ได้กำหนด Environment Variable ในโปรเซสที่รันแอป | ตั้งค่าใน Terminal เดียวกับที่เรียก Gradle แล้ว Restart แอป |
HTTP 401 จากผู้ให้บริการ |
API Key ผิด หมดอายุ หรือไม่มีสิทธิ์ | ตรวจสอบ API Key และบัญชีโครงการของผู้ให้บริการ |
HTTP 429 จากผู้ให้บริการ |
เกิน Rate Limit หรือ Quota | ลดความถี่คำขอ ตรวจ Quota และใช้ Retry/Backoff อย่างเหมาะสม |
HTTP 400 เมื่อเรียก /api/chat |
JSON ไม่ถูกต้อง หรือ message ว่าง |
ตั้ง Content-Type: application/json และส่ง message ที่ไม่ว่าง |
โมเดลไม่เรียก lookupCourse |
โมเดลไม่เลือก Tool หรือ Prompt ไม่ชัดเจน | ระบุรหัสรายวิชาให้ชัด และตรวจว่าเรียกเส้นทาง /api/chat/courses |
| Gradle Build ไม่ผ่าน | JDK, Gradle หรือ Plugin ไม่เข้ากัน | ตรวจ java -version, gradle -v และเวอร์ชันใน build.gradle.kts |
ทดลองตรวจสอบ Input Validation ด้วยคำขอที่มีข้อความว่าง:
curl -i -X POST http://localhost:8080/api/chat \
  -H 'Content-Type: application/json' \
  -d '{"message":""}'
ควรได้รับสถานะ HTTP 400 Bad Request เพราะ ChatRequest.message ถูกกำกับด้วย @NotBlank รายละเอียด JSON ของ Error อาจต่างกันตามการตั้งค่า Spring Boot
ข้อควรแยกให้ออก: HTTP 400 ที่ Spring Boot คืนจากการตรวจ Input ไม่ใช่ HTTP 400 ที่ผู้ให้บริการ LLM อาจคืนเพราะ Model/Request Options ไม่รองรับ
#16. แนวทางสำหรับ Production
| ประเด็น | ข้อเสนอแนะ |
|---|---|
| Authentication | ใช้ Spring Security, OAuth 2.0 หรือ JWT และกำหนดสิทธิ์ต่อ Endpoint |
| Secrets | เก็บ API Key ใน Environment Variables หรือ Secrets Manager |
| Input Validation | จำกัดความยาว Prompt และตรวจข้อมูลคำขอ |
| Rate Limiting | จำกัดจำนวนคำขอเพื่อควบคุมค่าใช้จ่าย/ป้องกัน Abuse |
| Cost Control | เก็บ Token Usage, ตั้ง Quota และติดตามค่าใช้จ่าย |
| Timeout / Retry | กำหนดนโยบาย Retry อย่างระมัดระวังเพื่อเลี่ยงคำขอซ้ำ |
| Logging | หลีกเลี่ยงบันทึก API Key, Prompt หรือข้อมูลส่วนบุคคลที่ไม่จำเป็น |
| RAG Quality | ประเมิน Retrieval Relevance, Groundedness และ Answer Accuracy |
| Tool Safety | Whitelist Tool, ตรวจสิทธิ์ และแยก Tools ที่อ่านข้อมูลออกจาก Tools ที่มีผลข้างเคียง |
ตัวอย่างนี้เหมาะสำหรับ Workshop หรือ Proof of Concept หากนำขึ้น Production ต้องเสริมมาตรการด้าน Security, Monitoring, Error Handling และ Load Testing
#17. สรุป
Spring AI กับ Kotlin ช่วยให้ทีมที่ใช้ Spring Boot สร้าง AI Backend ได้อย่างเป็นระบบ โดยยังคงรูปแบบการพัฒนาเช่น Dependency Injection, Service Layer, REST Controller และ Unit Testing จุดเด่นสำคัญคือ ChatClient ที่ลดความซับซ้อนในการเรียกโมเดล และการต่อยอดสู่ Tool Calling หรือ RAG ภายใต้สถาปัตยกรรมที่คุ้นเคย
#แบบฝึกหัดเพิ่มเติม
- เพิ่ม Endpoint
POST /api/chat/summarizeสำหรับสรุปบทความจากข้อความที่รับเข้า - เปลี่ยนข้อมูล Tool จาก
whenexpression ให้ดึงจาก PostgreSQL - เพิ่ม Qdrant และนำคู่มือ Software Testing มาใช้สร้าง RAG
- ทดสอบความแม่นยำและระยะเวลาตอบสนองของ Basic Chat vs RAG
- เพิ่ม Unit Test สำหรับ
ChatServiceโดยจำลองChatModelหรือใช้ HTTP Stub แทนการใช้ API จริง
#Checklist ก่อนเผยแพร่โปรเจกต์
- [ ] รันแอปพลิเคชันได้ด้วย
bootRun - [ ]
POST /api/chatรับ JSON และตอบกลับanswer - [ ]
POST /api/chat/coursesให้คำตอบจากข้อมูลใน Tool ได้ - [ ] ส่งข้อความว่างแล้วได้รับ HTTP 400
- [ ] ทดสอบ
CourseToolsTestผ่าน - [ ] ไม่ Commit API Key หรือข้อมูลลับลง Repository
ตัวอย่าง Source Code: spring-ai-kotlin-demo.zip (แนะนำให้วางไฟล์ ZIP ไว้โฟลเดอร์เดียวกับบทความเมื่อเผยแพร่)
#เอกสารอ้างอิง
- Spring AI — Getting Started
- Spring Boot — Kotlin Support
- Kotlin Release Process
- Spring Boot 4.1.1
- Spring AI — OpenAI Chat Starter
- Spring AI — OpenAI Chat Properties
- Spring AI — Chat Client API
- Spring AI — Tool Calling
- Kotlin Official Tutorial: Spring AI + Qdrant
- Spring Boot — System Requirements
ปรับปรุงข้อมูล ณ 14 ตุลาคม 2026 | ตัวอย่างเป็นสื่อการเรียนรู้ ไม่รวม API Key และยังไม่ได้รัน Integration Test กับผู้ให้บริการ LLM